Quite a while ago, I read a blog post about a quilt-as-you-go braid quilt. It was a bit different than any others I've read, mostly because you piece the top and batting together then add the backing. There are not sashing strips to add to combine the quilted pieces and there was minimal quilting to hold the top and back together, but it wasn't needed and it looked great.
Now, do you think I can find that blog post or remember the author of that post? Of course not, so that means I'm "winging" it to figure out what to do. If you know the blog to which I'm referring, please let me know so I can give credit to the author. Thanks!
I have a bunch of 2.5" batik strips (some full length and others cut) that have been left over from various projects, plus I had a Paint Box Batiks roll that only had 20 strips in it so I decided to use it on this. I'm kind of embarrassed about how many 2.5" strips I have tucked away here. Well, this should use up a bunch of them!
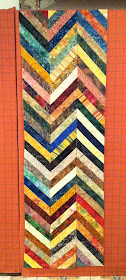
Here's what I have so far.
I started with batting strips cut 8" x 72" and I will be piecing 8 of these strips, making the finished quilt around 60" x 72". That should be a pretty good size throw, don't you think?
I'm not paying much attention to the order in which I use the strips (as you can probably tell), but it hasn't bothered me yet. I can see in the picture above that there are a few places where it looks like the same fabrics are zigging or zagging together, but that isn't the case. That really has been the only "rule" that I've been following - no two like fabrics next to each other. We'll see if I can continue to do that on the final 5 strips that need sewn.
I was going to sew all the columns and then put them together, but I was a bit anxious to see how they would turn out. The first to columns are sewn together, but the third one is just lined up to the others. The second column has a few issues and is a bit wonky, but I hope to be able to correct or at least contain that when I add the third strips.
School was cancelled for today so I may just have some time to work on this and get most of the strips made. WooHoo!!
ANNOUNCEMENT - BIG NEWS!!
Tomorrow I will be introducing a new "series" for my blog.
During the past few years that I've been teaching, I've tried to provide my students with helpful and practical hints on how to piece more accurately and basically just how to make quilting even more fun. About six months ago, one of my students asked why I didn't write down all these suggestions so she could get a copy and have them more easily accessible. Mmmmmm....
That got me thinking, so starting tomorrow, every Tuesday I will post a tip, suggestion or hint of some sort that I've used in my quilting. The posts will be called Tip Tuesday and there'll be a tab at the top of the blog page with links to the original posts. I hope you'll find the tips helpful and enjoy reading, and implementing them as much as I enjoy writing them. :-)
Check out what other quilters have on their design walls today. Go to Judy L's Patchwork Times to get inspired!


Love how your braid is coming out. I think that is a great idea - we certainly can all use these resources on hand.
ReplyDeleteBeautiful start on your braid quilt.
ReplyDeleteYour braid quilt is coming along nicely Joanne! I look forward to Tip Tuesday! We can always use more quilting tips and tricks!
ReplyDeleteI am giving away a fat quarter bundle on my blog today! I would love for you to come over and enter! Happy New Year!
Inspiring Creations Giveaway