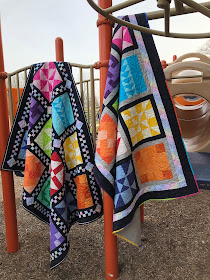
As I have said before, I made two full sets of blocks and just reversed the fabric placement. See THIS post to see what I mean. Even though I toyed with the idea of making one large quilt, I ultimately decided to make two separate quilts, and I'm very happy with my choice. :-)
I used Jen's awesome Checkered Rainbow setting for the original blocks, and I love how it looks. I loved the look of a black and white border, but I also knew that I didn't want to use a solid black and white. What was a girl to do? I was thrilled when I found this Wilmington Prints fabric - Bubble Up.
Isn't it perfect? I paired it with this Zen Chic Spotted Black fabric.
Success!
And just because I love a good side view of a quilt...
Do you see what I mean about how beautifully that Bubble Up fabric works?
I used the Spotted Black for my backing and while it's difficult to see in pictures, I like how the quilting design shows up on it.
Jen has great instructions on the Checkered Rainbow option on her blog. Be sure to check it out. I did add an additional small black border (1.5" finished) so I could sew a flange binding and not lose any of my points.
The Checkered Rainbow border and sashing was somewhat time consuming and labor intensive - but so well worth it! I decided that my second quilt was going to have a very simple border and sashing offering.
I chose two fabrics - the Spotted Black (can you tell that I really liked this fabric and bought a bunch of it? lol) and Grey Rustic Weave by Moda to frame the blocks. The grey looks slightly brown in this picture, but it is grey.
I framed the blocks, alternating the fabrics with a 1.5" finished frame. Technically, that made the finished block size 15". I then laid out the blocks in the same order as the first quilt. I played around with borders and decided that I needed/wanted to use the Bubble Up fabric because it had so many of the block colors in it. After sewing on that 2" finished border, I decided that I couldn't end with that fabric, so I added a 3" finished border of the Spotted Black. I was still a bit underwhelmed when the top was together, but while I was picking up fabrics to put away, I decided that a scrappy binding made from all the Starlet fabrics (Blank Quilting) that I used for the blocks just might solve the "boring" problem. I think I made the right decision.
Of course, here are the obligatory side view pictures.
Because these quilts are so colorful (I guess the challenge worked!), I thought it would be fun to photograph them in a park or playground. We are fortunate to have one very close to us, so Jack and I took advantage of the surprisingly good weather and headed to the park.
Jack actually took most of the pictures this time because he is nursing a sore leg and I didn't want him up on a step stool (which you can see in some of the pictures, but I don't care). When he takes pictures, this is some of what you get. 😄 I guess he hasn't figured out how to delete pictures before handing them over to me. hahahaha
We had a good time and laughed through much of the picture taking. We tried a lot of different shots, trying to be creative like those other quilters out there. We succeeded in some cases, but failed miserably in others. lol
We really wanted some good pictures of the two quilts together, just haphazardly hanging side by side. We had good intentions...
And then we thought that we should get some pictures of the bindings and maybe some of the quilting...
Like the Spotted Black, I bought a lot of the Grey Rustic Weave, so I used that for the backing of the second quilt. It shows off the random free motion quilting that I did.
After we got home, I realized that we didn't get any of the flange binding by itself. Oh well... We did however, get these pictures of the binding. I really like the first picture!
Even though it doesn't look like it, both quilts measure approximately 60" x 70". I just folded them differently when I was trying to show off the binding.
I am very pleased with these quilts and am looking forward to the 2020 Challenge. Check back tomorrow, because Jen is releasing the first block a day early - December 31st, and I'm blogging about it. Yay!


They look Great! And so much Fun! I can't wait to kick off 2020 with our January blocks :)
ReplyDeleteOh, that checkerboard framing is so dramatic. I love that speckly look in both of them. What a fun photo shoot and great pictures came from it. Take a bow!
ReplyDeleteI loved your talk at our guild Wednesday the 15th, I look forward to taking a class from you!
ReplyDeleteCathy Zimmerman
I loved your talk at our guild Wednesday the 15th, I look forward to taking a class from you!
ReplyDeleteCathy Zimmerman