Monday, August 31, 2015

Design Wall Monday

I'm working on some samples for M & E Quilt Shoppe. Here are the four panels for the Midi Bag.


The 2 1/2" squares are pressed on to the interfacing and I'll start sewing them in just a little while. I used a jelly roll called Perfectly Seasoned by Sandy Gervais for Moda. It's beautiful fabric!

The Midi Bag is a smaller version of the Mondo Bag. Do you remember when I posted about making them? Click HERE to see my first Mondo Bag. I've made four or five more but don't think I have pictures of them. Mmmmmmm, how did that happen? You can see pictures of Mondo Bags, and Strippety Do Dah Quilt (the quilt that I teach along with the bag) that a number of students have made. HERE.

I've got other projects going on as well, but no pictures to show. :-(

What are you working on today?

Check out 

to see what other quilters have on their design walls today.

I'm also linking up to Monday Making

Sunday, August 30, 2015

Strippy Quilt is Done!

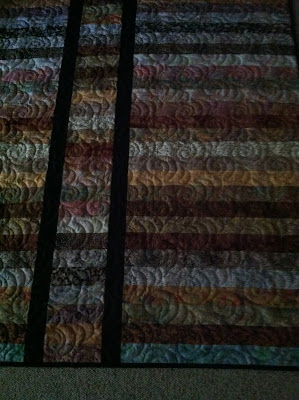
I've had this top done for quite a while but I finally quilted and bound it. 

While trying to do some organization in my sewing area, I needed to find a way to use up a number of 2 1/2" strips that I had left over from a variety of projects. This is the result.


Jack was never thrilled with the look of this quilt and I have to admit that it isn't my favorite either. But, I used stash and that makes me very happy. Plus I got to practice some more quilting.

I laid it out on the floor so I could get things ready to take it outside to get pictures but I got distracted and it stayed there until the next morning. 

After breakfast, Jack went to the back room before I did, and as he passed the quilt on the floor he said, "Hey, I like how this is quilted and it makes me like the quilt better."  Hahahahaha!


Maybe I'll give this to him as a late anniversary quilt.  :-)

Tuesday, August 25, 2015

Tip Tuesday! Bobbins

"Tip Tuesday!" - Bobbins

I love learning new things and then sharing that knowledge with my quilting friends. So, every Tuesday I'll provide some tips, hints, tricks, tutorials, shortcuts, etc. that I've learned over the years and share them here on the blog. 

"Tip Tuesday" will be a collection of information about a wide variety of subjects garnered from a large variety of sources.  I am not an expert by any means and do not take credit for being the great wizard behind all of these hints and tips. I will gladly give due credit whenever possible.

These tips will be archived and accessible to you just by clicking on the "Tip Tuesday" tab above. 

Read, enjoy, and be inspired!
************************************************


Do you have a bunch of bobbins that look like these? They are only partially filled and there is too much thread on them to throw away, but just enough to make it a pain to start sewing with them because you know you're going to run out real soon after starting. 

I can't tell you how many times I've had students tell me that they hate changing bobbins and would love it if there machine had a bobbin auto-refill. I have to admit that I used to feel the same way. 

At the end of last year, I read a blog post written by Susan Favro of SewMuchSmarter,com and I have to say that she makes some interesting and logical points about the value of having a bobbin that needs refilled. 

Here's what Susan has to say... 

Why I love having a bobbin ...


Lots of quilters dream about the day when we no longer have to fill and re-fill bobbins. When/if that day arrives, we can just quilt and quilt with never a thought to having to re-fill a bobbin.

Well, I got to thinking about why I like having to stop to change bobbins. Here are the reasons I came up with:
  • First, it gets me to take a break. It's good for the creative spirit to sometimes take a step back to get refreshed. It's also good for our eyes, back, etc. to stretch a bit and change positions.

  • Second, it gives me a timer of sorts for when I should be cleaning and oiling my machine (quilting machine or sewing machine). It's a quick and easy thing to clean out the bobbin area and get some oil to my hard-working machines.

  • Third -- When I use my serger it is nice to be able to sew and sew with nary of thought of my bobbin running out. But then again - that thread path! Sure I can tie off my threads and pull them through but on occasion that doesn't quite work out and then I have to re-thread all the cones. It's moments like that when I'd be glad to be able to just quickly pop in a bobbin and get back to sewing/quilting.
Trade offs. I guess it's all trade offs.

Until my next post: Quilt like you mean it!

What do you think? She makes some good points, doesn't she? 

And since we've started the conversation about bobbins, next week's Tip Tuesday! will include some important information on bobbins that we all should know. 

Friday, August 21, 2015

Friday Finishes!

This table runner is done and already at M & E Quilt Shoppe. It's made using the Zig Zag Table Runner by Cluck Cluck Sew.  It was quick and fun to make!


Now I didn't do this, but it's done and I love it!


My pressing station has a new covering, and it's even cleaned off. My sister Ann did the covering and if you read yesterday's post, you'll know that you couldn't tell that it had been done. But, it's all cleared off and ready for it's next pressing adventure.  :-)  Thanks, Ann!

And just because I think they're funny, I have to share a couple of things with two of my granddaughters. 

Sadie is a girly girl and she loves to dress up and play princess.


Now I know she looks cute, but that's not what I really want to share. The crown was a little too large and it kept falling down and she asked me in a very serious voice, "Grandma, what do you do to keep your crown from falling into your eyes?"


Seriously? Has she been hiding and watching me wear that crown when I thought I was alone?  hehehehe

And finally, Quinn saw some fabric and said she thought it was beautiful and wanted to audition it on the design wall. It was such a proud Grandma moment for a seven year old to ask about auditioning fabric, that I naturally said yes.


And then she started singing and Sadie joined here in front of the fabric. They were giggling and singing and having so much fun.


After about ten minutes, Quinn stopped and said, "So Grandma. What do you think?" I told them they looked like they were having fun and that I'm sure we could find something to make with that fabric. She looked at me like I was crazy and said, "Please don't use that fabric yet. It's a great back stop for us to practice auditioning for a singing talent show." 

Oh dear! A back stop! And they weren't auditioning the fabric at all. THEY were auditioning. And who knows what singing talent show they were talking about. 

Do you think that perhaps I have a one track mind - quilting?!?

Thursday, August 20, 2015

Special Messages in Odd Places

I always try to find the positive in absolutely everything that happens, and sometimes that is much more challenging to do than I care to admit. Nevertheless, I continue to try.  :-)

So, imagine my delight when I opened up one of these little chocolates to find a perfectly timed message for me.


I can totally follow this advice and it makes me feel so much better after having been caught in a downpour this afternoon.


And since I was feeling so good about the advice I got from the first piece of chocolate, I decided to have another one. (I really don't crave chocolate often, but when I do, I want a bunch of it.) The second piece was also a stall tactic for what I really needed to do - clean my sewing room. 

I had my sewing room fairly cleaned and organized when I had to set aside the couple of projects on which I was working to deal with something that needed immediate attention. What a mess! I can't wait until I can get back to these piles and take care of them.


But wait! I reached for another chocolate and when I read the message, I laughed out loud. I guess it's okay if my sewing area is a mess right now. This is like a Chinese fortune. You don't mess with the message because it's always true.  :-)


I guess I'm not going to worry about the mess right now. Maybe I'll have another chocolate and it'll tell me how to deal with all of my UFOs. 
It's worth a try. Want to join me?  :-)


Tuesday, August 18, 2015

Tip Tuesday! - Scissor Care

"Tip Tuesday!" - Scissor Care

I love learning new things and then sharing that knowledge with my quilting friends. So, every Tuesday I'll provide some tips, hints, tricks, tutorials, shortcuts, etc. that I've learned over the years and share them here on the blog. 

"Tip Tuesday" will be a collection of information about a wide variety of subjects garnered from a large variety of sources.  I am not an expert by any means and do not take credit for being the great wizard behind all of these hints and tips. I will gladly give due credit whenever possible.

These tips will be archived and accessible to you just by clicking on the "Tip Tuesday" tab above. 

Read, enjoy, and be inspired!
************************************************

How many pairs of scissors does one person really need? Sadly, this isn't all of the scissors that I own, but these are the ones that I use most often. How many do you own? 

Now, the bigger question is how well you take care of your scissors. I admit that I don't care for mine nearly as well as I should. As a matter of fact, while using the pair second from the left, I realized that they, along with a few others, need to go to the "Scissor Spa" to be sharpened, cleaned, oiled, etc. They'll be on their way within the next day or so and I am positive that we will all be much happier upon their return.  :-)

So, what can we do to take better care of our scissors? Probably first and foremost is to use the scissors properly and for the tasks for which they are intended. 

It really is a good idea (Yes, I understand it can be costly.), to have a separate pair of scissors for fabric only. You and your scissors will be much happier! And if you are going to have two pairs, clearly mark them so there is no mistaking paper vs. fabric. We really do want to avoid confusion. 

"don't touch the fabric scissors"


Gingher has provided some very useful information HERE about Maintaining your Gingher Scissors and these pointers are not exclusive to their scissors.

Haley Pierson-Cox over at The Zen of Crafting shares some information on Crafting 101: How to Clean and Oil Your Scissors if you want to do it DIY style.

Remember, to do the best work we can requires that we have quality, well-taken care of tools. You and your projects deserve that!

Monday, August 17, 2015

Design Wall Monday

I've been trying really hard to finish up some projects around here, but I keep getting side tracked. 

While I was working on making donation pillow cases, I decided that I needed to see if I have fabric that would be appropriate for teenagers. I found what I was looking for, but also found four fabrics that I thought were fun and needed to be used in a quilt. I started playing around with sketches and then found an old pattern that I've used called BQ

Needless to say, I finished the pillow cases and started a new quilt. Here's what I've come up with so far.


It's hard to see in the picture, but the large squares are bikes, fishing lures, dirt bikes and hand tools. I plan to add a small border (probably yellow because all of the large squares have yellow in them) and follow it up with a larger green border. The binding will probably be black. 

I have enough of the novelty fabrics to create another quilt and think I will do so, but not add borders. As is, this quilt top measures 54" x 72" and would make a nice donation quilt for a young man. I also like the fact that I'm using up stash.  :-)

What are you working on today?

Check out what other quilters have on their design walls today.


Tuesday, August 11, 2015

Tip Tuesday - No More Dried Up Fray Check

"Tip Tuesday!" - Fray Check

I love learning new things and then sharing that knowledge with my quilting friends. So, every Tuesday I'll provide some tips, hints, tricks, tutorials, shortcuts, etc. that I've learned over the years and share them here on the blog. 

"Tip Tuesday" will be a collection of information about a wide variety of subjects garnered from a large variety of sources.  I am not an expert by any means and do not take credit for being the great wizard behind all of these hints and tips. I will gladly give due credit whenever possible.

These tips will be archived and accessible to you just by clicking on the "Tip Tuesday" tab above. 

Read, enjoy, and be inspired!
************************************************

Here's a tip from my sister Pat that I think is great.

To avoid your Fray Check from drying out, stick a pin in the bottle and then screw on the cap. The ball of the pin will stay in the cap and the pin will keep the Fray Check from drying up, thus closing the opening. 


If the pin does not stay in the cap, simply add a drop of glue and that will solve the problem. Genius, right? 

This would probably work for glue or other liquids too. :-)

Thanks Pat!

Monday, August 10, 2015

Design Wall and Weekend Sewing

I don't actually have anything up on the design wall today (not yet, at least), but there was something up yesterday that I want to share. 


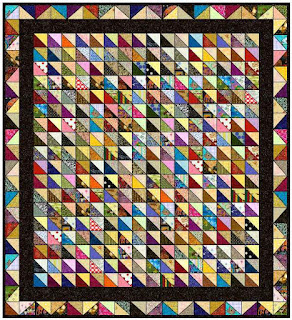
Scrappy half square triangle quilt

This is Jerry's quilt and I'm loving!

On Saturday, I was joined by a group of 10 people who agreed to be my guinea pigs for a color value experiment/workshop. They really didn't know what we were going to do other than work with half square triangles and it was going to be scrappy. (It kind of scared a few of them to join because they love the idea of scrappy but struggle with working with scraps. They are much more comfortable with organized and matching fabrics. I feel their pain, as I was that way for a very long time!) 

Here's how this all came about. My sister Ann and I were at the April guild meeting listening to the guest speaker, Mary Huey who showed a quilt that was done as a color theory exercise. Unknown to each of us at the time, Ann and I both came away from the meeting really intrigued by that quilt. All of the quilts were wonderful, but there was something about that quilt that was special.

Mary had shared with us that she uses the book "Color from the Heart" by Gai Perry as a guidance for her color choices in many of her quilts, so I just had to read it. I found the "no longer in print" book from the library and read through it in one day. I knew I needed this book and finally found a copy to purchase at a reasonable cost. I love this book and have referenced it numerous times in the months since Mary's visit to the guild. 


Fast forward a month of two when Ann and I were talking and Mary's quilt made it's way into our conversation. Ann said she thought it would be neat to do something like that and I laughed out loud and told her that I had been jotting down notes about it since the meeting. I contacted Mary and she was gracious enough to send me information on how she handles her workshops and that was all it took. I was off and running and started making decisions on how I wanted to do this.

After I had somewhat finalized the "rules," I started asking people to join the activity and explained that this was a test group to see if I could actually offer this as a class or workshop. I put a lot of thought into who I wanted in the group. I wanted people with a variety of skill levels and I also wanted to stretch the comfort zone of some people. I knew that I wanted to make this a learning experience and not just a "end up with a quilt" class. I was pleasantly surprised that the first ten people I asked agreed to join the group. YEAH!!

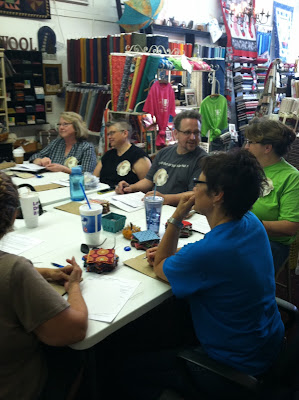
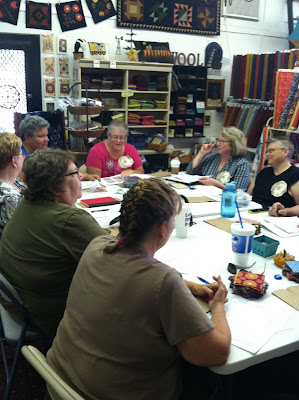
We met at M & E Quilt Shoppe on Saturday and each participant brought the pre-determined number of 4" squares to be shared with the group. 

Color Value Group

Color Value Group

Of course I made a math error and they needed more squares but I took care of that yesterday. 

Color Value Exercise

We exchanged fabrics, discussed the concept of value, the techniques they could use to make half square triangles (I'll share more on these techniques in a future post), and the process I want them to use to layout their blocks the first time. 

They are going to randomly pull a completed half square triangle out of a bag and place it on a design wall with the dark triangle in the bottom left corner. (Jerry's quilt above is following this order.) After all of the blocks are up that way, they will take a picture and then the fun will begin. 

They are free to rotate the blocks anyway they'd like to create new designs. I don't really want them to move too many blocks, but they are free to do so if they feel the need. I shared a few ideas with them about possible layouts and border options to get them started.


The two bordered quilts shown above are actually identical to the first quilt shown here. They simply have two different borders on them. And the second quilt is the same as the first one, but with the blocks rotated (not moved) to create diagonal lines across the quilt. 

When we left the shop, I think everyone was excited and looking forward to the challenge. We shared a number of e-mails, texts, and pictures about the progress throughout the day yesterday and that was fun.

Here's Jerry using a Collins Seam Guide  to check for value between two fabrics. Jerry was using a bag to randomly pull his fabrics.

Color Value Exercise

You can also use the Red Sew Glasses which are not only awesome, but fashionable. 
Sew Red Glasses

Ann had Tony and Claire put her fabrics together. They are using the seam guide too; and as you can see in the picture, the squares are being "blind pulled" from a box.

 Color Value Exercise


Color Value Exercise

Ann, Jerry and Connie were sewing at my house and as usual, it was a ton of fun!

Color Value Exercise


I am a bit worried though. I may have driven Ann to drink. Can you see the bottle on the floor next to the machine?


It's Long Island Iced Tea!


What are you working on these days?


I think you'll be inspired and amazed.

Friday, August 7, 2015

Friday Finishes

Although it's not completely done (quilted and bound), I did finish this quilt top.


When I showed this on Monday, I only had the bottom two quadrants completely sewn and part of the top left. Well, it's done and the border is on it. (I did reduce the border size from 10" to 8" because I added some of the border fabric to the interior of the quilt and I didn't figure that into the yardage I bought. Oh well; I like it anyway.) I need to think about the quilting of this for a while, so I doubt that it will be completed real soon. Maybe one of you have a quilting suggestion and I can get right to it.  :-)

In case you forgot, here's what the original quilt looks like - Zen Cabin, by Zen Chic- Brigitte Heitland.


I know this isn't everyone's taste, but I was taken by the above picture and wanted to try something outside my comfort zone. I know that one of my brother-in-laws doesn't love this because when he saw the partial top he asked (in a very polite way), "Why would you make something like this?" :-) That made me laugh.  

One thing I love about this quilt is that I pieced it entirely on my featherweight. It is kind of funny that something so modern looking was sewn on a featherweight that had just been used to piece this beauty.


I just find the difference so fun. I'm loving the experience I'm getting sewing with this machine. I'm one happy quilter.


And one week ago today, I was in the middle of our annual sisters' long weekend and loving every minute of it. The flowers that my future brother-in-law sent us are a pleasant reminder of that time. Thanks Robert, and thanks to my lovely and very talented sisters. I love you all! 

Monday, August 3, 2015

Design Wall Monday

Even though I have just spent a wonderful five days with my sisters, I got some sewing done. Here's what's on the wall today.


Here's what it will look like when I get the last two fabrics added to the top left quadrant.


This is my version of Zen Cabin by 
I'm using a Jelly Roll called Winterberry by 
I love the fabrics, although my picture does not do it justice.


Quite a different look than the Four Patch Galore that I posted last week
Here it is, finished. Well, at least the the top is done. 

It measures 92" x 100", so two of my sisters held it from the balcony so I could get a picture of the entire quilt. 
They must really love me, especially since they don't love heights.  :-)


What's on your design wall?

To see what other quilters are working on,

Go to Judy L's Patchwork Times