Monday, February 29, 2016

Design Wall Monday

My goal is to post at least a couple of times this week and since I have something on the wall, I'll start with design wall Monday. Yeah! 

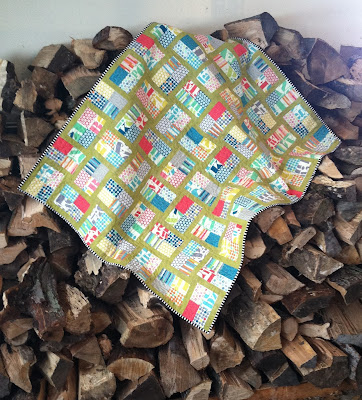
This is one of the 2.5" strip quilts on which I've been working. It's a variation of my Framed Rectangles quilt. I love how versatile this pattern is!

Framed Logs - Jelly Roll Quilt, 2 1/2" strips

This quilt went together very quickly because I made it using strip sets. The print fabric is Just My Type and I've used that for a few other quilts as well. Remember my version of Sparkling Gemstones? These two quilts have the same print fabrics, but look very different. I like them both!  :-)

Sparkling Gemstones, Jelly Roll Quilt, 2.5" strips

The roll on had 25 strips in it, but since the quilt only needed 18 strips, it was perfect. The remaining 7 strips will be my binding. (I love it when the math works out perfectly the first time!)

To get more of a variety, I cut each 2.5" strip in half and then made 6 strip sets that included three print strips and two black strips, and 6 sets that consisted of three print strips and two grey strips. After sub-cutting each strip set into three rectangles that measured 6.5" x 10.5". I then added the corresponding black or grey strips to complete the blocks. Easy Peasy!

There was one extra grey block, but since I wasn't sure how I was going to lay this out, I decided to make equal amounts of the blocks and make my decision after laying them out. As you can see, I opted for the 18 black blocks and 17 grey. I thought it created a better balance to have the four corners be black. I am very please with this so far.

I have the backing ready. I'm using the same backing I did for the Sparkling Gemstones, but since this quilt is larger and I had to piece it, I simply added a black strip of fabric down one side. I forgot to get a picture of the backing, but here is the picture from Sparkling Gemstones. I'll be sure to take a picture of the back when I get the Framed Rectangle Variation Quilt done.


Although I love the look of the black and white stripe binding on Sparkling Gemstones, I am using the left over strips from the fabric roll for the new quilt, and I'm excited to see how it will looks. I don't often use a scrappy binding (Jack doesn't really like them), I think this one will be perfect.  My goal is to have this one quilted and bound by the end of the week.

What are you working on today?
 
To see what other quilters have on their design walls, go to
 
 
or
 

Friday, February 26, 2016

Fabric Love!

I love to teach new quilters, especially children.
I saw this; laughed out loud, and knew that I just had to share it.
I wonder if we could make this part of the DEA's philosophy.
I'm willing to give it a try!

Tuesday, February 23, 2016

Tip Tuesday! Turning Tight Corners and Curves

"Tip Tuesday!" - Turning Tight Corners and Curves

I love learning new things and then sharing that knowledge with my quilting friends. So, every Tuesday I'll provide some tips, hints, tricks, tutorials, shortcuts, etc. that I've learned over the years and share them here on the blog. 


"Tip Tuesday" will be a collection of information about a wide variety of subjects garnered from a large variety of sources.  I am not an expert by any means and do not take credit for being the great wizard behind all of these hints and tips. I will gladly give due credit whenever possible.


These tips will be archived and accessible to you just by clicking on the "Tip Tuesday" tab above. 

Read, enjoy, and be inspired!

*********************************************

I haven't actually been doing very much sewing lately, as I am still doing the long term sub teaching job, but I have been able to sneak in a little sewing time. (I really do have to study each night to be prepared for the next day!)
But, I have been able to spend some quality time with my machine, I been working on a number of different things, including a project that required some curved corner piecing. I don't really mind curved piecing. It just seems to take a very long time because of all the adjustments that need to be made.
I stumbled upon a video from Laura at Sew Very Easy and she suggests reducing the stitch length to help speed things up and still have accuracy. I did, and IT WORKS!!  Check out her video here:
 
 
***************************************************************************
I have a new computer, thanks to my son-in-law Zach who built it for me. I'm still learning some of the new to me features of the operating system, but I'm thrilled to have a computer and not have to share with Jack. Of course, I am also relieved and happy to have all of my data at my fingertips. I can't tell you how many times I wanted to play around in EQ, only to not have it here. ARRRGGGHHHHH
I had to go "old school" and sketch on paper and pencil. Now if I could just find the time to put them into EQ and start making those quilts, life would be awesome.
 
I did finish a couple of projects that I will share in the next couple of days. One has to be gifted before I can show it here and I have to take a picture of the others.
 
Now that the computer is up and running, and I see an end to the Spanish teaching (my last day should be March 15th), I may just find the time to actually start posting on a regular basis again. Keep your fingers crossed.  :-)


Tuesday, February 2, 2016

Tip Tuesday! Hanging Quilts

In case you missed it, check out yesterday's post for information about a recent very special announcement.

"Tip Tuesday!" - Hanging Quilts

I love learning new things and then sharing that knowledge with my quilting friends. So, every Tuesday I'll provide some tips, hints, tricks, tutorials, shortcuts, etc. that I've learned over the years and share them here on the blog. 


"Tip Tuesday" will be a collection of information about a wide variety of subjects garnered from a large variety of sources.  I am not an expert by any means and do not take credit for being the great wizard behind all of these hints and tips. I will gladly give due credit whenever possible.


These tips will be archived and accessible to you just by clicking on the "Tip Tuesday" tab above. 

Read, enjoy, and be inspired!

************************************************

I don't know about you, but I have a lot of quilts hanging around my house.

Ever since I started quilting, I knew that I wanted to decorate with quilts and that included hanging them. The problem was (and at times still is), how do I hang the quilt? What kind of sleeve to I put on it? What do I do if the quilt will be used as a wall hanging at times, but also as a lap quilt? Do I add a sleeve or not? 

Out of curiosity, I took a quick count of the quilted wall hangings that are up right now and there are ten on the first floor alone. TEN!! I decided to not count the ones upstairs because I think it might be a bit embarrassing.

Here are a few of my favorite wall hangings, although none of these are up right now. :-)  As a matter of fact, a couple aren't even at the house right now. They are on an extended vacation at M & E Quilt Shoppe!  :-)

There is a sleeve and hanging rod here, you just can't see it.


There's obviously a sleeve here because you can see the hanging rod on both sides. (You can see it below in the picture of this from the back.) I don't love the look of being able to see the rod on many of my wall hangings anymore.


I've actually hung this backwards on purpose. I like how I pieced the back using left over fabrics from the front and I'm ok with the sleeve showing - sort of. It doesn't usually last too long when I hang it this way.  hehehe


You can still see the hanging rod with this patriotic quilt, but this is being hung with clips. There is a sleeve on this, but I like the clips better for this quilt.

This quilt is a little bit bigger than the rod length so it extends past the edges and you don't see the rod. :-) 

Usually my sleeves are made from the same fabric as the backing so it blends in in case I use the quilt for another purpose. But I also like the idea of using various fabrics from the front of the quilt so I have some on hand in case I need to make a repair.

For my small wall hangings, I've been using small corner tabs to hang them. remember this picture? This is the back of my Wonky Star wall hanging from the Dot to Dot Blog Hop back in 2012 


I like using this technique and have started putting the tabs in all four corners. That will allow me to rotate the quilt if it's not directional and to keep it "squared" while it's hanging. To do that, I add a dowel rod or something to the bottom as well as along the top.

I recently was sent a link for a You Tube video by Sew Very Easy about hanging quilts. It's quite interesting and I'm going to have to try this. Have you done this? If so, what are your thoughts?

Here's the video link:

Monday, February 1, 2016

HUGE Announcement and Design Wall Monday

Many of you know that I am honored to teach at M & E, a local quilt shop. It's a really fun shop with wonderful owners and lots of awesome customers.  Well, I've been keeping a secret that I am now allowed to finally share.

They've been selected to be in the Spring issue of Quilt Sampler Magazine!  YIPPEE!!!


The only reason I've known about the surprise is because they asked little old me to design their quilt for the magazine. Wow! Was I thrilled to do so. Here's a picture of a smaller version of the quilt (the magazine wanted it in king size!). This was an awesome experience and I am so happy for Mabel and Ethel. 
The Star of Methel


Made for:  Mabel and Ethel (M & E Quilt Shoppe)
Designed by:  Joanne Hubbard aka "Agnes"
Pieced by: JoEllen Schadek aka "Ho"
Quilted by:  Lesa Guerrera aka "Emogeane"

Here's the link to the announcement and a fun link to when they announced it at the shop this past Thursday.

These two ladies sure do deserve this honor!


So, on to my design wall...

I've been crazy busy the last couple of weeks, and it has been decided that my computer is toast so my son-in-law is building me a new one. Hopefully it will be ready to go with all the data restored on to it later this week.

I decided over the weekend that I needed to have things cut and ready so that I could just sit down and sew, even if I only have 15 minutes. That's what I did Sunday evening, after I finished my lesson plans for the week and tentatively scheduled the following weeks plans.

I have four table runners ready to piece along with a hexagon table topper. These are all made using the Easy Stripe Table Runner pattern and a 60 degree ruler. I have the backings and batting ready and think that it will be possible to have all of these done by the end of the week. (I don't really care if they aren't done. I just want to feel productive again!)

These first two runners are made from a single 1.5 yard cut of fabric. I decided to make these "opposite" and like both of them, although I think I like to top one better. (Ignore the brown streak in the middle of these runners. They are not pieced yet and that will be gone when that is done.) The fabric used in these runners is Bluebird, by Timeless Treasures. I love sunflowers. Need I say more?

easy strip table runner

 There are two of the runners below, although I only photographed one. Both are ready for piecing and will be identical.


easy strip table runner

This is the hexagon table topper that I'm making from the "waste" triangles from cutting the two runners above. Again, it's not pieced yet so...

This fabric is called Love and it is also from Timeless Treasures. I love the mason jars and daisies. I have already decided that the table topper will have a mason jar set in the middle of it, and it will be filled with daisies.  :-)

What are you working on today?

Check out what others have on their design walls.


and