Thursday, December 21, 2023

Trimming Flying Geese

I've been making a fair number of projects that include flying geese lately. Most of these projects use the four at a time method, which I really like. It is fast, easy, and I like to make them oversized so I can trim them and end up with them most accurate flying geese unit possible.  :-) 

There are a ton of tutorials on making four at a time flying geese, so I am not going to show how to do that. Instead, I am going to show you how I like to trim them. There are a couple of steps that are often overlooked, but they are VERY important to have the units turn out exactly as they should. 

For demo purposed, I am using a unit that will measure 2 1/2" x 4 1/2" unfinished (2" x 4" finished).

Here's my untrimmed flying geese block. The block should be pressed well so it lays flat. Notice the orientation of the V. This is important to be able to trim the first two sides accurately!


Even though it may look like it, I do not using the lines on the cutting mat to trim blocks. I like to use a square ruler for trimming, so I am using a 6 1/2" square ruler in this tutorial. (Yes, I know there are special rulers for trimming flying geese. I do not own any of those, and neither do many of my students. That is why I'm doing this tutorial.  😉 

Disclaimer: I am right handed and the pictures below are taken accordingly. 

The first thing I do is orient the 45 degree angle along the right side of the V. Don't worry about lining up anything else just yet. I will show you the most important places to look and align in the next series of pictures.  


The blue arrows in the picture below are what I like to call "alignment points." I am checking for an accurate 45 degree angle of the V, the correct width, the correct height, and the correct center point of the block. Remember that the actual alignment points will change depending on the size of flying geese you are making, but the process will be the same. 

In this example, the flying geese that will measure 2 1/2" x 4 1/2" unfinished, 
so the pictures shows that I am checking for an accurate 45 degree angle of the V, 
the correct width (4 1/2"), the correct height (2 1/2"), 
and the correct center point of the block (2 1/4").  

I am making a flying geese block that measures 2 1/2" x 4 1/2". With that in mind, the following steps should be taken and points should be noted and used to align the ruler before trimming. (See the arrows in the next pictures to help you with alignment.)

1) Align the 45 degree angle of the ruler along the right side of the V. (see purple arrows)

2) The width of the block is 4 1/2" so the center of the block (the tip/point of the V) should be 2 1/4".  (see the white arrow)

3) Once you have aligned the center point, look to the left and make sure the block extends at least to, but preferably a little past, the 4 1/2" line. Check at the top and bottom of the left side of the block. (see the blue arrows) 

4) Check along the bottom to make sure the block extends at least to, but preferable a little past, the 2 1/2" line. (see the orange arrows) 

5) Another thing to look for at this point is to make sure that the fabric extends at least 1/4" from the bottom of the V. This is for the 1/4" seam allowance which will help you not lose the point when you sew the block to another unit or block. (see the center orange arrow) 

**If everything is aligned properly, the right corner of the ruler should intersect with the top, right side of the V. (see top purple arrow) and the 4 1/2" ruler mark should intersect with the top, left side of the V. (see the top blue arrow) 


6) Once everything is correct, trim the right side and top of the flying geese block. 


7) Rotate the block so the V is upside down and the trimmed sides are on the left and bottom.


8) Verify that you have the accurate alignment points again. 

     A) The left side of the block should align with the 4 1/2" mark on the ruler. (see blue arrows)

     B) The bottom should align with the 2 1/2" mark on the ruler. (see orange arrows)

     C) The tip of the V should align with the 2 1/4" mark on the ruler (see pink arrow)

     D) Fabric should extend at least 1/4" past the tip of the V. (see pink arrow)

9) Trim the right side and top.


Here is a perfectly sized 2 1/2" x 4 1/2" flying geese block, ready to be used. 

Another Project

As I said in my last post, we've been quite busy around here but I needed to spend some time with my sewing machine, just to keep my sanity. Sewing really does help me relax, stay calm, and regroup when things are getting a bit out of control. 

I decided that I needed to sew something that is pretty mindless, so I took a look at my many UFOs. I very quickly decided that there are a number of projects that need to stay right where they are. Now is not the time to work on them. For a couple of those project, there may never be a time to work on them, but that's a whole other issue.  

I finally decided that since I'm teaching another Plays Well with Others class in January, and I had a bunch of those blocks already made, that I'd make a new sample. Easy Peasy!


Unlike the first version of this quilt, there is no rhyme or reason to the placement of the strips in this quilt. I simply picked up a strip, decided if it had enough contrast with the one next to it, and then sewed, pressed, and pulled the next strip. No heavy duty thinking needed, and that's exactly what I wanted.


I used the same fabric for the pieces that create the star, so that was easy!


This was fabric that was left over from another project and was perfect to use when I've taught this class previously. No matter what class I teach, I like to make "step-out units" to demonstrate the process of each step. For this quilt, using a light colored fabric made it easy for students to see the markings they would be making. 

By the time I completed all the partial blocks (step-out units) I had enough to put the blocks on the design wall. 


For this quilt, putting the blocks together was pretty simple. I just didn't want two of the same fabrics next to each other and I wanted some contrast between them. Basically, I just put up blocks and then moved them around as needed. 

It is a little deceiving how these blocks are made. You don't start out by making star blocks. Instead, each star block is constructed from four individual "kite" blocks. Sorry! I didn't take a picture of an individual "kite" block when I was making this quilt. Here's a very bad picture from another version that I'm making. 


Once I decided on the final layout, I sewed four "kite" blocks together into stars and then sewed the star blocks together. Again...easy peasy. And guess what...the star points purposely don't have to be matched up perfectly. Yay! 

In an attempt to keep the star points in tact, I purposely "floated" them. That means that the intersection looks like a hot mess up close, but since there are so many fabrics converging here (8 different fabrics), you really don't notice it when the quilt is done. 


It felt good to put this quilt together. I like it and have a couple other versions of it in the works. :-) 

Monday, December 18, 2023

A Little Bit of Sewing

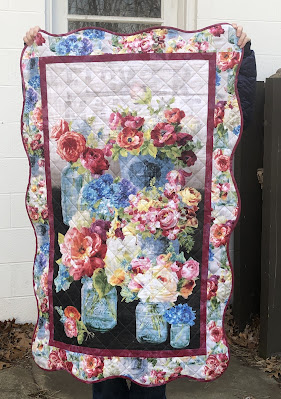
We've been quite busy around here and unfortunately sewing has had to take a back seat. But... I did do a little bit - just to keep my sanity.  :-)  I made a sample for an upcoming class on how to use the Creative Grids Scallop Template. 


This template was designed by Krista Moser and it makes creating scallop-edged quilt pretty darn easy. The first time I used this template was when I made the 2021 Shop Hop quilt for Chestnut Ridge. While this isn't a great picture, I think you can see how that scallop border adds a great finish to the quilt.  


For the upcoming class, I decided to use Krista's Simple Scallop Baby Quilt pattern that is made using a panel. Here is Krista's quilt.


When I first saw this quilt, I went on the prowl to find the panel that Krista used, but I had no luck. Instead, I used a very pretty Flower Market panel from Wilmington Prints. I've used the panel before, but that was prior to the creation of the scallop template. Of course I can't find a picture of the quilt so I guess I'll just have to show the baby quilt. :-) 


I am very happy with this quilt. I chose to use the same fabric for the small border and binding (the pattern is written for that) and I like how it looks. Yes, this is requires bias binding, but that does not bother me. As a matter of fact, in the class; not only will be be learning how to make the scallops, we'll be learning the ins and outs of bias binding. 

I've got to run, but I'll share a few more projects within the next week or so.