Sunday, March 21, 2021

Twist Those Seams!

Having super flat seams at block intersections or block units, makes quilting so much easier. A few years back, I learned how to twist my seams and that was a game changer.

Way back in 2014, I wrote up a blog post on how to twist seams and it was well received. I know that it helped a lot of quilters and that makes me happy. That information is still good, but I've made a couple of changes in process. You can see the original tutorial HERE


Recently, while facilitating an on-line Mapleton Avenue Sew Along for Chestnut Ridge Sewing, I demonstrated this updated seam twisting information. The pattern called for seam twisting, but many participants had never done it and didn't understand what to do. I included twisting in the weekly video and was thrilled to hear people say how much they appreciated the video.

With that in mind, I decided to edit the video to just the twisting segment and share it here. My hope is that between the original tutorial and this video, you become a Seam Twister!

Wednesday, March 17, 2021

Quilt Pictures and More

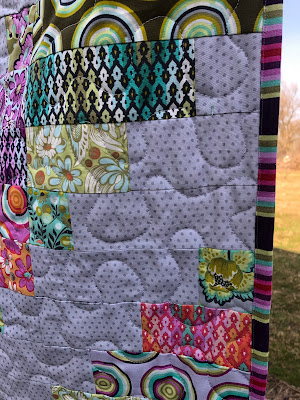
I took a couple of pictures of my second version of the Mapleton Avenue quilt today. I am sooooo happy that I took the time to un-sew and change the layout!


I didn't take the time to stage some great pictures of this quilt because I really wanted to share it ASAP. I'll get better ones later. I love how these fabrics look against the changing grass color, the still-barren tree limbs, and that beautiful blue sky.  


I quilted a simple all-over meander and I am happy the results. I know that some people feel that a meander is kind of like cheating, but I disagree. I know how this quilt will be used and know that I wanted the fabrics to shine and not the quilting. Besides, I really do like the look of a meander.  A few years back, one of my granddaughters told me that she loves "those swirly all-over lines" that I quilt because she likes to trace them with her finger while she's trying to fall asleep. Who needs more reason to continue to quilt meanders?  :-) 

I am very happy with my binding! Yep; it's the stripes that were in the pre-cut package of strips.


There were two of each strip and I sewed them in an alternating orders so there was a nice flow around the quilt.


I love this picture and the beautiful tree and sky above it!


And just because I like to show it, here is the back. This was the original grey that I was going to use for the background on the front. I am very happy to have made the change.


I like how the stipe looks against this grunge backing.


Much to his chagrin, I had to get a picture of my quilt holder/binding consultant/quilt namer - AKA Jack. I am blessed with his constant support and encouragement.


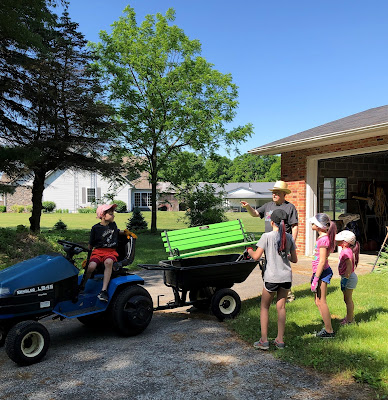
Do you see that little bit of green way in the back on the left side? That's the Peace Bench that Ronan and Jack rebuilt last summer.


We had a very old garden bench that we were going to get rid of when Ronan asked if he could put it back by the "Peace Trees." I didn't know what he was talking about, so I asked him to explain. He said that the area way in the back is very peaceful and he loves to go back there when he's upset or just needs a break. There are a lots of trees, wild flowers, etc. back there, and it's because it's away from the house, it's quiet. (During the summer, it's actually hard to see from the house because of the trees and other plants that are quite tall.) 

Shoot! When he asked like that, how could we say, "No"? He and Jack spent a lot of time taking apart the bench, painting the wood (Ronan picked the color), and then putting it back together. They had a good time doing this and each learned a lot. Ronan ended up with his own toolbox and tools by the end of the project, which certainly made him happy.


When the restoration was done, Ronan asked his sisters to help move it to the Peace Area.  It was kind of an interesting undertaking, but it got done with no injuries or damage to the bench. 


All of this was done prior to Jack's back surgery and broken ankle. When he could finally get around without a wheelchair or walker, the kids asked if he could join them on the bench to say a prayer for his complete recovery. I love this picture! 


Of course the cousins love the bench too!


I am looking forward to spending time back in the Peace Area and know the kids are too. I think I'll take a few quilts back there and get some pictures. 

Monday, March 15, 2021

Happy Monday!

It's a new week and there's lots of good stuff happening and fun stuff to show.

The black and red Mapleton Avenue quilt that I showed the other day is now complete and I'm thrilled with how it turned out. 


I love the black and white binding!  


And yes, just like my label says, I really do believe that everyone deserves a quilt.  :-)


When I showed the red and black quilt the other day, I also shared a glimpse of another version of the Mapleton Avenue quilt. 


I love these fabrics, but I wasn't thrilled with how it looked in the original layout. One of the participants in the Sew Along laid her blocks out following a diagonal pattern and I loved it. I decided to turn a few blocks and see if I liked it. 

I loved the new look and got out my seam ripper yesterday morning. Some times you use a seam ripper because you WANT to, not because you HAVE to. Because of that, it didn't take long to un-sew the rows, rearrange them, and then sew the top together again. (Truthfully, I didn't have the top all sewn together, but I did have just under half of it done.) 


Here's the new layout. I love it and was so excited that I went ahead and quilted it too. 


I will get to the binding later today and post another (and better!) picture tomorrow.

So, what am I going to do with these quilts or the next couple that I'll be making? The red and black quilt has a dedicated recipient and I have a thought about the second one. But, if that changes I'm going to donate it to a couple of the 2021 Hands2Help Challenge

I've participated in this Challenge for a number of years and think it's great. The challenge is organized by Sarah over at Confessions of a Fabric Addict and she does a great job with it. There are always options of to where to send your quilts and this year includes a special challenge. Please take a few minutes to read about this and consider joining me for the 2021 Hands2Help Challenge. 


What are you working on this week? 

For inspiration, check out Judy's Design Wall Monday post or Beth's Monday Making.

Thursday, March 11, 2021

Black and Red Quilt

Yesterday, I shared a few pictures of my "in progress" Atlantic Avenue quilt. I also mentioned that I had just completed a red and black quilt, and that I would share a picture of that today. 


I am hosting an on-line Sew Along on the Friends of Chestnut Ridge Sewing Facebook group and we are using the Mapleton Avenue pattern. 


Just because I feel like I have to, I am making two versions of quilt. I changed the black and red version a little by adding an additional column of blocks so it measures 56" x 64". (The pattern offers four size options, but none of them were quite the size I wanted so I made my own changes.) This two-color version was made totally out of scraps, and in the school colors of my oldest grandchild. (She is running track this year and I know from experience that she will most likely need this to keep warm during the early part of the season.)

My other quilt will be the lap size (48" x 64") and that is being made from an old 2 1/2" pre-cut package that I had in my stash. I chose to use a single background fabric, which is making the construction very simple and fast. This is the pre-cut and a grunge that I had considered using. I decided against it and went with a grey dot fabric instead.


Here are a few of my blocks just randomly laid out. I'm very pleased with the background fabric choice!


I have a few sub-teaching days coming, so my sewing time with be limited; but I hope to have this top pieced by the weekend. I'd also like to get the black and red one quilted and bound. I'll keep my fingers crossed, but I won't be overly disappointed if I don't get everything done that I want to. W

What are you working on today?

Wednesday, March 10, 2021

Trimmings, etc.

 What does your trash bin look like? Here's mine from the other day...


That's a lot of purple and orange! 

I am almost (notice I said almost!) embarrassed by this stack of purple fabric that is from my stash. Why do have I have so much purple?  Who knows?


I am making two versions of the Sassafras Lane Designs Atlantic Avenue. One of the quilts will be much like the cover quilt, and I have all of my black/white, purple and orange blocks made. I have all of the fabrics pulled for the other colors and I am sewing those as leader/ender projects.


My second version of the quilt is a two color version, which is why you see so much purple and orange in my trash bin. Jack chose the colors and while I was a bit apprehensive, I decided to just dive right in and get to work. 

I have the top complete, but have not had an opportunity to get a picture of the whole quilt. Instead, I'll share a few "in progress" pictures. Here's the center...


And here's 2/3 of it laid out. (I really struggle with getting good pictures of purple fabric! One day I'll have to learn to how do that.)


As you can see, this quilt uses a lot of purple, so I guess it's a good thing I have that stash. I didn't have to buy a single purple or orange fabric! 

While I was working on this, I decided to make the purple and orange blocks that are needed for the rainbow version before putting that fabric away. I am glad I did and will make the red blocks next since I just completed a black and red quilt. I'll share pictures of that tomorrow.

What does your trash bin look like today?

Monday, March 1, 2021

March Color Challenge

It's March 1st, so we have a new Color Challenge Block


This month we are using 

Red/Orange

and featuring

Yams!


Big question here...
Are we dealing with yams or sweet potatoes? 


The skin of a "real" yam kind of looks like tree bark, while the sweet potato skin is more reddish/orange. Plus, the "meat" of a yam is more starchy and often compared to a russet potato in flavor. 

I'm not going to get into a debate about the differences, because there is sooooo much info out there that it would make your head spin; but this chart from the Mississippi Extension Office provides a quick, down and dirty glance at the differences.


There are botanical differences between the two, with sweet potatoes belonging to the morning glory family of plants. The edible parts of the sweet potato are called roots, while yam edible parts are called tubers. Sweet potatoes are more prolific than yams, producing 4-10 roots per plant, compared to 1-5 for yams.  Generally, I don't see yams in my grocery stores. And, most of the time, the sweet potatoes are labeled "Sweet Potatoes/Yams." 

Both plants are nutritious and provide a variety of vitamins and minerals. Many medical professionals believe that sweet potatoes can help protect again cancer and cardiovascular disease. And, because of its low glycemic index numbers, sweet potatoes can be enjoyed by diabetics. I will give fair warning here though, many people who enjoy a baked sweet potato often slather it with a brown sugar, cinnamon, butter mixture that completely changes that glycemic index number. I also have memories of sweet potato casserole that included lots of sugar, eggs, pecans and mini marshmallows. I was never a fan of that, until I became and adult and found a recipe that made it less sweet. If and when I do make it, which isn't often because I am the only one in the family that likes it, I have adjusted the recipe to be much less sweet and serve it as a dessert - and there are NO marshmallows! 

***********************************
I had fun finding the fabric for this month. Who knew that there was sweet potato fabric available? 


As you can see, I used the same green that I've been using the past two months. I love how those pieces just seem to float in this block!


I had the perfect reddish/orange fabric in my stash for my 6" blocks and think it looks great with the light-bright mosaic fabric. 
Again, I love how these pieces just float in the block.

To get your copy of the block instructions, be sure to visit Jen's blog

I think I've mentioned that I have a vision in my head for finished projects, but that I have yet to finalize that vision. I will say that with each month, the vision is becoming more solidified and I am getting quite excited about it. I am not going to spill the beans, but I can tell you that I will not be making two large quilts as I have done in the past. 

***********************************

Thank you to the First Quarter Sponsors!
Let's show them our appreciation and check out their products.
Jen has a complete list of the sponsors HERE


***********************************

It's recipe time and this one is a bit different. It is best if it can be grilled, but when that's not an option, it can be made in the oven. 

Yam and Pear Kabobs


Ingredients

1 large yam (sweet potato), chopped into 1 - 1 1/2" cubes
2 zucchini, cut into 1" chunks
2 firm pears, chopped into 1 - 1 1/2" cubes (if the pears are too ripe, they will fall apart and not work well)
1 cup white wine
1/4 cup teriyaki sauce

Instructions

1. Mix the wine and teriyaki sauce in a 1 gallon resealable plastic bag. Add the yams, zucchini, and pears.
2. Refrigerate for at least 2 hours to marinate (longer is better)
3. If grilling - fire up the grill to medium high and let it get hot. If cooking in the oven, pre-heat oven to 300 degrees 
4. Put yams, zucchini, and pears on metal skewers (flat is best, but not necessary).
**If you are making this in the oven and do not want to place on skewers, you don't have to. Just place the yams, zucchini, and pears in a metal cooking sheet, keeping them in a single layer.
5. Grill 30-40 minutes, basting with the marinade as they are cooking. Turn the skewers often until they are crispy on the outside and tender on the inside. If not using skewers, gently turn the food frequently with a spoon and marinate as they cook.
6. If cooking in the oven rather than grilling, once the yams, zucchini, and pears are tender, broil for one minute to make them crispy.
7. Remove from grill or oven, transfer to serving plate and enjoy!

***********************************

Here are my two blocks together. I really enjoy the pictures with both blocks. It is amazing how different they look. 


Check out these other bloggers to see their interpretation of this month's block. 
I'm not going to lie; I'm also looking forward to some new recipes.  :-)