Tuesday, September 30, 2014

Rush Hour - Day 6

It's coming to a close!
It's Day 6, the last day of the 
Rush Hour Blog Hop


Today's participants:

Tuesday, September 30


This blog hop has been a lot of fun! I've enjoyed every bit of taking a peek at the wonderful creations by so many truly creative people. 
Thank you all! 

Wednesday, September 24, 2014

Rush Hour!

It's Blog Hop Time Again!!


Thanks Mdm Samm and Carol for organizing and cheering us on for this wonderful hop. As always, you two ROCK!

Today's list of characters participants 

Wednesday, September 24


***************************
Hurry! Hurry! Hurry!

It seems like all we ever do anymore is rush around!

gives us good reason to "slow down and enjoy the fabric." 

It is FABULOUS!

Check out these black, gray and white fabrics. I'm not even showing the reds that made their way into the line. 


Image of FABRIC BUNDLE - Rush Hour from Studio E

To see the entire line, click HERE

I've always loved this combination of colors. The contrasts are always stunning and I can't think of a single black, red, white and grey fabric that I've not liked. I have some in my stash and I am very stingy with it. I don't usually offer that to anyone because I love it so much and want to keep it all to myself. 

As soon as this hop was announced, I knew what I was going to make. I had purchased a quilt pattern from Jeni Baker of In Color Order a while ago and was looking for just the right fabric to use. This line fit the bill, so I started looking for a place to buy it. That search took me a while, but I finally found it and was thrilled. 

Since the search took longer than expected, I started getting a bit concerned that I was going to be able to get the envisioned quilt finished before the blog hop. I knew school was starting soon and that my time was going to be limited, so I started thinking about Plan B. (It's always good to have a Plan B!)

I pulled a bunch of black and white fabrics, some red fabric and some old sketches and began work on a project that has been in the "dream state" for quite a long time. I've really been working on finishing UFOs and other "planned but never started" quilts, so this was perfect.

I got this far and realized that I bit off more than I could possibly chew in a short period of time and decided to implement Plan C. 


Plan C was easy because it was simply downsizing Plan B to make a large wall hanging. Plan B is still in the works, but it just wasn't going to get done before this hop. 


 I love how this turned out! 
And to think this is Plan C. :-)


Quilt size: 54" x 54"


This started as a bunch of black and white 2 1/2" squares. I liked it even before I added the red, but oh how that red does wonders! Of course putting it on point helps too.  :-)


Can you see the fire pit in the background? It's on the left. 


This quilt is kind of busy with all those little squares so I thought it went along well with the RUSH HOUR theme. When I saw the fire pit in the background of this photo, I almost cropped it out. But then I decided that I liked how it contrasts with the idea of rushing around. I can't think of many other things that I find more relaxing than sitting by a fire in the evening after a busy and hectic day.

burning log and fire - stock photo

It certainly doesn't hurt if you have the makings for s'mores nearby!  YUMMY!!

Multiple marshmallows extended over a camp fire to roast. - stock photo    

When I was almost done with this quilt, the Rush Hour fabric arrived and I was thrilled. I still had time to make the original quilt. YIPPEE!


I had the blocks and rows all laid out and ready to sew when I asked my husband what he thought about it. He liked it (LOVED the fabric!), but said he thought the placement the white blocks made this too organized to fit the Rush Hour theme. 


I should have known better, but I asked him what he thought I should do. 

His reply was, "Give me a minute because I have just the thing." 

I went to the kitchen to get a drink and when I returned the design wall was empty! He had taken all the blocks down!

I looked at him with what I can only imagine was a shock and disbelief. He handed me the blocks, looked at the clock and said, "In keeping with the true theme of RUSH HOUR, you have one hour to lay out this quilt. I think that a random placement of the white blocks would look great. You better get started." 

I'm positive it took a few minutes before the task ahead of me completely registered, but then I thought, "What the heck? He's right. Whatever I have in one hour is how it's going to be."

I got to work and here's the result. I didn't even really feel any pressure, unlike some days when I'm struggling to get too many things done in too short of a time frame. 


I hate to admit it, but he was right. I really like how this turned out. I even finished early and had time for that drink I brought in from the kitchen.  :-)


 Since I liked the contrast that occurred when the fire pit showed up in the background of the other quilt picture, I decided I wanted something similar for this quilt.

I wanted to quilt something that would contrast the RUSH HOUR theme and thought of the saying "Stop and Smell the Roses!"

The design isn't really roses, but it is flowers.


I even put a black and white floral on the back and I love that!


I had some difficulty choosing what to use for binding. My first thought was solid black, but I thought that would be kind of expected and even boring. I had enough of the backing fabric to use, but it just didn't work for me. I then went back to my stash and pulled a recently purchased black, white and grey fabric that kind of reminded me of snowflakes. 


The "snowflake" fabric won!  


I threw the quilt over the clothes line to get an outdoor picture but it was too heavy and sagged quite a bit. (I think I need to tighten my line!)


As I was headed to find a better picture location, my phone rang so I just tossed the quilt on the wood pile. That made me think that I think I wanted a fire - and s'mores!
   

Now for the giveaway!

Not only do I love these colors, but I also love to work with stripes. What better way to combine these two loves than with some striped black, red, white and grey fabric!

One lucky person will win 1 yard of this fabric 


"Pear Tree Greeting" by Hoffman California International. 

The winner will be chosen Thursday, October 2nd.

For your chance to win, leave me a comment telling me your favorite quilt color combinations or your favorite thing to do when you realize that you are getting stressed and just need a break. Keep it clean!  :-)

Also, please remember to provide an e-mail address if you are a no-reply blogger. I'd hate for your number to be pulled and then not be able to reach you. 

Thanks again Mdm Samm and Carol! 

Tuesday, September 23, 2014

Tip Tuesday! Bind an Inverted Corner

Click HERE for today's

Rush Hour

Blog Hop Participants


Welcome to

"Tip Tuesday!" - Binding Inverted Corners

I love learning new things and then sharing that knowledge with my quilting friends. So, every Tuesday I'll provide some tips, hints, tricks, tutorials, shortcuts, etc. that I've learned over the years and share them here on the blog. 

"Tip Tuesday" will be a collection of information about a wide variety of subjects garnered from a large variety of sources.  I am not an expert by any means and do not take credit for being the great wizard behind all of these hints and tips. I will gladly give due credit whenever possible.

These tips will be archived and accessible to you just by clicking on the "Tip Tuesday" tab above. 

Read, enjoy, and be inspired! 

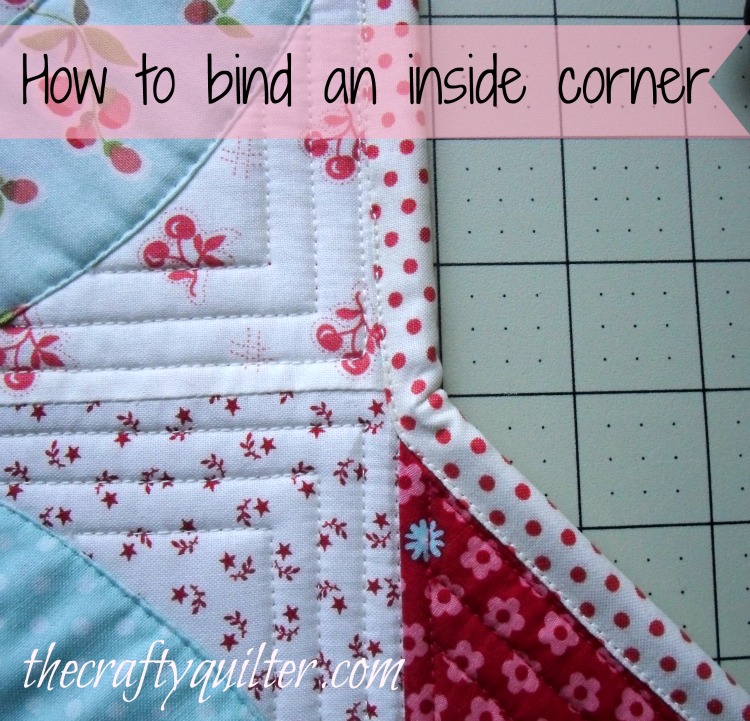
I really like binding quilts and I am often asked about binding irregular edged quilts. The Crafty Quilter has a wonderful tutorial on how to bind an Inverted or Inside Corner. 

bind an inside corner


Click HERE to see the tutorial.

Rush Hour Blog Hop Starts Today!


Sew we quilt

It's starting and here are today's participants!

Tuesday, September 23

Monday, September 22, 2014

Design Wall Monday and Giveaway Winners

First an apology.

I've been having some complicated computer issues and have been struggling to access my blog or even my e-mail. I can/could check my e-mail by using my husband's computer and my phone, but my files, pictures, etc. are not on his computer and I have not done a back-up as well or as often as I should.  (I know! Lesson learned. That will be rectified when I get my system up and running properly again.)

Keep your fingers crossed that everything is corrected now and that I have no problems with my upcoming blog hop post Wednesday.

So, because of the "issues" I have a few catch-up items to take care of - like giveaway winners!

The winners from the See You in September Blog Hop have been picked and are listed below.


The winner of the umbrella frame and pattern provided from Umbrella Joan


#71 Regina!

          Regina said...

                       WOW! That is one cute umbrella! I would love to give making one a try. Thanks for 
                       hosting the giveaway!


And the winner of the fat quarter pack provided by M & E Quilt Shoppe


# 110  Jane's Quilting

          Jane's Quilting said...

                   Your bags are adorable and they do match the featherweight perfectly. Looks like you                          need to make covers for them now. I also like your star quilt. I myself love making stars.                    But your unbrella...that is beautiful! I would have never thought of making an umbrella.                      What a great idea!!

Winners have been sent an e-mail. Thanks for playing along everyone!

Be sure to stop back Wednesday when I will be posting for the 

Rush Hour Blog Hop! 

There's another giveaway.  :-)


Now, for the design wall...

I belong to the Cleveland Modern Quilt Guild and many of us are in a block exchange. September was my month to pick a block to be made and I chose Chopsticks (based on Crazy Mom Quilts Birch Trees quilt.. )

Here's the black and white sketch I provided my group and asked them to make their block similar to this. (don't you love EQ?)


I provided various solid color backgrounds and lots of scraps for them to use. I plan for my blocks to finish around 16" so these will be big blocks with a big impact. I will have a total of 20 blocks so this quilt will end up being a pretty good size also, about 64" x 80"

I'll be making some blocks myself and here's one of them. This has not been trimmed down yet because I want to wait and see what sizes I get back for the group. I love all the scraps in this!


I enjoyed making this block and remembering all the original quilts that resulted in these scraps.  

Check out what other quilters have on their design walls today. 

Go to Judy L's Patchwork Times.

Monday, September 15, 2014

Design Wall Monday

I decided that I want to make simple rag quilts for all of the young grandkids for Christmas this year, and the first one is done - almost.


As I was clipping this, I realized that I forgot to add the extra trim along the edges. I have it cut and ready to add; and since I had already started clipping, I decided to clip the entire inside and then go back and clip along the edges after I added the trim.

I have all the fabric for the other rag quilts and it is cut, along with the batting. I'm sewing these as leader and ender projects so it may seem like it's taking a long time to complete them, but it really isn't. 

That's what I love about leader and ender projects. Since I've been slowing sewing a seam or two while working on other projects, I've quilted a bunch of these squares and even put some rows together. When I decided to concentrate on the rag quilt, I just needed to complete two rows and then sew the rows together. Easy Peasy!

I love productivity!


What are you working on today? 
to see what other quilters have on their design walls.   

See You in Sept. Continues...

Check out the wonderful projects created as the 
See You in September 
blog hop continues!


Saturday, September 13, 2014

Playing Catch Up - Including See You in Sept. Days 6-8

I've had some issues with my computer as well as my ability to judge the amount of time certain projects would take, so I missed the last few days of posting links to the See You in September blog hop. 

I've got some blog hopping to do today and tomorrow! Enjoy!!


Wednesday, September 10


Thursday, September 11


Friday, September 12

Tuesday, September 9, 2014

Tip Tuesday! Thread Control

Click HERE for today's
See You in September 
Blog Hop Participants

Welcome to

"Tip Tuesday!" - Thread Control

I love learning new things and then sharing that knowledge with my quilting friends. So, every Tuesday I'll provide some tips, hints, tricks, tutorials, shortcuts, etc. that I've learned over the years and share them here on the blog. 

"Tip Tuesday" will be a collection of information about a wide variety of subjects garnered from a large variety of sources.  I am not an expert by any means and do not take credit for being the great wizard behind all of these hints and tips. I will gladly give due credit whenever possible.

These tips will be archived and accessible to you just by clicking on the "Tip Tuesday" tab above. 

Read, enjoy, and be inspired! 


So the title of this post is a bit misleading. 

I'm really not in control of my thread, just like I'm really not in control of my fabric, my rulers, etc. That's a whole different topic that I just am not ready to delve into at this time.  :-)

So, back to the thread issue. Although I typically use So Fine by Superior Threads for my piecing, I use another type of thread for my hand quilting and binding. One thing that has always been an issue for me is the label that is on many of these thread spools. Unless the manufacturer, color number and thread weight is printed on the spool, I often have no idea of that information because the labels come off so easily.

Here's a picture of a couple of spools of my hand quilting thread. All looks good, right?


Well, before you know it, the label starts to rip and the numbers and words are a little challenging to read.


And then the label starts to peel off.


Before you know it, the label is completely wrong and I can  only guess at what the actual color number is. On some of the spools, this isn't a big deal. I can certainly tell the difference between some of the colors just by looking at them, but others aren't so easy. 

When somebody says they want me to use cream thread for the quilting and or binding, there can be some issues. Which cream thread? If I need to buy additional thread because I don't have enough to complete the job, I invariably buy the wrong color. If I only had the label attached or knew the number!

Here's what I use to help resolve this issue.


Yep!  A sharpie marker. And red is the color I like to use. It is much easier for me to see the red than the black, brown or blue.

As soon as I buy a spool of this thread I mark the color number on the bottom edge of the spool. I don't bother with the manufacturer for this thread because I generally only use one type of thread for hand quilting or binding so it's easy to remember.


Here's a bunch of my hand quilting threads, all clearly marked. 


Well, almost all of them are marked.


The label came off the purple thread before I could mark down the number. I never seem to remember to take this spool with me to the store so I can figure out the number and label this spool. :-)


One other thing I do is keep a list of the colors I have, and how many spools of each color. I keep this in my purse so I don't buy colors that I already own. Well, maybe I don't do that too many times anymore.  :-)