I've signed up to participate in Blogtoberfest again this year. Basically, that means I am supposed to post every day for the month of October. I considered not signing up because it will be "tight" for me to post a few times, but I decided to try anyway. I can always pre-date a post and schedule it to show up magically, when everyone knows that I am busy (Lynn and Ty's wedding day, Alex and Erica's wedding, Bras for a Cause, for example).
The main reason I decided to do it again was that I "met" a lot of bloggers last year because of the Blogtoberfest; and, what the heck, it was fun! You can join the fun or see who is participating by going to I Saw You Dancing - Blogtoberfest.
I'm number 133, so be prepared to find a few interesting blogs to read. Also, it may be profitable to check back frequently because I know others will join as the month goes on. PLUS, many of the bloggers are hosting giveaways. YEAH!!
I will have a giveaway, but I have to give it more thought and will post about it soon. Stay tuned! Maybe I'll have something wedding related, in honor of the upcoming nuptials. Mmmmmmmm (thinking, thinking, thinking)
Sunday, September 30, 2012
Friday, September 28, 2012
A Few Finishes
I really like how the Wonky Star block that I quilted for my Dots on Dots giveaway looked, so I made an identical one for myself. :-)
Here's the one in route to the winner...


All of the applique was fused to the backing fabric (which is really orange, not yellow) but none of it was sewn down. I decided that since this is at least three years old (and pretty small), I really should get it done. (This is not my oldest UFO, but it is one of the smallest ones so I thought it would be an easy finish.) I got busy and now it's ready to use this Halloween and another UFO is done, done and done (pieced, quilted and bound). YEAH!!
I'm off to make some napkins for Lynn's wedding and do some embroidery work for an order.
Life is good!
Here's the one in route to the winner...

an here's mine...

Want to know why I have two identical blocks from a project that is supposed to be not only wonky, but random? I made these blocks when I was playing with the tutorial and setting up a project board in case I decide to teach this some day. I have a few other blocks (I think four or five) that are completely done, and I have another three or four that are at various stages of completion. Those are used to help students see what each step should look like. (I'm a very visual person and assume that many students are as well. That may be the wrong thing to assume, but I certainly would rather error on the side of caution here. I would hate for a student to not "get it" when I could have very had a sample to show.)
Anyway, this little ditty will be hung over the dresser in the bedroom that has the quilt in it. I do like to have complimenting pillows or wallhangings for my quilts. :-)
Have you seen this way of hanging quilts? Instead of a sleeve, you add corner tabs! I simply cut a square of the backing fabric, folded it in half, basted it in the corners and sewed it down when I added the binding. This is a great way to hang mini quilts. With this technique, you don't have a hanging pole sticking out of the sides. I hang the quilt up using a small dowel or rod that rests on a hook in the wall. Love it!

After I finished the binding on the wonky star block, I wanted to work on something that would be a quickie, so I pulled a small wallhanging UFO out of "The Tub of Shame." This was a kit from a local quilt shop and I thought it was really cute. (So why didn't I finish it?)

All of the applique was fused to the backing fabric (which is really orange, not yellow) but none of it was sewn down. I decided that since this is at least three years old (and pretty small), I really should get it done. (This is not my oldest UFO, but it is one of the smallest ones so I thought it would be an easy finish.) I got busy and now it's ready to use this Halloween and another UFO is done, done and done (pieced, quilted and bound). YEAH!!
I'm off to make some napkins for Lynn's wedding and do some embroidery work for an order.
Life is good!
Thursday, September 27, 2012
Look What Jack Made!
They may not be quilts, but look what Jack made! (In case you don't know, these are keys for sending morse code.) Jack and I are both amateur radio operators (Ham Radio Operators), but I am not active. (Actually, once I started quilting, I kind of lost interest in radio. Imagine that!)
Jack really enjoys code. Me not so much. He would rather make a contact entirely with code and no talking what-so-ever. If you know me at all, you know that I prefer the talking kind of contact. Jack is NI8N and I am W8YCP. (My earlier call was N8QMP, but after Dad died, I requested his first call from the FCC and was granted it in 2004. That made me very happy!)
Anyway, I think these are awesome! And to think Jack makes lots of comments about the amount of work needed for me to make a quilt. I watched him make these, and I'll tell you what. These were not simple little things to make.


I like these and know he'll be making more. I really like it when he and I are both in the back room working - him on the radio or making something, and me quilting. Call me a dork, nerd or boring, but that's my definition of a great way to spend an evening!
Jack really enjoys code. Me not so much. He would rather make a contact entirely with code and no talking what-so-ever. If you know me at all, you know that I prefer the talking kind of contact. Jack is NI8N and I am W8YCP. (My earlier call was N8QMP, but after Dad died, I requested his first call from the FCC and was granted it in 2004. That made me very happy!)
Anyway, I think these are awesome! And to think Jack makes lots of comments about the amount of work needed for me to make a quilt. I watched him make these, and I'll tell you what. These were not simple little things to make.
This is the second key he made. (For some reason, I don't have a picture of the first one.) He made this without a kit, using his grandfather's telegraph key as his inspiration.

This little thing (I think it's cute!) he made to use with his QRP (low power) radio. It is compact so it takes up very little space and is perfect to take in a backpack so he can "play radio" while hiking, etc.

Here's one similar to the first picture, but with different paddles and mounting. So I guess this really isn't too similar to the first one is it? :-)

Here's the latest one he's made. Isn't it pretty? (I know it's not a great picture. Sorry!)

I like these and know he'll be making more. I really like it when he and I are both in the back room working - him on the radio or making something, and me quilting. Call me a dork, nerd or boring, but that's my definition of a great way to spend an evening!
Monday, September 24, 2012
Monday Mumblings...
I was a busy beaver this past week, but not so much in regards to quilting. I finished up four more table runners (2 Christmas and 2 everyday) and got my project boards ready for some upcoming classes. I spent Tuesday and Thursday helping out at Country Fabrics, a "local" quilt shop, during their annual tent sale and on Friday, I attended one day of Quilting with Machines. Wednesday was a busy day as well, as I helped a friend with a presentation and then played volleyball that night. I spent Saturday trying to play catch-up and yesterday Jack, Lynn and I spent about 3-4 hours doing some run-around work getting a bunch of little things done for the wedding. Whew, I'm tired just thinking about it!
This week will be a little busy as well, but not so bad. I finally dyed my gridded flannel to the dark color I wanted; and so far I like it, even though I have yet to hang it properly.

I know, some of you are wondering why I want a brown design wall. I found that the light color of the batting I was using before washed out many of my fabrics choices. I thought about using black batting, but I work with a lot of black fabrics and thought I'd have the same problem. I played around with various colors and brown just worked the best for me. I took the advice of a couple of people and put felt on my wall. Well, I REALLY disliked that because I had to use pins to hold the blocks and pieces in place.
While attending a Judy Niemeyer workshop at Tennessee Quilts way back in March/April I was introduced to a gridded flannel by my friend Denise. (On a side note, I did not know Denise before arriving in Tennessee, but we had a mutual friend - Hi Mary! - and now I am happy to call Denise my friend. Mary and I were traveling south together and since Mary was going to be staying with Denise, she invited me to stay at her house too, sight unseen. Now that is one trusting soul!) Anyway, Denise had this flannel up on her design wall and I loved it.
I tea-stained some and it was ok, but I really wanted it darker so I finally took the time and dyed it to my desired color. As you can tell, you can still see the gridded lines and I'm happy about that. I'm hoping to have this completely hung by tonight and then I'm set to go. YEAH!!
I bought a bolt of this gridded flannel and still have some if anyone is interested. Just e-mail me and we'll talk. I have a friend who wants some dyed (not quite so dark), and I plan on doing that later this week. If you want some dyed, I can do that for you too. Again, just e-mail me and let's talk.
For the past five years or so, I have made the homecoming sashes for our local high school. It's that time again and I've got the ribbon ready to go.

The game isn't until Oct 12th, but I really would like to have these done and delivered by the middle of next week. I don't want to have to worry about embroidering these while I'm thinking about Lynn's wedding.
Speaking of the wedding, I am going to spend some time today sewing napkins. I was going to post a picture, but it would just look like a big pile of black fabric (which it is). Perhaps when they are done I'll get a good one and post that.
Tomorrow is going to be busy, as I have a class from 10-2 and I'm helping my friend with another presentation in the evening. I seriously doubt too much will get done, but I do want to have something ready for handwork when I get home. It already sounds good to just sit back, relax and hand stitch a binding, doesn't it?
Well, as the title says, those are my Monday Mumblings...
Do what you love and enjoy your day!
Sunday, September 23, 2012
Dots on Dots Blog Hop Winners
Sorry for the delay!
You know that as soon as you set a deadline, something happens and technology does not want to play nicely. :-)
Jack said he had a pretty difficult time choosing the winner of the Name This Quilt giveaway. He pretty quickly narrowed the list to six names and then four, but after that it wasn't so easy. After much deliberation he finally picked a winner!
Congratulations to .....
tink's mom who said...
and to the Fat Quarter Winners
picked by random number generator...
and
#75 Des said...
I will be e-mailing all the winners and anxiously awaiting replies so I can mail out your goodies.
Thanks for playing along Everyone!
Friday, September 21, 2012
Dots Blog Hop - Day 10
It's Day 10. :-(
I knew it was coming, but I really was in denial.
I was hoping that the dots would just keep showing up day after day after day....
Oh well (deep sigh) I guess all good things have to come to and end sometime.
Here's today's line up. Enjoy!
I knew it was coming, but I really was in denial.
I was hoping that the dots would just keep showing up day after day after day....
Oh well (deep sigh) I guess all good things have to come to and end sometime.
Here's today's line up. Enjoy!
Thursday, September 20, 2012
Dots on Dots Blog Hop Day 9
Wow, it's day 9 of the Dots on Dots blog hop already. I've been loving this hop and am so amazed at the creativity, production and talent of some many quilters. Thanks everyone for sharing with us. Here is today's schedule. Enjoy!!
For a complete list of the Dots on Dots schedule, click here!
Wednesday, September 19, 2012
Dots Blog Hop Day 8
It's day 8 of the blog hop already and my mind is just swimming with ideas for new projects! This has been a lot of fun and I'm telling you, there are some REALLY talented people out there. Thanks for sharing those talents with us.
Here's today's line up....
Here's today's line up....
Click here to see the full schedule of the hop.
Sit back and enjoy!
Tuesday, September 18, 2012
Dots on Dots Blog Hop

Thanks for joining me today for my contribution to Corrie's (from Quilt Taffy) and Mdm Samm's Dots on Dots Blog Hop. I hope you've been following along and enjoying yourself as much as I have.
Thanks Corrie and Mdm. Samm for all the work you put in to organizing and preparing this blog hop. You two are awesome!
Here's a list of other bloggers who are posting today. Be sure to check them out.
Joanne 9of12 (this is me!)
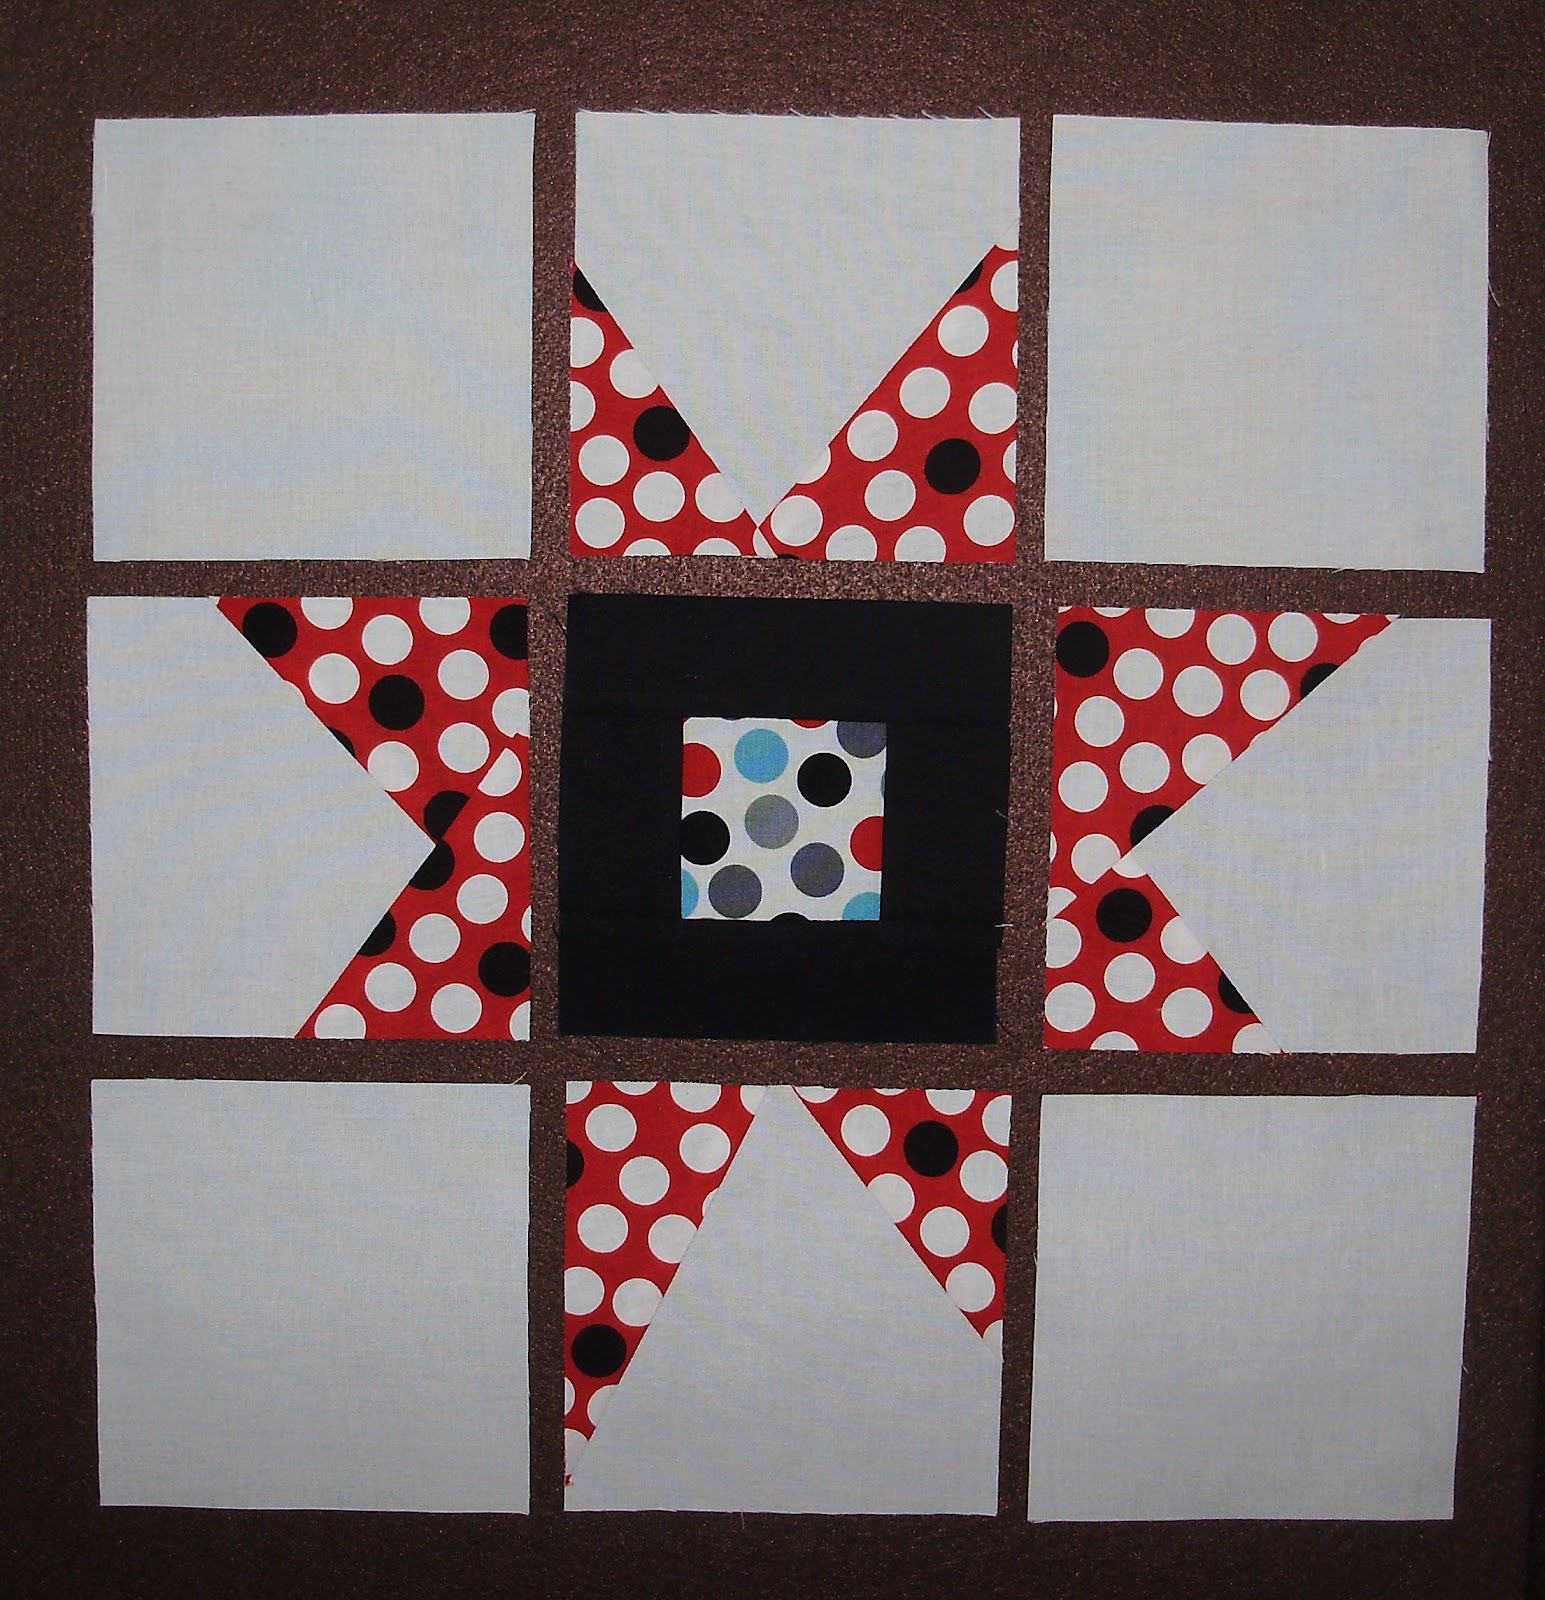
So without further adoo, here's my block. A Wonky Star!

I love this block and thought the dottie fabric would be perfect!
Have you ever made one? If not, here's a tutorial to help you create your own .
First I started with a 2 1/2" square and added 1 1/2" sashing strips.

Sew the sides on first and press to the sashing strip.

Next add your top and bottom sashings. I like to have the sashing strips on the bottom close to the feed dogs. This allows me to control the seam allowance in the first seams. (I really hate it when they get sewn in the wrong direction and cause bulky seams.) I've used red thread so you could see the stitching lines. Normally I would use something more neutral.

Press these toward the sashing strip as well and trim to 4 1/2", as needed.

It's time to create your wonky star points! Cut 8- 4 1/2" squares of your background fabric (white). Set aside 4 of these squares to use for the block corners. Also cut 4 - 4 1/2" squares of your star point fabric(dottie fabric).

Cut the star point squares one time on the diagonal to create 8 triangles.

Stitch one triangle to the right side of each of 4 background squares, at any angle you want, but.....(there's always a but, right?)

Make sure that when the triangle is flipped and ironed to the correct side, it extends past the edge of the background square. I cut a small piece of heavy duty template plastic and marked 1/4" lines on both of the long edges. I use this to "audition" my angle and make sure it extends past the edge.

Check out the picture below.You don't want this to happen to you. You will have to rip out the seam and resew it. After doing that a couple of times, I decided to use the template plastic. :-)

Much better!

Here are four triangles added at different angles. (Changing the angle of the triangles will help create the "wonkiness" of the star and make these really fun!)

Trim the excess background fabric, flip the star point to the right side and press the triangle out. The star points will extend past the edge of the background fabric and look pretty ragged.

Follow the same technique and add the second triangle, only this time add it to the left.

These 4 are ready for trimming!

Trim background pieces and press as before.

Trim this unit to 4 1/2" square. Here's the first cut.

And the last cut.

Now you have the necessary 4 star points. Don't they look fun?

Lay out your star as follows:
Sew the pieces together to create three rows.

Sew the rows to create your wonky star block. Trim to 12 1/2", as needed.
I made eight of these blocks and put them together to make this small quilt (about 49" x 49"). Isn't it fun?

Here's a close up of the quilting in the center. It's the only non-wonky star in the quilt.

Now for the giveaways!
I'm feeling quite generous right now so there are three giveaways!
I'm giving away two sets of fat quarters of some dottie fabrics. Aren't these fun?

Here's what you need to do to try and win.
1) Leave a comment, any comment.
2) For a second chance to win, become a follower and leave a comment telling me you have done so. If you are already a follower, leave a comment to tell me that.
Winners will be randomly selected Saturday evening, Sept. 22nd.
But wait...
One lucky winner will receive this block, quilted and bound.
To win this block (quilted and bound), you need to leave a comment with a name suggestion for the completed quilt. My husband usually names my quilts, but he suggested we let you do it.
He will pick the winner on Saturday evening, Sept. 22nd.
Thanks for looking and wading through all of these pictures.
Enjoy the hop and have a dottie day!
Monday, September 17, 2012
Design Wall Monday
My how time flies! It's Monday already and another design wall day. I really do enjoy Monday because I get the opportunity (or is it an excuse?) to spend a chunk of time on the computer checking out LOTS of quilting projects. Thanks Judy!
Here's one of the projects on the wall for me today.


Here's one of the projects on the wall for me today.

Yep, another set of Easy Striped Table Runners. These are so quick to make and I love having a bunch on hand for quick gifts.
Do you see the strip to the left? I really need to find a way to use them. These table runners don't need binding so I can't use them there, but I really don't want to throw them away. They are 2" wide and just so darn pretty. If I can't think of anything else, I may use them as ribbon for Christmas gifts. :-)
I can't show you the other project that is up on the wall because it is for my Dots on Dots Blog Hop post tomorrow but here's a sneak peek at some of the fabrics that I used.

Be sure to check back here because not only will I be posting my block (and finished project), there will be a link to other hop sites and a giveaway opportunity. I'm feeling generous so there will actually be three giveaways! :-) WoooHooo!!
Grab a cup of coffee, tea, soda or water and check out what other quilters have on their design walls today. Go to Judy L's Patchwork Times and have a great day!
Dots on Dots Blog Hop Day 6
It's Day 6 of the Dots on Dots Blog Hop and here are today's participants. Check them out and be sure to leave comments. Many of them have giveaways. :-)
In case you missed a day or two, click here to see the full schedule, including links to each blog.
Tomorrow's my big day! YEAH!!
Sunday, September 16, 2012
Stash Report - Sort of...
Its been pretty busy around here but I have completed some projects in the last 6 weeks or so. Here's a rundown of my year to date numbers.
UFOs Done, Done and Done (pieced, quilted and bound).....10
New Quilts Done, Done and Done....................................21
To Be Bound................................................................. 1
To Be Quilted................................................................13
Here's a rundown of donated and sold quilts in the last two months (YEAH!!)
Donated....................................................................... 4
Sold............................................................................. 7
Yep, I've been a busy beaver!
Don't forget that I post my block on the Dots on Dots Blog Hop Tuesday.
Click here (!Sew We Quilt!) to see the entire schedule.
Check out the stash reports of other quilters by going to Judy L's Patchwork Times.
Friday, September 14, 2012
Day 5 - Dots on Dots Blog Hop
It's day 5 of the Dots on Dots Blog Hop and the projects continue to make me smile and want to get busy sewing! Sit back, relax and enjoy!
September 14
Go to !Sew We Quilt! for more information and the entire schedule.
Thursday, September 13, 2012
Dots on Dots - Day 4
Wow, I've been seeing LOTS of great dots the last couple of days and my head is spinning with ideas for new projects! I guess I should just admit that if I want to complete even a fraction of the quilts that are of interest to me I should just give up sleeping all together. :-)
Check out !Sew We Quilt!'s blog today to see more information about this WONDERFUL blog hop and the daily top 2 choices.
Here is the list of today's participants. Sit back, relax and enjoy! I know I will. And by the way, my day is fast approaching - it's in just 5 days!!
Check out !Sew We Quilt!'s blog today to see more information about this WONDERFUL blog hop and the daily top 2 choices.
Here is the list of today's participants. Sit back, relax and enjoy! I know I will. And by the way, my day is fast approaching - it's in just 5 days!!
September 13th
Wednesday, September 12, 2012
Dots on Dots Blog Hop Day 3 Schedule
Dots on Dots Blog Hop Day 3 Schedule
Check out these great sites!
!Sew We Quilt! has more information about the hop, if you are interested.
Tuesday, September 11, 2012
Dots on Dots Blog Hop Day 2 Schedule
As promised, here's the Day 2 schedule for the Dots on Dots Blog Hop.
Click the !Sew We Quilt! page for more information about today's schedule and the hop in general.
I loved looking at all of yesterday's blogs and I've started a list of things I want to do. That list is getting VERY long. :-)
Dots on Dots Day 2
Tuesday, Sept. 11
Enjoy!
Monday, September 10, 2012
Design Wall Monday
There's a lot going on here so I'll just get to the point (actually I'll get to the pictures!)


Well, I have a lot to do so I better get off the computer and get busy. See what other quilters have on their design walls today. Go to Judy L's Patchwork Times.
First off is my friend Jean's quilt that I quilted on another friends HQ16. This is now ready for binding. YEAH!

Here's the back. Not a great picture but I think you can see the texture. (I love that!)

Here's a close up of the quilting. The pattern is called Spring Thing, by Jodi Beamish. Yep, I used red thread on both the top and bottom of this quilt. Now both sides are a two-color quilt!

Speaking of quilting, this is Jerry's Framed Rectangles quilt that is ready to be quilted. I'm using the Spring Thing pattern on this one too. Can you tell I really like that design? Actually, Jerry picked that out without me using my powers of persuation, but I have to say that I'm happy he chose it. :-)

(By the way, this picture was taken at the montly Milan Quilt Builders guild meeting. Click here to check out all the wonderful quilts that were shown during our "Sew and Tell."
Here are two Easy Striped Table Runners that are ready for the quilting. This pattern has been around for a few years, but it is so quick and easy that I use it often. In case you've never used this pattern before, I will tell you that there are five seams and NO mitering. That's it! It's all in the cutting of the 60 degree triangles. Also, since you use the "birthing" method of layering, there is no binding. Simple, and they made super (and super fast) gifts!
These two runners were made using the same striped fabric. The difference is in where I cut my repeat (in other words, how wide my stripes were cut). Two table runner tops out of 1 1/2 yards of fabric! Not bad. :-)

And finally, these are fabrics I'm using for my contribution to the Dots on Dots Blog Hop. I can't show you my blocks because I don't post until Sept. 18th, but you can see what is up so far today. Grab a cup of coffee, tea or soda, sit back and realx and then click on this link to see the "dotalicious" creations! Each day of the Hop I will post a link to the daily contributors. Many of the contributors are providing tutorials, giveaways, etc. and I know we all like that. Enjoy and be sure to leave comments for the contributors. I'm sure they'd all love to hear what you think of their projects.
I'm going to see if I can cut and paste each day's list. Let's keep our fingers crossed.
MONDAY's Dots Enthusiasts
September 10th
Subscribe to:
Posts (Atom)