Sunday, September 30, 2018

Sneak Peek

Remember when I showed these semi-circles...


and these fabrics? It was for a secret sewing project.


The quilt is complete and pictures have been sent to the designer, Rachel Rossi. Now I just need to wait for the pattern release so I can post pictures of the whole quilt. 

In the mean time, here are a few sneak peek pictures.


I really like this quilt and am super excited that all the fabric, except the backing, came from my stash. (No judging about how much I have in my stash, please.) 

Wednesday, September 26, 2018

Happy Results

I am working on updating some information and samples for a strips workshop that I'm presenting next weekend, so I sat down to do some sketching and a little math. 

Yep! I did the math - all by myself! 

A little background is in order here. I am the first to admit that math is not my strongest asset by any means, but I don't completely shy away from it either. I use the basics a lot when quilting, especially when I'm designing a quilt or resizing a pattern. Of course, it helps that I am married to a man who we affectionately call "The Human Calculator." He is always willing to help me when I get stuck. He really enjoys messing around with math and is very good at it. As a matter of fact, for the past five or six years he has tutored a number of junior and senior high school students in a variety of math disciplines including Algebra, Geometry, and Trigonometry. He loves doing that and the students like him and they learn. It's a win-win situation! 

So back to my project...

For the workshop, one of the first things I am going to show is how to take the basic Jelly Roll Race quilt and adjust it to make a variety of sizes. We won't be adding borders; but rather, we'll be doing the math to figure out how many strips are needed to make a quilt the desired size. Easy Peasy! 

Doing this got me thinking about how I might be able to change the quilt's design and not just the size. While I like the fact that a Jelly Roll Race quilt can be done very quickly, I don't always love the resulting look. Sometimes I think it just looks too choppy and not very pleasing. I really want to come up with a better way to either place the strips, cut them, or something. Anything!

I had some 2.5" strips that I didn't really love and I decided to use them for the test. After doing the math and crossing my fingers for luck, I cut 10 print strips and 10 solid-reading fabrics in half. I then sewed the strips together, alternating a print with a solid-reading strip. I ended up with one very long 2.5" strip. I cut the strip into equal lengths (36.5" because that's how wide I wanted my quilt top to be), and then I did the happy dance because my math worked - for the most part! 


I'll have to make a few tweaks when I sew the rows togethers so the solids match up correctly (see the middle rows), but that can easily be done. Doing this will result in the quilt being a bit smaller than 36", but I'm ok with that. (I realize that this happened because I did not verify that all of my starting strips were the same length before sewing. Lesson learned!)

I'm happy with this and will make a "real" version of it using fabrics that I really like.

I love it when a plan works!

Sunday, September 23, 2018

Fall in Fabric

I had the bright idea to make some placemats using Fall colors. To be exact, I was going to duplicate the colors of candy corn. I was thrilled to have a few minutes to steal away in the sewing room, sew the strips together, and then cut the triangles. Everything was going so well that I figured there'd be a good chance that I could get a couple made before Monday and I would take them with me to Chestnut Ridge when I take my wallet class.

I was a happy girl until I went to the grocery store and bought some real candy corn. Do you see the error of my ways?


The yellow is at the bottom of the candy, not the orange!

I guess it was a good thing that I didn't sew this placemat together before I went to the store. 


I've made another strip set and cut some triangles. Oh it's so much better!


This placemat looks so much better.


I played around with the triangles and will decide later what combinations I want to sew. I also need to make anther strip set so I have enough triangles. 


I'm glad I bought the bag of candy before doing any more sewing. :-)

These are quick and easy placemats and I know the grand kids will enjoy them.


Monday, September 17, 2018

Design Wall Monday

In my post last week about the Tumbling Triangles quilt, I showed a picture of my progress. Today, I can show you one completed quilt top and one almost completed top. Yay!

Here's the top that is almost completed. I have one diagonal seam to sew and the top right and bottom left corners. After that, I just need to add the borders.


This quilt is similar to the original quilt, with the background fabric light and the triangles dark.


Here's the top that I completed. I made it opposite of the original. In other words, the background is dark and the triangles are light. 


I used the same fabrics for both quilts because it would be interesting. It also helps that I had enough of both fabrics in my stash to do that. WooHoo! I've used up a bunch of stash and ended up with two quilts. 

What are you working on today?

Check out the Quilting Eye Candy at

Monday, September 10, 2018

Design Wall Monday

It's been a while since I posted, but I've been awful busy and something had to give. I'm thrilled that I've had a bit of sewing time and have something to show today. Yay!

Before pictures, I have to provide a little back story about a couple of things I've been doing. This past weekend was the first Ohio Amish Country Quilt Festival and I was asked to present a Triangle Frenzy School House Program on Thursday. I did and it was a lot of fun! 

Because of an emergency situation, on of the teachers for a Saturday class had to cancel and I was asked if I could fill in for her. She was scheduled to teach Tumbling Triangles, a Dub Tucker pattern. 


Although I had experience with a few of the specialty rulers that Deb Tucker uses with her patterns, I had never used the V Block Tool. I did a quick internet search and watched a YouTube video and I decided that if I could get my hands on the tool and a pattern, I could make the quilt and teach the class. 

Things didn't turn out exactly as planned and I did not get either the pattern or tool until Friday morning. Yikes! I was stressing out, thinking that there was no way I was going to have even a small quilt top done in time for the class.

Well someone was watching over me because a woman working in one of the booths at the Festival (Sue), heard me talking about the situation with a couple of the organizers. She said that she had a Tumbling Triangles quilt top and the pattern in her hotel room. Sue really didn't know why she stuck it in her luggage, but she did and I was welcome to use it for the class. She was a life saver and I was so happy!

I spent Friday learning to use the tool and making some blocks in between talking with Festival participants at the Chestnut Ridge Sewing booth. I got one of each of the four blocks made as well as all the pieces needed for a step by step visual of how to make each block. I was so relieved to not have to make the entire quilt top!

The class went well and the students were wonderful. At the beginning of the class, I explained the situation and they were appreciative of the fact that the class was not canceled. The were also ok with a sample that was only a quilt top and step by step visuals that did not match the sample. I sure did luck out with that group!

I spent yesterday getting myself reorganized and prepped for some presentations I will be doing this coming weekend at Gathering Stitches in Holmes County. After I was feeling pretty good about the status of that prep work, I decided that I REALLY wanted to do some sewing before heading to bed. I pulled out the bag in which I put all the Tumbling Triangles pieces, reorganized it, and sewed the rest of the small triangle units. I completed all nine of the A Blocks and have all the triangles units made for Blocks B-D. 

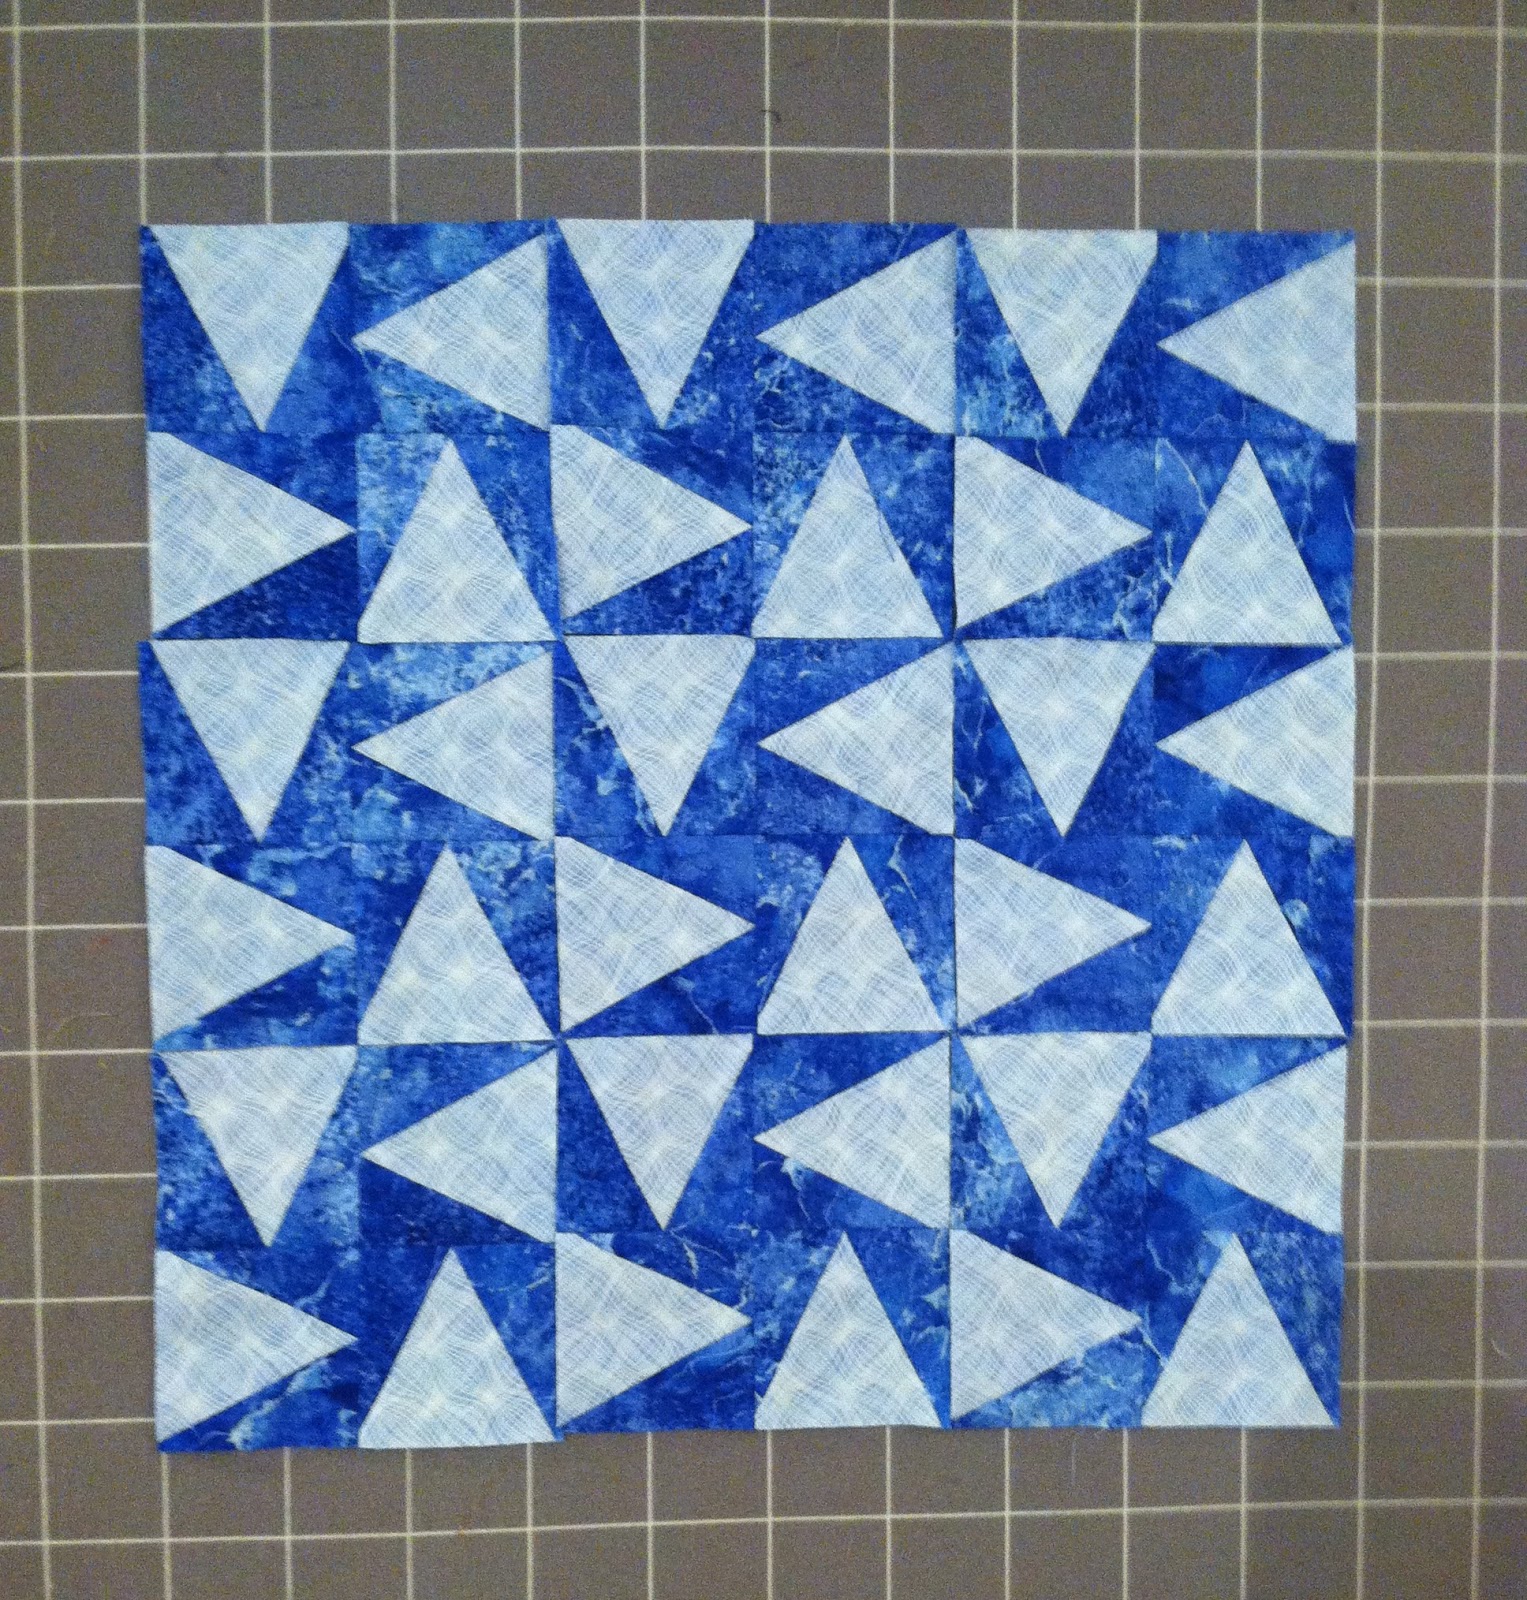
Since I was thinking that I needed to make a sample very quickly, I chose to make the 40" version rather than the larger one that I like. Each of the triangle units measure 3" finished, so the block is only 6" x 6".  Here's a picture of the nine A Blocks. (They will not be placed side by side in the quilt.) 


I have all the triangle units for the other blocks sewn and ready to press and trim. You can see what Blocks B-D will look like in the picture below. 


For some reason, the picture I took of Sue's quilt, along with my step by step visuals did not work on my phone camera. That makes me a bit sad because I really wanted you to see her version. She used an off-white background and a Kaffe Fasset fabric for the triangles. I am making mine reversed. The background on my quilt will be the dark blue and the triangles will be the light blue. I can't wait to see how this turns out. 

I'm hoping to get this quilt top completed soon and perhaps make another one, only larger. :-)

What are you working on today?

Check out some quilting eye candy at 


and