Showing posts with label Secret Sewing. Show all posts

Tuesday, April 4, 2023

Secret Sewing

 Yikes! I totally missed March...

Well, I didn't really miss it; I was just busy and didn't have time to post anything. 

I've been crazy busy with secret sewing projects so I wouldn't have been able to share many pictures any way. 

I just finished trimming 195 half square triangles. 


Yes, you read that correctly - 195 half square triangles.

These are actually bonus HST from trimming 224 flying geese units. This secret sewing project includes two quilts - one "biggish" one and a small wall hanging. The flying geese were used in the quilt and the HST were used in the wall hanging. I'll be able to show these projects sometime this summer.

I have been working on various Quilts of Valor as leader and ender projects, but I haven't taken any pictures yet. I'll try to do that soon and share them here.

I have three quilts that are wedding gifts that I'll be able to share after those weddings, all which take place within the next 45 days. 

I told you I have been busy.  :-)

Sunday, July 10, 2022

A New Project To Share

So much for posting more frequently! :-( 

Honestly, I've not just been sitting around eating bon bons and twiddling my thumbs; but since I haven't been sharing anything here, it certainly feels like that's the case.

In the past two weeks, I have completed a couple of secret sewing project for Tammy Silvers that I can't show yet, but I can show snippets. The first quilt is a Christmas quilt, and it is adorable. 

Take a look at this block The quilt is fun and easy to put together and I think I am going to use the pattern to make a wall hanging and table runner. I may even make a few placemats to go along with it. It really is that adorable!


I completed another secret project for Tammy and it involves a lot (320!) flying geese units. 


Yikes! That was a lot of trimming! I used a Studio 180 Wing Clipper to trim everything, so that made it much easier and faster. 


I've made some samples for upcoming classes, but I haven't taken pictures yet. Maybe this week...

I recently taught a Granny Squares Quilt class that was fun. I made the original sample I use for class back in 2014 and it was made using very traditional/30's reproduction fabrics. (I made a second version of this quilt in late 2014 that is very different, but it was made using a specific fabric that is no longer available. Check that out HERE.) 


While I still like the original quilt (and second version), I decided I wanted an updated and larger version so I headed to my stash and pulled out an older Alison Glass Sun Prints 2.5" strip pack. I found a fabric that I liked for the background and made up some blocks and step-out samples. 


I needed to add a couple of fabrics to end up with the required number of blocks, so I pulled two from my stash that I felt blended well. I am happy with the choice. 


I sewed and trimmed 48 blocks and decided to put them up on the design wall right away, instead of putting them away and work on something "more pressing." That's just one of the many ways I end up with a bunch of UFOs and I was determined that would not happen with this quilt.

Here are the blocks, with no sashing added yet. I wanted to get an idea of the layout and be sure no two adjacent blocks had the same fabric. Until I put this on the wall, I didn't realize how many yellow fabrics I used in making the blocks.  hahaha


I have started to sew in the vertical sashing strips and then sew rows together. After that, I'll add the horizontal sashing and decide about a border. I have a fabric I am considering, but I'm not sure about it and won't be until that top is complete. 


I have projects on which I should be sewing, but I needed a break from "required" work and this is perfect! I am looking forward to seeing this updated version of a very traditional pattern. :-) 

Tuesday, January 11, 2022

Secret Sewing Reveal

I've been working on a couple of secret sewing projects and it's Reveal Day for one of them. I've shared some sneak peaks on social media over the last couple of weeks, but in case you missed them I'll share them here too.

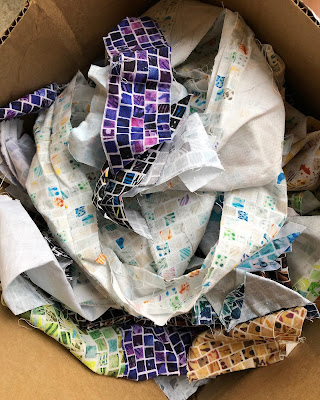
In November, I received a box from Cheryl Lynch filled with Mosaic Masterpiece scraps. I was excited when I opened the box and saw all this gorgeous fabric. 

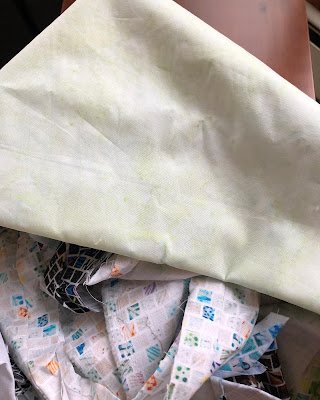
Since I wasn't sure what I'd be getting, I'd only given a little thought as to what I was going to make. The plan was for me to add some of my own scraps and create a quilt. After seeing the scraps, I came up with a plan and decided to add one constant fabric, a very light green. 


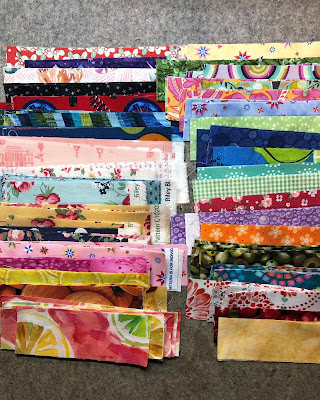
I then went to my "Small Scrap Bin" and pulled a variety of fabric and started cutting 1.5" x approx. 5.5" pieces. I stacked the cut pieces on one side of my pressing table so I could see if/when I needed to add a new color.  This is a very mixed group of fabrics, but it's exactly what I wanted. 

I have to laugh at the comments I received when I shared this picture on social media. Yes, it really is a jumbled mess of fabric and could actually have turned into a hot mess, but I was sure it would work. I got busy sewing and paid no real attention to which strips I pulled. They just had to contrast with the strips near it. 

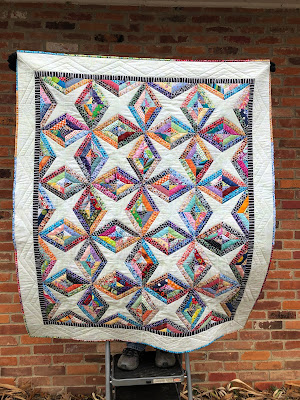
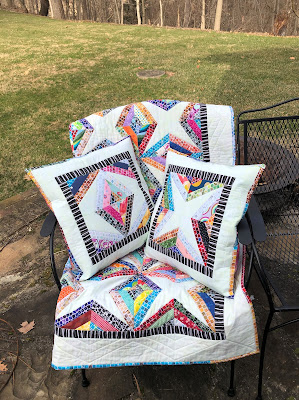
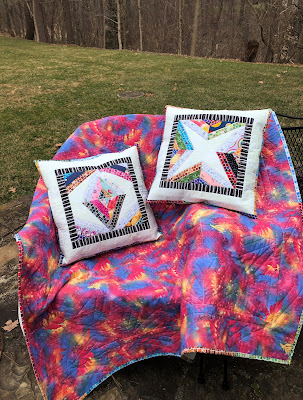
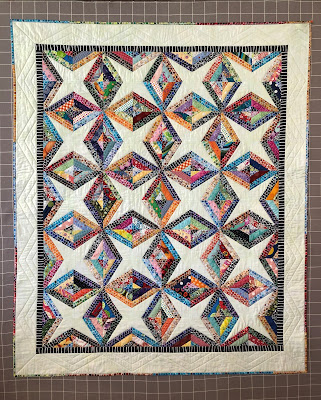
I completely forgot to take pictures of the small block units to show here, so I will just share the completed quilt now. I don't think this picture does it justice, but I think you get the idea.

I am very happy with the results! 

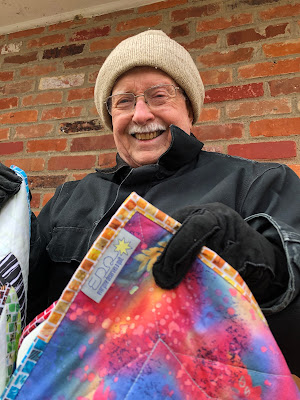
I tried to take pictures outside because the lighting is so much better, but the wind and cold temperatures didn't want to cooperate, as you can see in the picture below.

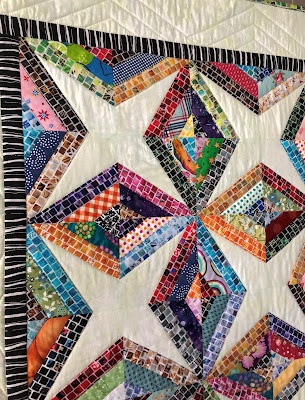
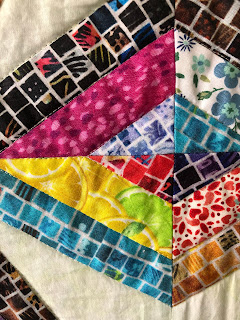
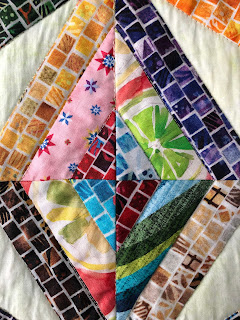
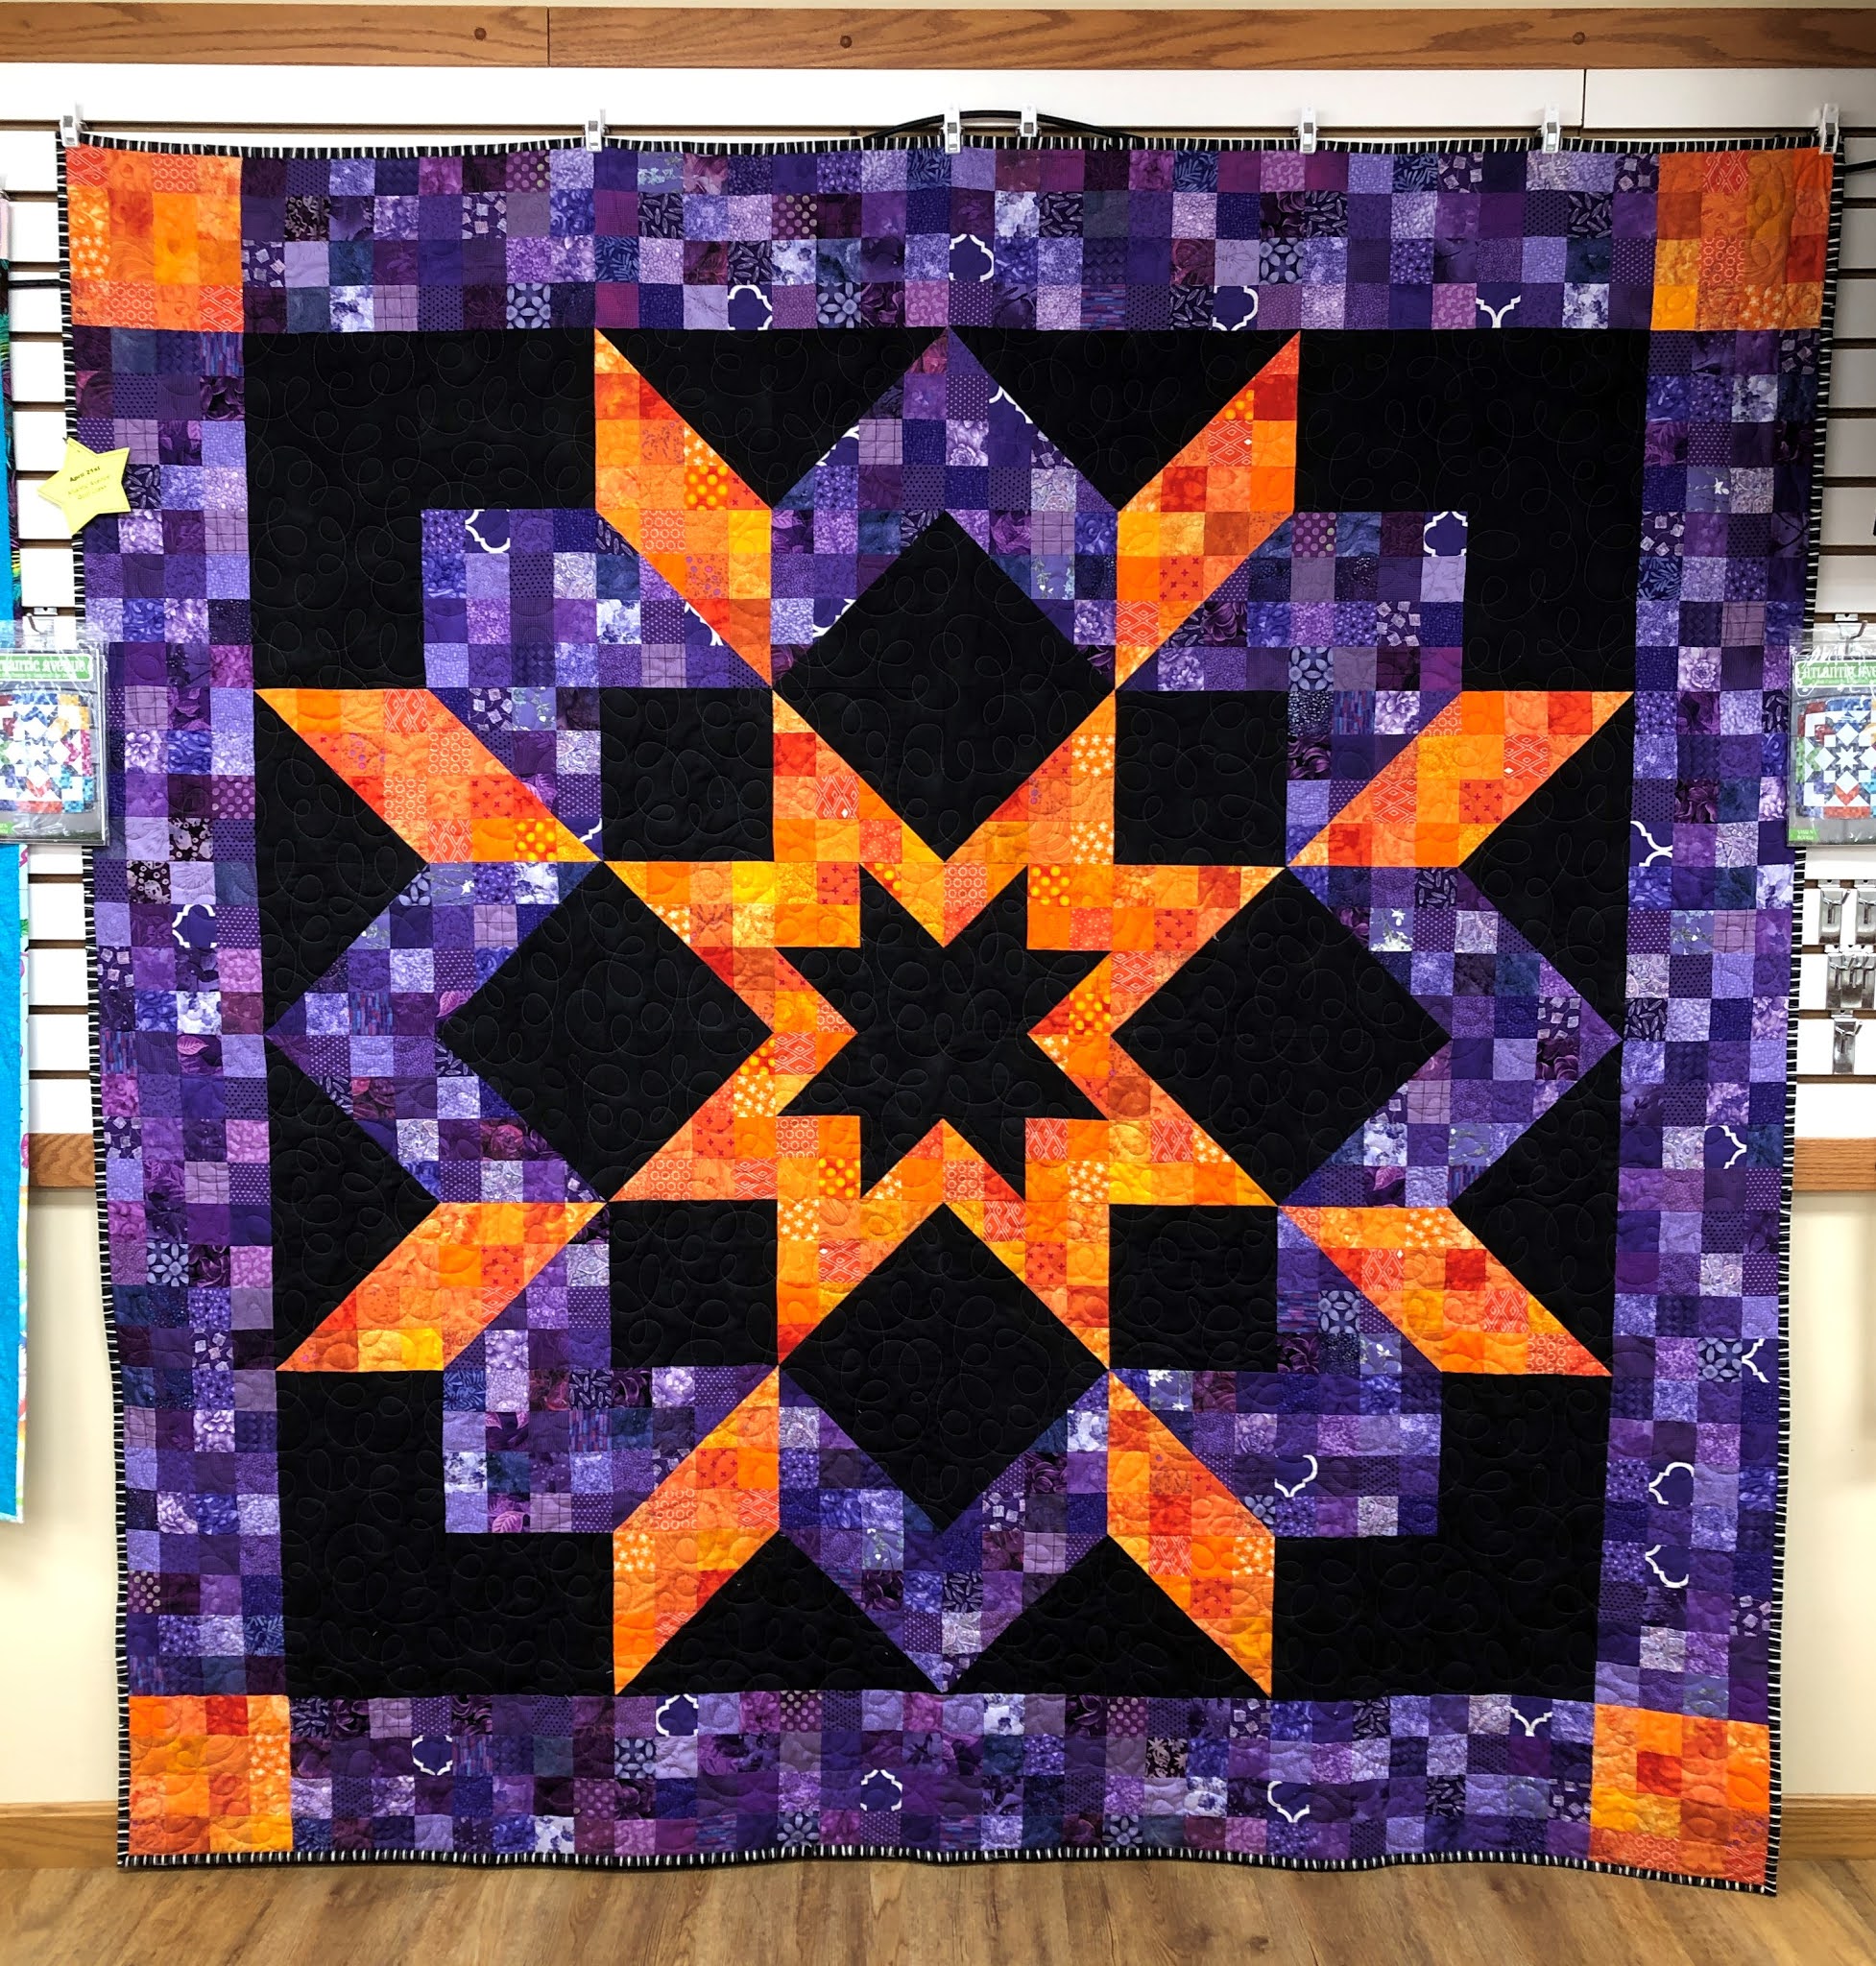
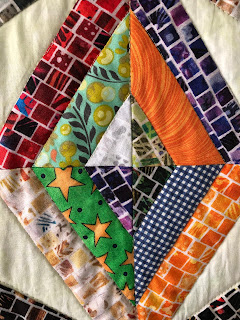
Here are a few close ups of the quilt.


This quilt was created using a foundation piecing technique. I started with a 5.5" square of the constant fabric. I drew two lines to create what I call a kite. I then sewed strips onto each side. The first and third rounds were sewn using the Mosaic Masterpiece fabrics. I used my fabric scraps for the middle strip. 

When I was sketching this out, I was thinking about the star that would be created from the unsewn constant light green fabric when four small blocks were sewn together. I was pleasantly surprised (thrilled, actually) with the secondary design that was created when those blocks were sewn together. Jack thinks it looks a bit like a Medieval coat of arms. I don't know what it looks like, but I like it!


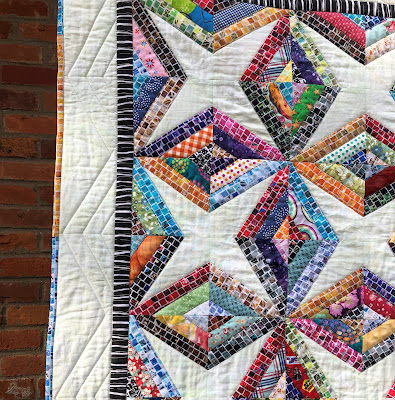
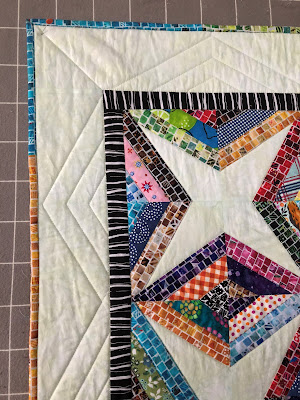
I used my favorite black and white stripe for a border to frame the blocks. I usually reserve this fabric for binding, and that was one of my original binding options; but after I had the inside of the quilt sewn together, I knew that this would be the perfect first border. I added a plain border of the same light green fabric from the blocks and then bound this with scraps of the Mosaic Masterpiece fabric.


I quilted in the ditch around all of the strips and created the illusion of the blocks continuing into the border. I was very happy when that turned out to look like I had envisioned. Yay!

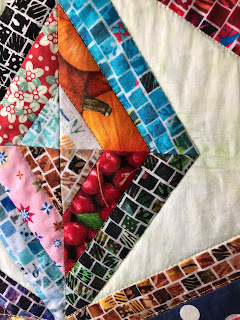
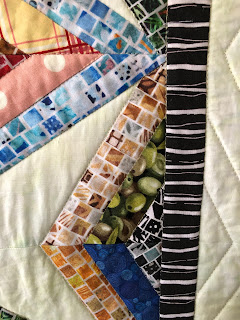
Earlier I said that I used an interesting mix of scraps from my stash. Here are just a few examples of some of those fun fabrics...

Doesn't everyone have Hot Wheels and toy truck fabric in their stash?


I have quite a bit of fruit and vegetable fabric because that was the theme of the 2021 Color Challenge project hosted by Patterns by Jen. Check back Friday for the reveal of that challenge. 


I also included at least one piece from each of the ten reading pillows I made for the grandkids' Christmas gifts. I think they'll enjoy seeing pieces of fabric from their pillows in this quilt. 


Speaking of pillows, I made a few extra blocks (on purpose because I wanted to have options while laying out the blocks), so I made two 18" pillows to go with the quilt.


Isn't this backing fabric fun? I had that in my stash too. 


If you've been a reader of my blog for any length of time, you know that my husband Jack is my official quilt holder and quilt namer. Here he is smiling, despite the 16 degree temperature and strong winds. I am one lucky woman!


I have to share a conversation Jack and I had regarding the making and naming of this quilt. I think it's kind of fun.

As I'm pulling fabric from my scrap bin...
Jack: That's your small-pieces bin. Are you using those for this quilt?

Me: Absolutely! I'll be using pieces that measure 1.5" wide by about 5.5" long.

Jack: Oh, ok. I don't see it, but I trust that you know what you are doing.

As I cut fabric, the conversation continues with:
Jack: You realize that you just cut strips of Hot Wheels, olives, and toy trucks right?

Me: Yep! And I'm adding the other fruit and vegetable fabric that I used for the Color Challenge project. Plus, fabric that was used in each of the grandkids pillows (all 10 of them) will be in there too, along with whatever I pull out next. 

Jack: This should be "interesting."

I made a few blocks to test my pieces and put them on the design wall. The conversation continued:
Jack: I'm sorry Hon, but I am not loving this...

Me: Give it time. Do you like the individual blocks?

Jack: Yes, sort of. This may be a challenge for me to name. 

I added more blocks to the design wall and the stars (both the pieced ones and the solid ones) began to show.
Jack: I get it now. I'm kind of liking this and will start thinking about names. 

Me: I already have a name in mind. The goal here was to make a scrap quilt using the mosaic fabrics along with my stash. In my mind, I needed fabric that compliments each other and "plays well together."  That's what I want to name this: Plays Well with Others

Jack: BINGO! That's perfect and I think the quilt is pretty darn cool. 

Fast forward to the finished quilt and picture taking:
Jack: This is one of my favorite quilts that you've made. You know I don't love scrappy bindings, but that mosaic fabric is perfect! 

Me: I agree!  ❤❤❤ 

Me: Since I made extra blocks, just to be safe; I made two pillows also. I am smitten with those as well.  :-) 

Jack: After we take pictures outside in the freezing cold, I'm going to use that quilt to warm up and sit by the fire.
That's exactly what he did!  :-) 

Quilt Facts:
Quilt Name: Plays Well with Others 

Quilt Size: 48" x 58"

Technique: Foundation Pieced

Machine Quilted in the Ditch and straight lines on my domestic Bernina 180

Fabrics: Scraps of Mosaic Masterpiece from Cheryl Lynch and whatever was in my stash, Hoffman 1895 Sea Grass for the constant light green, QT Fabrics Digital Blanc Et Noir Stripe Black, and Fossil Fern by Patricia B. Campbell and Michelle L. Jack for Benartex for the backing (Other than the fabrics from Cheryl, all of the fabrics came from my stash.)

Pillows: 18", with zippered backs made from the same fabric as the quilt backing 

I am thrilled with this quilt! I hope the new year brings you as much joy in your quilt making as this quilt has brought to me!

Wednesday, October 6, 2021

A Few Projects

It's been a while since I've posted, but that does not mean I haven't been busy and sewing. Right now, I'm working on my Cozy Cabin quilt from Modernly Morgan. She is having a Quilt Along and I'm happy with my process.


I am using the leftover fabric from my Homespun quilt, another Modernly Morgan pattern. I hosted a Sew Along for that pattern and made three different variations. All three of these quilts were made using the same initial blocks. It is in the layout of those blocks that you create completely different looks.


One of the original Homespun quilts has already been gifted. Bailey likes her quilt and the crazy ice cream she chose as her birthday treat.


I finished four quilt tops for Myra Barnes of Busy Hands Quilts, but I have to get those pictures together and will share those in another post.  I'm also working on a couple other "secret sewing" projects and can't share those yet, but I am staying busy.

What are you working on today?

Saturday, April 17, 2021

Catch Up Post

I've been a slacker when it comes to writing blog posts. It's always on my lists, but doesn't always make it to the top of the list.  I finally sat down at the computer and decided to write a few words and share a few pictures. 

Remember the black and red version of Mapleton Avenue that I shared last month? It has been gifted to Quinn and I even got a few pictures.  Yay!


I finished my two-color plus a background Atlantic Avenue quilt and LOVE it! Jack picked these colors and he is very pleased with results too.  


In case you can't see it in the picture above, I used the same black and white striped binding for this quilt. I think it is perfect for these quilts. I have at least one more project on which I plan to use it, so I guess it really was a good thing that I bought quite a large amount of it.  


I had some "sewing for others" to do and this big beauty is now complete. I did not get a picture of this after borders were added, as it was too big for my design wall. Plus, it was raining and pictures just weren't going to happen before it needed mailed. I'll share some of the pictures that I receive from the person who commissioned it. 


None of these pictures do the quilt justice. The fabrics are beautiful and it was a joy to make. After the borders were added, this beauty measured 93" x 107" The pattern is Sweet Caroline by Myra Barnes of Busy Hands Quilts.  

I have a couple of secret sewing projects on which I'm working and I'm enjoying them very much.  Here are the fabrics for one of the projects.  These just make me smile.  😊


I have a few other projects on which I've been working. I'll get some pictures of those to share too. That may happen this weekend, but I wouldn't hold my breath. 

Monday, August 24, 2020

School Colors - Secret Sewing Reveal

 This isn't on my design wall right now, but it was recently one of my secret sewing projects that is now complete. The timing of the reveal is perfect, as it's that time of year that kids are headed back to the classroom.

Introducing...

School Colors


This pattern is now available in both 
print and pdf version at 
Busy Hands Quilts.


Just like every other quilt I've made using one of Myra's pattern, this was so easy to follow and her illustrations are wonderful. The pattern includes two sizes (throw and twin); and they both perfect for kids going off to college or when you want to show your school spirit and stay warm at the same time. Unlike many patterns that require more blocks to be made to increase the size, the twin size is made using the same number of blocks, just a larger size. How cool is that? 

Here are a few pictures of Myra's completed quilt. 
 
School Colors - Image from Busy Hands Quilts


School Colors - Image from Busy Hands Quilts

Check out that quilting! 

School Colors - Image from Busy Hands Quilts

As you know, I always like to take pictures of the quilts I make from side angles. 


And a look from the other side...


One of the coolest things about this quilt is that the blue stars are not pieced as star blocks. They are created with some awesome pieced sashing. WooHoo!

You all know that I am a sucker for a good red, white, and blue quilt, so I'll be making my own version of this soon because it will make a great Quilt of Valor. But, I am also thinking that this would be a great quilt to make for a school fundraiser. All you need are the two school colors and a background/accent, and you are good to go. If you are having a difficult time visualizing this, Myra has provided some samples in a variety of colors. Check it out HERE.

School Colors - Image from Busy Hands Quilts

You can get your own copy of School Colors at Busy Hands Quilts.
While you're there, sign up for her newsletter. 

Check out Myra's Facebook page for more pictures of this beautiful quilt. 
You won't be sorry you did! 

So, what IS on my design wall today?

I finished Peyton's elephant quilt top. I'm got the back ready to sew and then it's time to quilt this puppy elephant. :-)


I've been playing around with a small project that I can use for teaching a very basic paper piecing class, and this is what I've come up with. After I took this picture, I layered it, quilted it, and have the binding sewn on. I'll hand stitch that down later today. 

 
I did finish the Picket Fence quilt top that I showed last week. Since I was using up leftover pieces of a layer cake (10" squares), my quilt is smaller than the pattern size. I was toying with the idea of adding a border, but I opted against that and am happy with my choice. Without thinking, I took it off the wall before I remembered to get a picture.  I hope to get this quilted and bound by mid-week, so I'll get some pictures then.


What are you working on today?

Check out the Quilters Eye Candy at


and