Showing posts with label Wonky Stars. Show all posts

Tuesday, June 24, 2014

Tuesday Archives!

If you are looking for Tip Tuesday! click HERE.


Today's themes for Tuesday Archives are Dogs and Dots.


Val's Quilting Studio

Well, I don't think I have anything dog related, but I do have something dots related. I actually posted about this a couple of weeks ago for my Tip Tuesday! entry on Stress-Free Stars. I never get tired of this block and quilt, so I'll post it again for Tuesday Archives. 

HERE is the link to the tutorial on how to create your own Wonky Star Blocks.

And here's the final quilt that was made using the dottie star blocks I made.


Check out other Dogs and Dots posts by visiting 

Tuesday, June 3, 2014

Tip Tuesday! - Stress-Free Star Blocks Piecing

Welcome to
"Tip Tuesday!" - Stress-Free Star Block Piecing


I love learning new things and then sharing that knowledge with my quilting friends. So, every Tuesday I'll provide some tips, hints, tricks, tutorials, shortcuts, etc. that I've learned over the years and share them here on the blog. 

"Tip Tuesday" will be a collection of information about a wide variety of subjects garnered from a large variety of sources.  I am not an expert by any means and do not take credit for being the great wizard behind all of these hints and tips. I will gladly give due credit whenever possible.

These tips will be archived and accessible to you just by clicking on the "Tip Tuesday" tab above. 

Read, enjoy, and be inspired! 


Over the last several months, I've talked to a number of quilting friends and acquaintances who've said that they find themselves stressing out when they try to piece stars. They are worried that they'll cut off the points or that the overall block size will be wrong. They all love the look of star quilts, but just seem to have problems with them.

Quilting is supposed to be fun, and not stressful so I usually share my wonky star block tutorial with them. 


This was a tutorial I put together back in 2012 as part of my contribution to the Dots of Dots Blog Hop organized by Madm. Samm of Sew We Quilt!

Dots on Dots Blog Hop

                        Sew we quilt


In case you struggle with piecing star blocks, maybe this will work for you too. I have another, more traditional star block that I will share next week. It is so easy and quick to make that I think you'll just love it. 

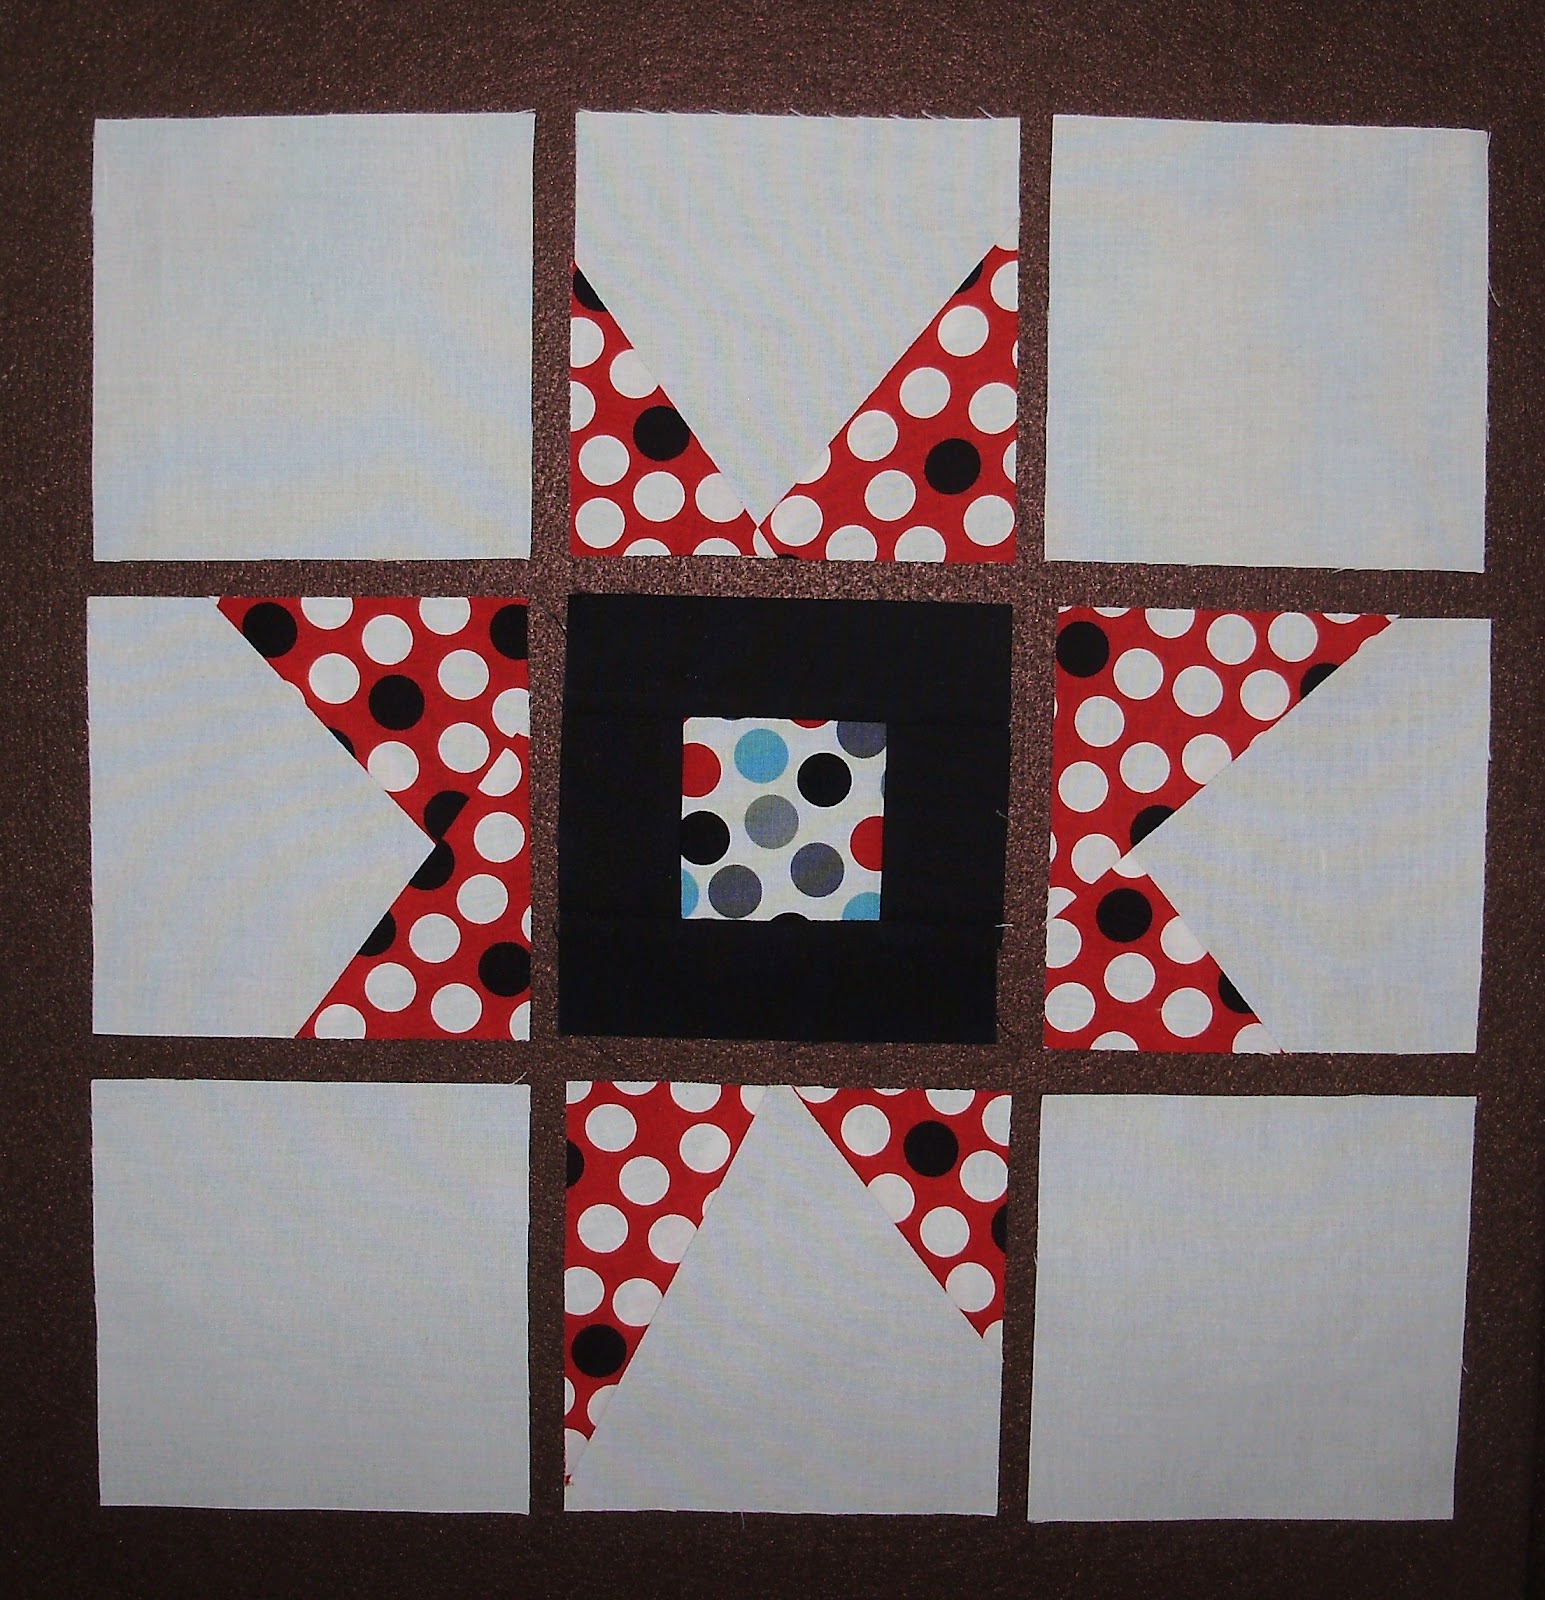
So without further adoo, here's my block.  A Wonky Star!


I love this block and thought the dottie fabric would be perfect!

Have you ever made one? If not, here's a tutorial to help you create your own . 

First I started with a 2 1/2" square and added 1 1/2" sashing strips.


Sew the sides on first and press to the sashing strip. 

 
Next add your top and bottom sashings. I like to have the sashing strips on the bottom close to the feed dogs. This allows me to control the seam allowance in the first seams. (I really hate it when they get sewn in the wrong direction and cause bulky seams.) I've used red thread so you could see the stitching lines. Normally I would use something more neutral. 


Press these toward the sashing strip as well and trim to 4 1/2", as needed.


It's time to create your wonky star points! Cut 8- 4 1/2" squares of your background fabric (white). Set aside 4 of these squares to use for the block corners. Also cut 4 - 4 1/2" squares of your star point fabric(dottie fabric).


 Cut the star point squares one time on the diagonal to create 8 triangles.

 
Stitch one triangle to the right side of each of 4 background squares, at any angle you want, but.....(there's always a but, right?)
 

Make sure that when the triangle is flipped and ironed to the correct side, it extends past the edge of the background square. I cut a small piece of heavy duty template plastic and marked 1/4" lines on both of the long edges. I use this to "audition" my angle and make sure it extends past the edge.


Check out the picture below.You don't want this to happen to you. You will have to rip out the seam and resew it. After doing that a couple of times, I decided to use the template plastic.  :-)

 
Much better!


Here are four triangles added at different angles. (Changing the angle of the triangles will help create the "wonkiness" of the star and make these really fun!)
 

Trim the excess background fabric, flip the star point to the right side and press the triangle out. The star points will extend past the edge of the background fabric and look pretty ragged.


Follow the same technique and add the second triangle, only this time add it to the left.
 
 
These 4 are ready for trimming! 
 

Trim background pieces and press as before.


Trim this unit to 4 1/2" square. Here's the first cut.


And the last cut.


Now you have the necessary 4 star points. Don't they look fun?


Lay out your star as follows:


Sew the pieces together to create three rows.


 Sew the rows to create your wonky star block. Trim to 12 1/2", as needed.


 I made eight of these blocks and put them together to make this small quilt (about 49" x 49"). Isn't it fun?


Here's a close up of the quilting in the center. It's the only non-wonky star in the quilt.


This was so much fun to make and the Blog Hop was a blast! I had a couple of giveaways too and that makes it even more fun. I gave away some fabric and a single block mini quilt (the first picture of this post). In order to win the mini quilt, you had to suggest a name for the larger quilt (circle of stars). 

The winning name was chosen by my husband and he chose Winkle, Winkle, Wonky Star. I think that's fitting and I still LOVE this quilt.  

Have a great day and remember, quilting is supposed to be fun. Enjoy yourself!

Friday, September 28, 2012

A Few Finishes

I really like how the Wonky Star block that I quilted for my Dots on Dots giveaway looked, so I made an identical one for myself.  :-)

Here's the one in route to the winner...


an here's mine...


Want to know why I have two identical blocks from a project that is supposed to be not only wonky, but random? I made these blocks when I was playing with the tutorial and setting up a project board in case I decide to teach this some day. I have a few other blocks (I think four or five) that are completely done, and I have another three or four that are at various stages of completion. Those are used to help students see what each step should look like. (I'm a very visual person and assume that many students are as well. That may be the wrong thing to assume, but I certainly would rather error on the side of caution here. I would hate for a student to not "get it" when I could have very had a sample to show.)
 
Anyway, this little ditty will be hung over the dresser in the bedroom that has the quilt in it. I do like to have complimenting pillows or wallhangings for my quilts.  :-)
 
Have you seen this way of hanging quilts? Instead of a sleeve, you add corner tabs! I simply cut a square of the backing fabric, folded it in half, basted it in the corners and sewed it down when I added the binding. This is a great way to hang mini quilts. With this technique, you don't have a hanging pole sticking out of the sides. I hang the quilt up using a small dowel or rod that rests on a hook in the wall. Love it!
 
 
After I finished the binding on the wonky star block, I wanted to work on something that would be a quickie, so I pulled a small wallhanging UFO out of "The Tub of Shame." This was a kit from a local quilt shop and I thought it was really cute. (So why didn't I finish it?)
 

All of the applique was fused to the backing fabric (which is really orange, not yellow) but none of it was sewn down. I decided that since this is at least three years old (and pretty small), I really should get it done. (This is not my oldest UFO, but it is one of the smallest ones so I thought it would be an easy finish.)  I got busy and now it's ready to use this Halloween and another UFO is done, done and done (pieced, quilted and bound). YEAH!!

I'm off to make some napkins for Lynn's wedding and do some embroidery work for an order.

Life is good!
 

Tuesday, September 18, 2012

Dots on Dots Blog Hop


                        Sew we quilt

 Thanks for joining me today for my contribution to Corrie's (from Quilt Taffy) and Mdm Samm's Dots on Dots Blog Hop. I hope you've been following along and enjoying yourself as much as I have. 

Thanks Corrie and Mdm. Samm for all the work you put in to organizing and preparing this blog hop. You two are awesome!

Here's a list of other bloggers who are posting today. Be sure to check them out.


Joanne 9of12 (this is me!)


So without further adoo, here's my block.  A Wonky Star!


I love this block and thought the dottie fabric would be perfect!

Have you ever made one? If not, here's a tutorial to help you create your own .

First I started with a 2 1/2" square and added 1 1/2" sashing strips.


Sew the sides on first and press to the sashing strip. 

 
Next add your top and bottom sashings. I like to have the sashing strips on the bottom close to the feed dogs. This allows me to control the seam allowance in the first seams. (I really hate it when they get sewn in the wrong direction and cause bulky seams.) I've used red thread so you could see the stitching lines. Normally I would use something more neutral. 


Press these toward the sashing strip as well and trim to 4 1/2", as needed.


It's time to create your wonky star points! Cut 8- 4 1/2" squares of your background fabric (white). Set aside 4 of these squares to use for the block corners. Also cut 4 - 4 1/2" squares of your star point fabric(dottie fabric).


 Cut the star point squares one time on the diagonal to create 8 triangles.

 
Stitch one triangle to the right side of each of 4 background squares, at any angle you want, but.....(there's always a but, right?)
 

Make sure that when the triangle is flipped and ironed to the correct side, it extends past the edge of the background square. I cut a small piece of heavy duty template plastic and marked 1/4" lines on both of the long edges. I use this to "audition" my angle and make sure it extends past the edge.


Check out the picture below.You don't want this to happen to you. You will have to rip out the seam and resew it. After doing that a couple of times, I decided to use the template plastic.  :-)

 
Much better!


Here are four triangles added at different angles. (Changing the angle of the triangles will help create the "wonkiness" of the star and make these really fun!)
 

Trim the excess background fabric, flip the star point to the right side and press the triangle out. The star points will extend past the edge of the background fabric and look pretty ragged.


Follow the same technique and add the second triangle, only this time add it to the left.
 
 
These 4 are ready for trimming! 
 

Trim background pieces and press as before.


Trim this unit to 4 1/2" square. Here's the first cut.


And the last cut.


Now you have the necessary 4 star points. Don't they look fun?


Lay out your star as follows:


Sew the pieces together to create three rows.


 Sew the rows to create your wonky star block. Trim to 12 1/2", as needed.


 I made eight of these blocks and put them together to make this small quilt (about 49" x 49"). Isn't it fun?


Here's a close up of the quilting in the center. It's the only non-wonky star in the quilt.


Now for the giveaways!
I'm feeling quite generous right now so there are three giveaways!

I'm giving away two sets of fat quarters of some dottie fabrics. Aren't these fun?


Here's what you need to do to try and win.
1) Leave a comment, any comment.
2) For a second chance to win, become a follower and leave a comment telling me you have done so. If you are already a follower, leave a comment to tell me that.

Winners will be randomly selected Saturday evening, Sept. 22nd.

But wait...
One lucky winner will receive this block, quilted and bound.


To win this block (quilted and bound), you need to leave a comment with a name suggestion for the completed quilt. My husband usually names my quilts, but he suggested we let you do it.

He will pick the winner on Saturday evening, Sept. 22nd.


Thanks for looking and wading through all of these pictures.
Enjoy the hop and have a dottie day!