Monday, October 29, 2018

Design Wall Monday

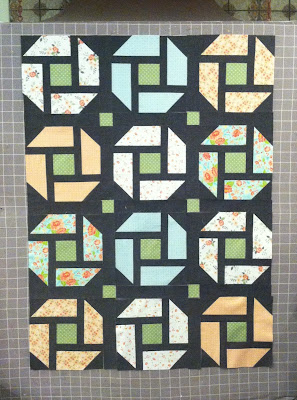
I've got the Patriotic Cheerful quilt top done, sort of...

Pardon the really terrible picture. It's been raining for quite some time and I could not get a decent picture. :-(


This is supposed to have a small border around it that is the same as the background fabric, but I'm not sure that I want to include it. I've decided to let this up on the wall for a little while and then make my decision. 

I was asked in a few e-mails about using this for a Quilt of Valor. The main concern was that the design was not patriotic enough (stars, etc.). I answered those e-mails personally, but thought that I would also answer here in case anyone else had concerns too.

I've been making QOVs for a number of years now and most of them have stars or something else that looks more patriotic. A couple of years ago I decided to incorporate a some "generic" designs too after a recipient asked if I had a quilt that did not include stars. He just did not like them. Fortunately, I did have a rail fence quilt and I swapped that out with the one he had received. 

I was not offended at all. Instead, I was very happy because had he not asked, I'm sure that the quilt he received would be sitting in a closest somewhere or even for sale at Goodwill. 

After that incident, I always have a variety of quilts available and am happy to swap out one for another if the recipient wants to do so. All the quilts are made using red, white (cream), and blue fabrics and many also include some gold fabric. I feel that no matter what the design, the fabrics I use make the quilts look patriotic. Plus, they always have a QOV label.

I've got a very busy couple of weeks coming up and am not sure that I'll have pictures of all the quilts before they are presented at the Veterans Day program at school. If not, I'll be sure to get pictures at the program and post them.


What are you working on today?

Check out the quilters' eye candy at 


and

Saturday, October 27, 2018

It's Sew Time!

My Bernina 180 has been at the spa for a little while and I've been using my back-up/travel machine (Bernina 135). I don't mind using the 135, but it sure is nice to have my 180 back!


I've had this machine for 20 years (Jack bought it for me right before we got married), and I've loved every minute of sewing with it. Yes, I've used many of the more recent machines that have a lot of wonderful features like built-in scissors, dual feed, a really big throat space, etc., but I still like this machine. 

When I picked it up from the shop, Mike (the repairman) told me that this machine has more stitches recorded than any machine he's ever serviced. 😮 He said that he was impressed with the stitch count and surprised that very few of those stitches are from embroidery. Yep! I like to sew.  😃

I'm working on a couple of class samples and t-shirt quilts, but decided to throw in a couple more Quilt of Valor projects too. (You know, because I have nothing else to do. lol) 

Back in May, I made this quilt for a class. (For some reason I don't have a picture of the completed quilt!)


The pattern is Cheerful by Andy Knowlton of A Bright Corner. For the class, I made step by step samples and I used red, cream, and blue fabrics with the intention of making a QOV from it. I just stumbled upon the container with the samples and decided to finish it. Here's what I have so far. 


Everything has been cut and is ready to make the rest of the blocks. I even have all the sashing and cornerstones cut. This will be so easy to chain piece and complete! WooHoo! Hopefully I'll have a completed top by tomorrow evening.

What are you working on this weekend?

I hope it's fun and relaxing for you!

Thursday, October 18, 2018

Hypersonic - A New Pattern by Rachel Rossi

I've been teasing you with a few pictures of a new pattern that I recently tested for Rachel Rossi, but today I can finally show you the entire quilt. Yay!

I'm very happy to introduce Hypersonic 


Not only is this quilt cool to look at and make, but there's a secret code in the design. The pattern includes instructions to make three sizes (baby, throw, and twin) and you can make it following the exact layout that Rachel has. Or, if you want to step outside your comfort zone a little bit, Rachel has included instructions on how you can create your own variation using the code as the basis of your layout.  

So what's the code? Its the Fibonacci Sequence code and it's pretty cool. The pattern includes a brief explanation of the code and how to incorporate it in the layout of this quilt. I made my sample following the pattern exactly for the twin quilt, but I'm working on another one that is different and it's making me feel a bit like a math whiz. 😄 (I have to say that because I am far from a math whiz!)

This is a fun quilt to make and I was honored to test it. Here's Rachel's blog post about the new pattern, including some really awesome pictures. 


Rachel always captures her quilts in some amazing pictures, and this one above is one of my all-time favorites. 

This pattern is very well-written and easy to follow. I found the cutting instructions easy to follow, even though they look intimidating at first. There is a separate page with cutting instructions for each size, which I really like! I don't always love it when the multiple size options are listed in parenthesis because it is too easy to misread and miss-cut something. 

Another really neat thing about this pattern is the coloring page. Instead of using crayons or colored pencils, I used strips of fabric to get a visual of how my quilt was going to look. 


I did move a few fabrics around to avoid a concentration of certain colors. I REALLY liked doing this.

The curved pieces on this quilt look challenging, but they were very easy. They were appliqued using a technique involving interfacing so you don't have any raw edges. I've used this technique before and love it.  It's easy and precise! Rachel suggests using mono-filament thread to stitch the pieces down, but I used matching thread color. 


Is it sad that all of the fabric (except the backing), and thread for this quilt came from my stash?

I like this quilt so much that I just had to take a bunch of pictures.  

This twin quilt is a decent size - 62" x 90" so I took pictures from the balcony again. I'm not sure how I missed getting my husband in the pictures, but I did. 


I've become quite fond of taking pictures of quilts hanging from a tree limb, so here's another one.  :-) 


And of course I have to take a picture of just about every quilt I make with it hanging on the wood pile.


I decided to quilt this with a swirly design to counteract the linearity of the piecing. I liked the results. 


I machine bound this quilt, using my flange binding technique. I am very pleased with the little splash of color along the edge.


Before I quilted this, a couple of the grandkids wanted to use it as a backdrop of one of their "shows," so of course I obliged. The only problem was that they liked it better hanging upside down.


The girls said that they liked it upside down because it reminds them of melting ice cream and that made them laugh. Yep! I can see that and the discussion quickly moved to the idea of having a snack and of course it had to be ice cream. Yes, I obliged with that too.  😀


Upside down or not, I really like this quilt! 


It's too late to make this long story short, but I enjoyed making this quilt and know you will too. You can purchase the pattern, along with Rachel's other patterns HERE. I know you won't be sorry!

Monday, October 15, 2018

Design Wall Monday

Whew! It been a long time since I've posted. 

I am patiently waiting for the go-ahead to post my review for the secret sewing I've recently done for Rachel Rossi. I should be able to do it any day now and I'm pretty sure that you are going to like the pattern as much as I do.  :-)

In the mean time, I've been busy with all kinds of things, including sewing a bunch of Quilts of Valor. As it's been the last few years, October sees me working on these quilts so that I have enough to present during the Veterans Day program at Monroeville High School. Here are some links to previous years' presentations: 2017      2016

This is the quilt that is on the design wall right now.


This is a variation of the Stargazer pattern by Villa Rose Designs.

I should have this top completed tonight and will take an inventory of what I have and what I still need to do. I'm really hoping that I'm close to what I need because I have other projects that need completed too. (Yes, I do work on these throughout the year, but often life gets in the way and I have to make a few right before the program. I work well under pressure and when I have a deadline.)

What are you working on today?

Check out the quilters' eye candy at


and

Sunday, September 30, 2018

Sneak Peek

Remember when I showed these semi-circles...


and these fabrics? It was for a secret sewing project.


The quilt is complete and pictures have been sent to the designer, Rachel Rossi. Now I just need to wait for the pattern release so I can post pictures of the whole quilt. 

In the mean time, here are a few sneak peek pictures.


I really like this quilt and am super excited that all the fabric, except the backing, came from my stash. (No judging about how much I have in my stash, please.) 

Wednesday, September 26, 2018

Happy Results

I am working on updating some information and samples for a strips workshop that I'm presenting next weekend, so I sat down to do some sketching and a little math. 

Yep! I did the math - all by myself! 

A little background is in order here. I am the first to admit that math is not my strongest asset by any means, but I don't completely shy away from it either. I use the basics a lot when quilting, especially when I'm designing a quilt or resizing a pattern. Of course, it helps that I am married to a man who we affectionately call "The Human Calculator." He is always willing to help me when I get stuck. He really enjoys messing around with math and is very good at it. As a matter of fact, for the past five or six years he has tutored a number of junior and senior high school students in a variety of math disciplines including Algebra, Geometry, and Trigonometry. He loves doing that and the students like him and they learn. It's a win-win situation! 

So back to my project...

For the workshop, one of the first things I am going to show is how to take the basic Jelly Roll Race quilt and adjust it to make a variety of sizes. We won't be adding borders; but rather, we'll be doing the math to figure out how many strips are needed to make a quilt the desired size. Easy Peasy! 

Doing this got me thinking about how I might be able to change the quilt's design and not just the size. While I like the fact that a Jelly Roll Race quilt can be done very quickly, I don't always love the resulting look. Sometimes I think it just looks too choppy and not very pleasing. I really want to come up with a better way to either place the strips, cut them, or something. Anything!

I had some 2.5" strips that I didn't really love and I decided to use them for the test. After doing the math and crossing my fingers for luck, I cut 10 print strips and 10 solid-reading fabrics in half. I then sewed the strips together, alternating a print with a solid-reading strip. I ended up with one very long 2.5" strip. I cut the strip into equal lengths (36.5" because that's how wide I wanted my quilt top to be), and then I did the happy dance because my math worked - for the most part! 


I'll have to make a few tweaks when I sew the rows togethers so the solids match up correctly (see the middle rows), but that can easily be done. Doing this will result in the quilt being a bit smaller than 36", but I'm ok with that. (I realize that this happened because I did not verify that all of my starting strips were the same length before sewing. Lesson learned!)

I'm happy with this and will make a "real" version of it using fabrics that I really like.

I love it when a plan works!

Sunday, September 23, 2018

Fall in Fabric

I had the bright idea to make some placemats using Fall colors. To be exact, I was going to duplicate the colors of candy corn. I was thrilled to have a few minutes to steal away in the sewing room, sew the strips together, and then cut the triangles. Everything was going so well that I figured there'd be a good chance that I could get a couple made before Monday and I would take them with me to Chestnut Ridge when I take my wallet class.

I was a happy girl until I went to the grocery store and bought some real candy corn. Do you see the error of my ways?


The yellow is at the bottom of the candy, not the orange!

I guess it was a good thing that I didn't sew this placemat together before I went to the store. 


I've made another strip set and cut some triangles. Oh it's so much better!


This placemat looks so much better.


I played around with the triangles and will decide later what combinations I want to sew. I also need to make anther strip set so I have enough triangles. 


I'm glad I bought the bag of candy before doing any more sewing. :-)

These are quick and easy placemats and I know the grand kids will enjoy them.