
Sarah, over at Confessions of a Fabric Addict has put together another great Blog Hop and I'm excited to be a part of this group. I encourage you all to check out the posts from yesterday, as well as all the posts over the next 10 days. There will be some great projects shared, tutorials offered, giveaways, and a Quilt Along. It really is like Christmas, even though it's 90+ degrees outside.
Saturday, July 14th
Joy @ Days Filled With Joy
Selina @ Selina Quilts
Sunday, July 15th
Joanne @ Everyone Deserves a Quilt
Jan @ The Colorful Fabriholic
Monday, July 16th
Carole @ From My Carolina Home
Jamie @ L'Fair Quilts
Karen @ Tu-Na Quilts, Travels & Eats
Tuesday, July 17th
Sharon @ Vrooman's Quilts
Mary @ Made by Marney
Wednesday, July 18th
Karrin @ Karrin's Crazy World
Marian @ Seams To Be Sew
Thursday, July 19th
Christina @ Christina's Handicrafts
Sherry @ Books, Hooks, Sticks, etc.
Danice @ Homespun Hannah
Friday, July 20th
Kristi @ Confessions of A Fabric Addict
Wendy @ Pieceful Thoughts
Saturday, July 21st
Cindy @ Stitchin' At Home
Meloney @ Mel's Quilting Blog
Sunday, July 22nd
Anja @ Anja Quilts
Moira @ Quilted Snail
Monday, July 23rd
Brenda @ Songbird Designs
Amy @ Sea of Estrogen
Bonnie @ In Stitches With Bonnie
Tuesday, July 24th
Kathy @ Kathy's Kwilts and More
Summer @ Summer Lee Quilts
Wednesday, July 25th
Susan @ Quilt Fabrication
Brandy @ Pampered Pettit
Jean @ All Points of the Compass
***********************
Be sure to read all the way to the end of the long, picture-heavy post because there is a giveaway.
So here's the back story to the projects I'm going to share.
About a year ago, I participated in a Hoop Quilt Along organized by AnneMarie Chaney. I loved the results and made a number of hoop quilts. Like many quilt-related projects, I was hooked and not only made a bunch, but I taught some classes on this, and continue to do so. You can see some that I've made HERE.
This got me thinking about what other "quilty" wall art I could make. I wanted something really fast and easy because I thought these pieces could be replacements for quilts that I want to make for someone, but just didn't have the time to complete. (I know none of you have that problem, right?)
I started gathering supplies and decided that the first thing I would do was to simply wrap some fabric around a canvas frame. Here's that first project I made.

I started with a basic artist canvas that measured 12" x 12". These are available at any art store and many discount stores as well.

I decided on the fabric that I wanted to use, (part of the Holiday Traditions line by Jan Shade Beach for Henry Glass) and realized that the panel was not large enough to cover the 12" x 12" canvas I had. No problem! I'll add a border and that will act like a frame. So I measured the panel, trimmed it so there was a little of the grey and then did some quick math to determine how wide my border strips needed to be to cover the top, sides, and have some wrap around width. (The canvas is 1/2" deep.)

In order to cover the canvas and to wrap around it, I needed to add a 2 1/2" border on all sides of the panel that measured 9 7/8". To reduce bulk, I pressed all my seams open.

Easy peasy! Now I just need to put it on the canvas.
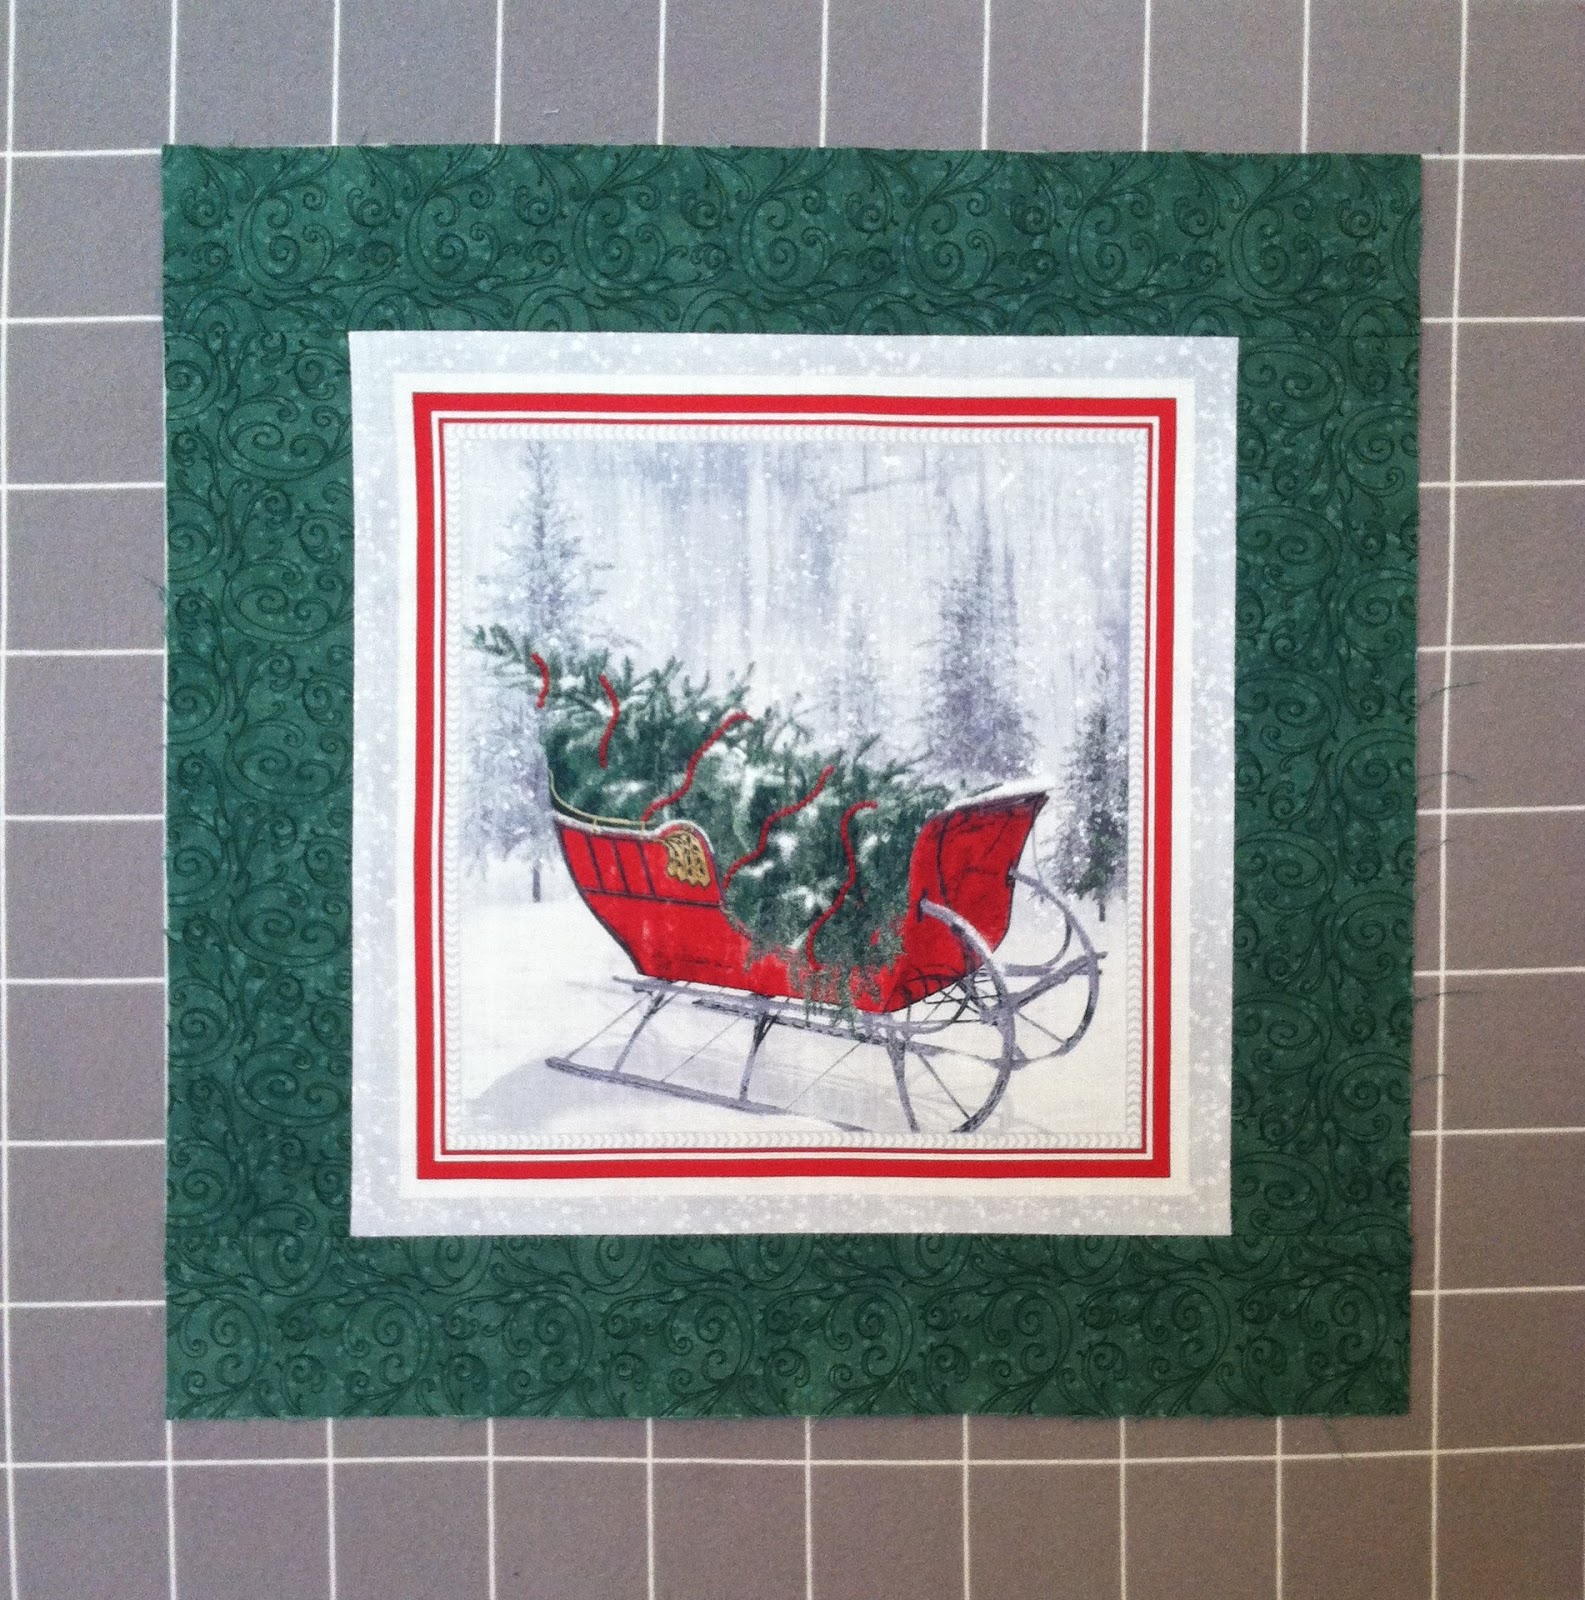
After thinking about it, I decided that I didn't want raw edges that could potentially fray, so I folded the edges 1/8" and pressed. I folded and pressed another 1/8" and them sewed a seam along the edge.

I decided to miter the corners because I thought it would look much nicer.

Next, I centered the fabric under the canvas. To do this, I marked the center of each side of the canvas (It's difficult to see this in the picture, because it's just a little pencil mark. Trust me, the marks are there.) I then folded the fabric in quarters to find the center points and I marked those with pins.

I started on the top and bottom and wrapped the fabric around to the back and secured the fabric with thumbtacks.

I made sure there were no wrinkles on the front and the fabric was secure. Bingo, I have a wall hanging to go along with the other projects I've made from this line.


I love this fabric line and have used it a lot. You can check out some of my other projects using this fabric HERE and HERE.
I couldn't just do this one project, so I played around with a few more ideas and this is what I came up with.
I had a few remnants of this snowman fabric and cut it down to fit into this oval frame. Had I had some coordinating blue fabric, I think I would have covered the matting with it so it really popped the snowman. Of course I could also just decorate the mat. :-)

I have a friend who loves butterflies and anything pink and brown. I had all of these fabrics in my stash, so I made her this little 8" x 8" picture. I simply fussy cut the butterfly and used that as the star center and then added the striped border. It was done the same way as the holiday sleigh above, although this is not a thick canvas, but one that is quite thin. This can be hung on a wall or placed on a stand as I've done here. (The border really is equal on all sides here. I just could not get a good picture of it.)

I think this little picture is great for someone for whom you want to make something, but perhaps not a quilt. It's still handmade and still "quilty."
Like many of you, I have a bunch of fabric scraps that were left over from finished projects and I really want to use them. A few years ago, I was commissioned to make a pinwheel quilt for someone. The lady picked the fabrics and I got started. It didn't take me long to decide that I needed to show her the progress to be sure that she wanted me to continue. I didn't love the fabric combinations she chose and really wanted to be sure that she did. She did, so I kept going.
There are very few pinwheel quilts that I've made that I have not loved, but that quilt was one of them. While going through my stash to pull fabrics for these "quilty" wall art projects, I came across scraps of those fabrics. Since the woman now attends the same church that I do, I decided to surprise her with something to go alone with her quilt. This is what I came up with.

I took the left over fabrics and made six pinwheels. I pieced them all together and instead of quilting them, I put them in the frame. Easy peasy!
The best part of this project is the construction of the pinwheels so they meet up perfectly in the center. The half square triangle (HST) units are constructed using the Magic Eight method, but there is some special piecing that I do to make the perfect points.
I layer the fabrics, right sides together. The light fabric has an X drawn through the corners.

Sew 1/4" along both sides of the drawn lines.

Cut the pieces apart on the drawn lines as well as through the middle, both vertically and horizontally.

Press the seams to the dark fabric and trim the HST to the desired size (3 1/2" for my project).


If you start sewing at the end that doesn't have the diagonal seam, you will stop when you come to it. Does that make sense?

Here's a better picture showing the 1/4" start and stop points. Press to the dark fabric, which will result in seams that nest when put together.

When you sew the two half pinwheel units together, be sure to sew with an accurate 1/4". Doing this will have you sew right along the X that is created from the previously sewn seams. (See right in the middle of this picture.)

Look! Perfect center points, every time!

To reduce bulk at the center point, gently press the center seam so the pieces open up. One half will press up and the other will press down. You'll also be creating a mini pinwheel on the back side. Be sure to press from the front to make it lay flat.

I'll be giving this "quilty" wall art to the lady at church later this month and I'm sure she'll be surprised.
And finally, I did one more "quilty" art project.

I reverted back to the hoop concept and simply quilted some background fabric, made a simple set of pockets, and hooped it to create a fun sewing room storage piece.
The background fabric is a Peppered Cotton that I simply meander quilted. The pocket is from the Studio e line My Happy Place; and I simply interfaced it for stability, folded it in half and top stitched along the fold. I then lined it up with the bottom edge of the background piece and sewed a seam down the middle to create two pockets. I then sewed along the sides and bottom to stabilize everything.

I hooped all the layers, centering the pocket seam with the top of the hoop.
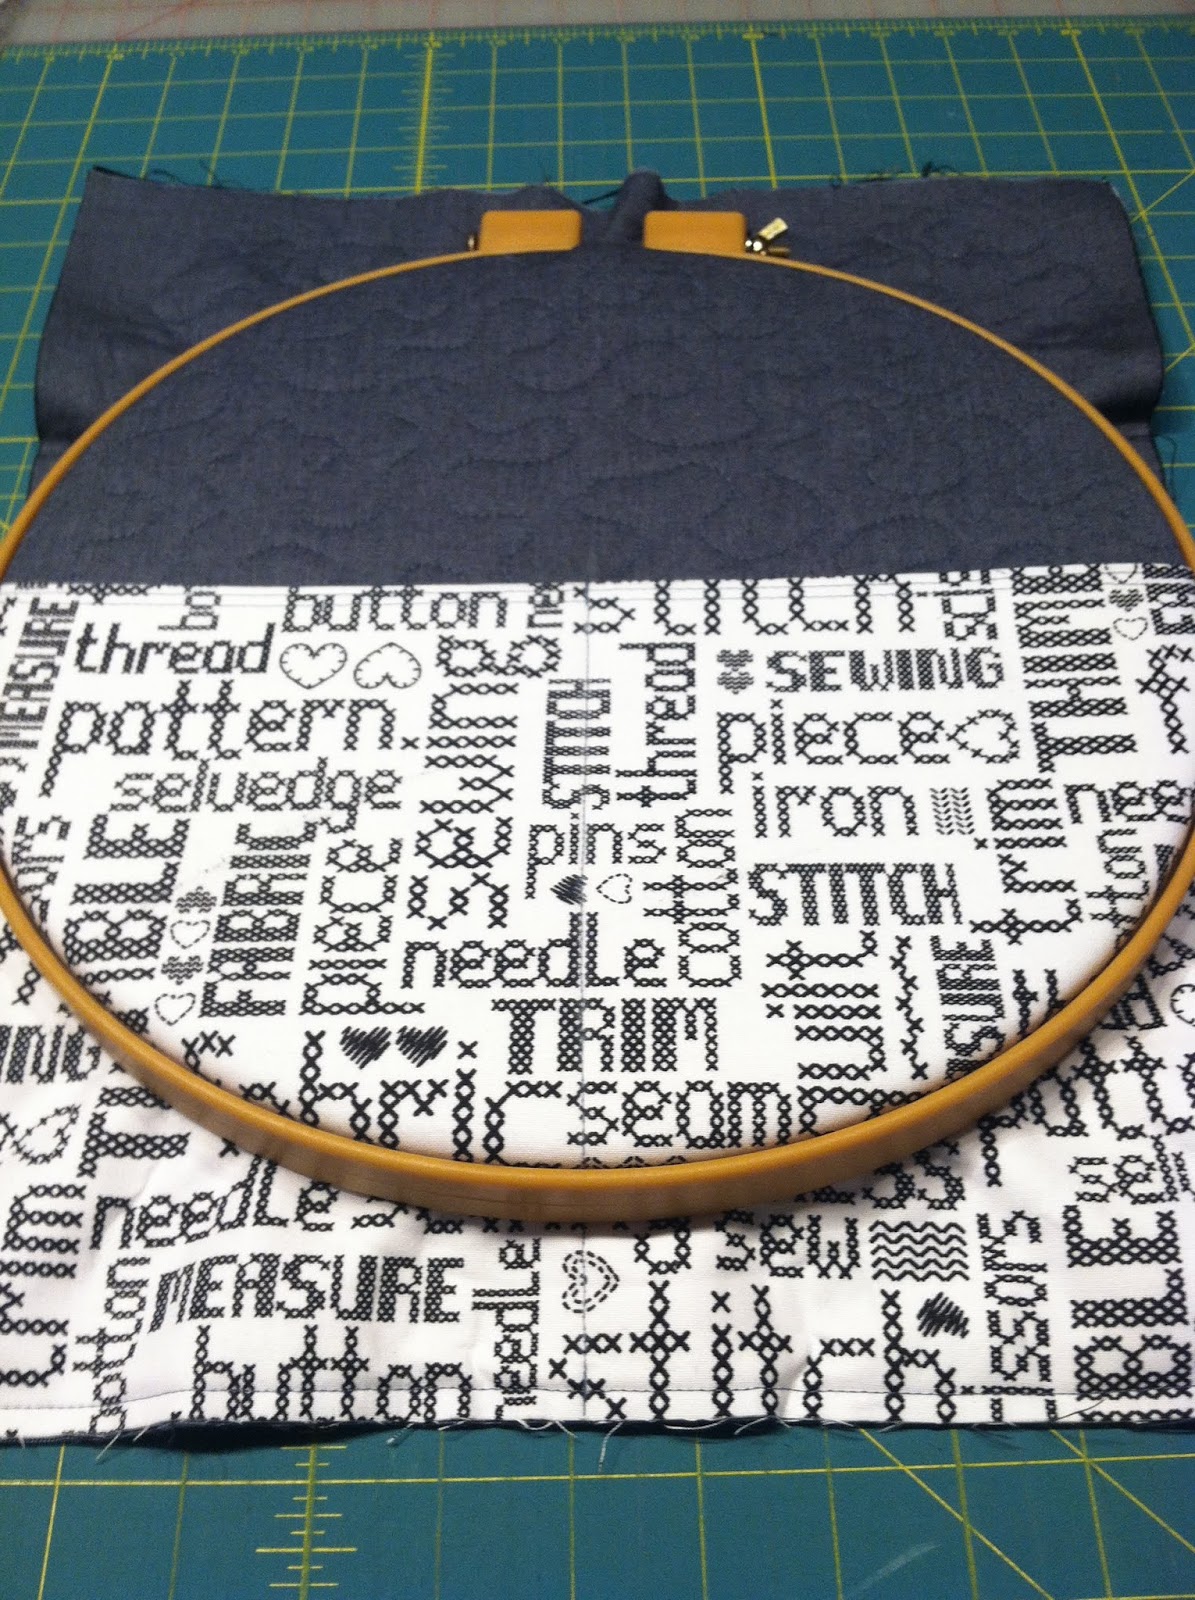
Here's the back - another Peppered Cotton by Studio e

I trimmed the edges, stitched them to stop fraying and then folded them around the back and glued in place.

I thought about wrapping the hoop with fabric, like I did with the original hoop quilts, but I decided against it. I like it like this!

Whew! Thanks for indulging me with reading about my projects. I am kind of OCD and when I start something, I really can't just make one.
If you are still reading this, I'm sure you're wondering about the giveaways. Since you've spent so much time here, I'm giving away two items.
First up, one lucky winner will receive the sewing hoop above. A second winner will receive a set of two canvases, a 12" x 12" square (1/2" think) and an 8" x 8" thin canvas.
To be entered in the giveaway, be sure to comment below. I'll pick a winner on Thursday, July 26th, the day after the hop ends. I'd love to have you follow me, but that is not required to be entered to win. Also, please be sure that you are not a no-reply blogger. I need to be able to contact you, so be sure I can reply to you. If you aren't sure, leave your e-mail in your comment.
64 comments:
Thanks for all the great ideas. I especially like that most of them are small, quick, and use scraps. I think I finally have it set to email reply, but if not: shades00(at)@gmail(dot)com
What great ideas! I think my favourite is the butterfly.
Great post. Thanks for participating in the hop. As a new quilter, I ESPECIALLY appreciate your tip on stitching perfectly matched pinwheel centers!! Thank you for sharing that information.
xx, Carolo
Thanks for your framing ideas. So much inspiration!
These are such great projects - love the tutorial on half squares - just what I need as I struggle with matching points!
Love the hoop and frame. Great gifts or something nice to keep.
petuniakr@aol.com
Love your canvass idea!
What fun ideas. I have so many orphan blocks that this would be wonderful to make up for quick gifts.
Great Job. I've been curious about mounting fabric on a canvas. Yours directions will certainly help. Thanks.
Thanks for sharing all of your quilt wall art projects. My favorite thing you shared is the pinwheel tutorial. My point matching is hit or miss. Sometimes every center matches beautifully and other times they are off just enough to drive me crazy. I never would have thought of your 1/4 inch trick.
Such fabulous ideas, Joanne! I especially like having a way to use those Christmas panels. And FYI, I saw another good one recently for orphan blocks - the artist attached them to the back of the panes of an antique window so you could see them through the glass. So cute, and hung in a window, instant stained glass!!
What good ideas! Quick easy projects that look great and would be fun to make as gifts. I have thought to frame some orphan blocks, but finding square frames isn’t easy. I never thought to use artist con as. Thanks.
It's nice to see some project ideas that aren't quilts yet are quilt related. They still have your signature. Thank you for participating in the hop and giving all the readers, not just me, great fodder for Christmas in July.
You've shared so many great ideas to showcase sewing projects! I hadn't thought of putting a project into a frame or onto a canvas. Now you've got my mind reeling with ideas!
Great ideas, love your hoop idea I think their are gifts in the future for some special quilting friends .
hjrogers@sympatico.ca
Great gift idea and tutorials. I love the canvas projects!
Great ideas for gifts! Thank you for sharing.
Wow the canvas is such a great idea! Thanks!
What a terrific idea. I love the little ones where you have the option to use a stand or hang it on the wall. The creative potential is going to be awesome. I have a great place to hang that hoop in my sewing area. I would like to hang yours vs. having to make one for myself ;}
Terrific post, so many great gift suggestions! And thanks to Sarah's 12DCIJ, there's plenty of time for making them between now and December.
Cute idea with the hoop sewing organizer!
barbkaup(at)(yahoo)(dot)(com)
Really great ideas! I’d love to know more about how you cover your hoops with fabric. It really gives them a beautiful finish!
Such good ideas, thanks for being part of the hop. I have made several hoop art projects like yours, one was a hand embellished art project that took weeks to complete! I've done the small ones for ornaments like you have as well, perfect little ways to use the cute tiny panels. Don't enter me in your drawing, I have plenty of hoops and canvases. I am going to see if one of the canvasses will work with your idea! Thank you for sharing your process.
I love your projects. I will have to try some of them. I also love your method for pinwheels.
Thanks for sharing your wonderful ideas. I often have a panel that I don’t know how to quilt. Putting it on a canvas is a great idea.
really cute projects
Beautiful projects! I love your canvas and the snowman ornament is adorable.
What lovely useful ideas you have shared. I just picked up some hoops on our sharing table at guild. Now I know what I can do with them. Thanks for sharing your ideas.
You are so clever. I love the idea of the hooped sewing caddie! Thanks for sharing. Janice,snell@gmail.com
Thanks for offering a giveaway to go along with your stop on the 12 Days of Christmas in July Blog Hop!!
I enjoyed seeing all the stuff you made, especially the hoop project to hold stuff. Very creative. Thanks for sharing your ideas.
Thanks for all the lovely ideas. I really like the hoop idea. I think I know just who needs one...me!
kthurn(at)bektel(dot)com
thank for all the great ideas, who doesn't have scraps, and someone who i just want to make something for,but as you said, don't always have enough time!!!
That’s a whole lot of crafty goodness for the holidays! Thanks for sharing.
Those canvas projects are so innovative, but the hoop is great. You gave us such details and photos. I know how much there is behind this, hope I do as well on my day.
Thank you for the tutorial to some great projects! I love the canvases! Thank you!
Great ideas for all those orphan blocks I always have laying around
Thanks for sharing all these great ideas!!
Love the idea of the canvas to showcase a block. Many wonderful shares - I want to make the pocket hoops , so great inspiration to get going on those.
Absolutely All Great Projects! I especially love the hoop frame storage display! I will be making one of these for my daughter-in-law as a housewarming gift! She is lucky enough to have a spare room to dedicate to sewing! Awesome Stuff! Thank you for sharing your quick tutorial! Anita Jackson of quiltlovefordomesticfelicity@gmail.com
I love your canvas block idea. I see so many beautiful panels and never know what to do with them. thanks for sharing your great ideas.
Love your ideas. Thanks so much for sharing.
What a neat idea! Never thought to do something like that. I'm thinking some of these for each season, say Halloween, Fall, Thanksgiving, Christmas, etc. Perfect as gifts too! Thank you for sharing and thank you for the opportunity to win your giveaway!
The sewing hoop is BRILLIANT❗❗
Thank you for sharing.
Merry Christmas🎄🎄🎄
The sewing hoop is such a unique idea. Thanks for sharing.
Great idea for the sewing hoop. And I love the idea of using canvases for 'framing' panels as art. Thanks for both ideas and for the giveaway.
WOW! I love the information on using the canvases to create fabric pictures.
The sewing hoop idea is pretty neat as well. I could see it used for Christmas cards as well.
Have a great day,
all of your projects are wonderful ideas. thanks for sharing and the give a way.
quilting dash lady at comcast dot net
Great fast and easy projects to share and give away. Thank you for the give-a-way, Mary.
mary4gen@cox.net
What a nice collection of projects. Thanks so much for sharing these great ideas, and the giveaway.
What a great way to display small projects and panels. Thanks for sharing your idea.
So many great gift ideas...thank you! I love the idea of wrapping a block around the canvas and that hoop is so cute.
Wow - love the idea of using the canvas - will have to try it!! mumbird3atgmaildotcom
Never thought of putting fabric on a canvas. Susanpshaffer@gmail.com
What great ideas. I would not have thought to mount a project to canvas -- great way to decorate. Thanks for sharing.
Wow the sewing hoop idea is great. So cute and useful.
thanks
Great ideas. Thanks for sharing!
I love the canvas art idea! I think it's a great way to use Christmas fabric.
nikilsend(at)outlook(dot)com
Thanks for ideas and tips, the pinwheel one for sure...
Great projects...I too bought a bunch of the fabric panels...Loved it but yet to work on it.... tyty again for doing the desire to inspire challenge. .I enjoyed looking at your pictures back then too.... happyness04431@yahoo.com
I love all your arty projects! My favorite is the first one on the canvas frame... oh and the little snowman in the oval frame... and.. oh, I love them all! Thanks so much for sharing! xx
So many great gift ideas-too hard to pick a favorite! Thanks for the detailed instructions, now to get busy.
Cute ideas, I love the idea of creating a pocket with the quilting hoop. You have many creative idea. Thank you for sharing and participating within the blog hop!
Beautiful Thanks for sharing! ❤❤❤ Merry Christmas
Post a Comment