Even though our temperatures have been in the 90's all week,
we are celebrating Christmas in July
with a continuation of the
12 Days of Christmas in July Blog Hop

Thanks to Sarah - Confessions of a Fabric Addict - for organizing this hop.
And in case you haven't see it already, Sarah is hosting a Christmas Quilt Along.
If you sew for just one hour a day, for twelve days, you'll end up with a really neat quilt that measure 76" x 76".
What a deal.
Sarah, you are awesome!
*******************************
Joining me today and providing a tutorial for a machine applique pillow cover with a string of Christmas lights is
Like me, Paige is offering a giveaway so be sure to check out her site.
*******************************
In case you missed a day or two of the hop,
here's a complete list of the participants.
July 14th: Sharon Vrooman @ Vrooman’s Quilts
Carole Carter @ From My Caroline Home
July 15th: Yanicka Hachez @ Finding Myself As An Artist
Chris Dodsley @ Made by ChrissieD
July 16th: Marsha Hodgkins @ Quilter in Motion
Leanne Parsons @ Devoted Quilter
July 17th: Tonia Conner @ All Thingz Sewn
Selina @ Selina Quilts
July 18th: Lara Buccella @ Buzzin Bumble
Soma Acharya @ Whims and Fancies
July 19th: Joanne Harris@ Quilts by Joanne
Suzy Webster @ Adventurous Applique and Quilting
July 20th: Vicki in MN @ Vicki’s Crafts and Quilting
Jennifer Fulton @ The Inquiring Quilter
July 21st: Michele Kuhns @ Crayon Box Quilt Studio
Jan Ochterbeck @ The Colorful Fabriholic
July 22nd: Alla Blanca @ Rainbows. Bunnies. Cupcakes.
Zenia Rene @ A Quilted Passion
July 23rd: Joanne Hubbard @ Everyone Deserves a Quilt
Paige Alexander @ Quilted Blooms
July 24th: Carolyn Jones @ …by CJ
Tisha Nagel @ Quilty Therapy
July 25th: Susan Arnold @ Quilt Fabrication
Beth Sellers @ Cooking Up Quilts
Linda Pearl @ One Quilting Circle
*******************************
Like my blog title says, I believe that
Everyone Deserves a Quilt
and I think that
Everyone Deserves a Christmas quilt too.

This quilt will finish approximately 57" x 75", but it can easily be adapted to be larger or smaller.
There are two repeating blocks for this quilt, and each one finishes 9". You will be making 18 star blocks and 17 chain blocks.
When I saw these fabrics, I knew that they were just screaming to be made into a lap quilt. Since I didn't have a real definite plan when I was buying the fabric, I had to do some quick estimations and keep my fingers crossed that I guess correctly.

As soon as I got home, I started sketching and it wasn't long before I knew exactly what I wanted to do. And thankfully, I had bought enough of every fabric. YAY!

So what do you need to make your very own quilt?
Star Background Fabric - 1 3/8 yards
Star Center - 5/8 yards
Star Points - 1 yard
Chain Block Center and Corners - 1 yard
Chain Rectangles - 7/8 yard
Border 1 - 1/2 yard
Border 2 - 1 1/4 yards
Binding - 2/3 yard
Star Blocks (Make 18)
Cutting
Star Centers
*Cut 3 strips, 5" x WOF (width of fabric) and sub-cut into 18 - 5" x 5" squares.
Each strip will yield 8 squares, so you will only need to cut 2 squares from the last strip.
Star Background Fabric
*Cut 5 strips - 5" x WOF. Sub-cut into 70 - 2 3/4" x 5" rectangles. Each strip will yield 14 rectangles.
*Cut 6 strips - 2 3/4" x WOF
From 1 strip, cut 2 - 2 3/4" x 5" rectangles AND 12 - 2 3/4" x 2 3/4" squares
From the remaining 5 strips, cut 60 - 2 3/4" x 2 3/4" squares
Star Points Fabric
*Cut 11 strips - 2 3/4" x WOF. Sub-cut into 144 - 2 3/4" x 2 3/4" squares.
Each strip will yield 14 squares.
Assembly
Draw a diagonal line on the wrong side of the star points squares. Lay a star point square right sides together on a star background rectangle. Be careful of the orientation of the drawn line. You may find it helpful to place a pin in the corner, as shown in the picture below.

Draw a diagonal line on the wrong side of the star points squares. Lay a star point square right sides together on a star background rectangle. Be careful of the orientation of the drawn line. You may find it helpful to place a pin in the corner, as shown in the picture below.
Sew along the drawn line. Trim 1/4" from the sewn line.


Press to the corner (star point).

Each star block will have four of these units, so you will need to make a total of 72 of these.

Now we are going to do the same thing to the other side. Remember to watch the orientation of the drawn line. It doesn't matter which direction you sew, Do whatever feels the most natural or creates the best results.

Trim and press as before.

Oops! I forgot the picture of the finished flying geese unit!
Once you've completed all 72 flying geese units, you are ready to sew the star block together. YAY!!
Lay out the block as shown below. Each star consists of one center square, four flying geese units, and four corner squares. Isn't this pretty?

All we have to do now is sew each row and then sew the rows together!

I'd like to share a few tips that will help you sew and keep those points we all so desperately love in star blocks.
When sewing, sew with the flying geese unit on top and the solid piece close to the feed dogs. Not only will this allow you to watch the seam allowance direction so it doesn't get flipped over, it will also ensure that you get nice sharp points.
In the picture below, you are sewing the flying geese unit to the star center square. Can you see the X that is created from your previous seams? Use this as a guide to know exactly where to sew to maintain the points.


I also find it helpful to add a few extra pins so there is no shifting when I'm sew the units together. I especially like to place a pin near the end of the seam I'm sewing as well as along the perpendicular edge. I know it's extra time, but I think the results are well worth the time and effort.
Back to the block construction...
Press the top and bottom row to the small corner squares and press the center unit to the large center square. In other words, press away from all of the flying geese units.

Once all of the rows are sewn, sew them together. Follow the same procedure for hitting the X to keep those points sharp.
WooHoo! Make 18 of these beauties.

Are you still here? Great!
Just a little bit more and then the fun begins.
Don't forget that once we've got the quilt top together, there is a giveaway. :-)
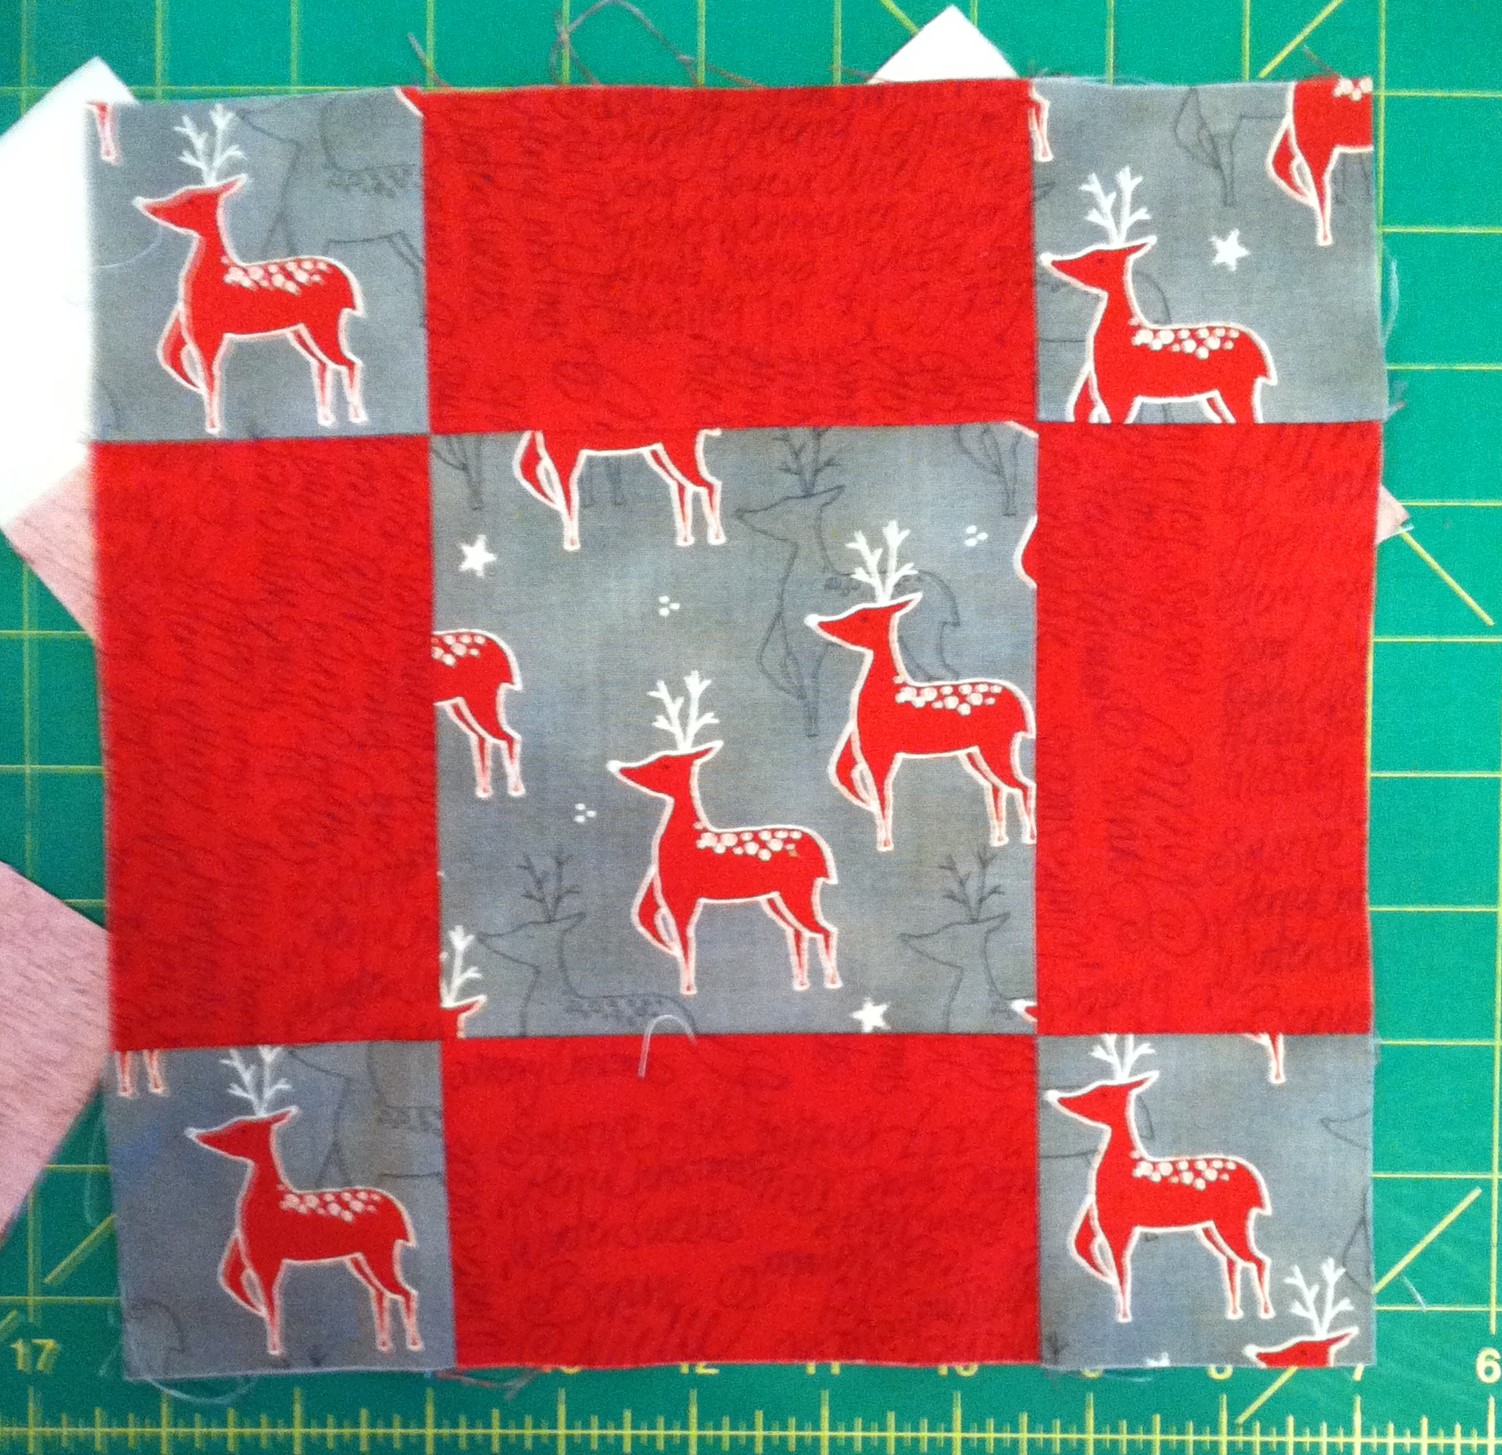
Chain Blocks (Make 17 )
Cutting
Chain Centers and Corners
*Cut 3 strips, 5" x WOF (width of fabric) and sub-cut into 17 - 5" x 5" squares.
Each strip will yield 8 squares, so you will only need to cut 1 square from the last strip.
*Trim the remainder of the last strip to 2 3/4" x WOF (approximately 35").
Sub-cut the strip into 12 - 2 3/4" x 2 3/4" squares.
*Cut 4 strips - 2 3/4" x WOF and sub-cut into 56 - 2 3/4" x 2 3/4" squares. Each strip will yield 14
squares. A total of 68 squares is needed.
Chain Rectangles
*Cut 5 strips - 5" x WOF. Sub-cut into 68 - 2 3/4" x 5" rectangles. Each strip will yield 14 rectangles.
Assembly
(I promise that this block is very easy and will go together much quicker than the star blocks!)
Lay out the block as shown below. Be careful if you are using a directional fabric like I did.

Just like with the star blocks, sew the units into rows and them we'll sew the rows together.

Press towards the rectangles.

Now sew the rows together to finish the block. (See, I told you this was much faster than the star blocks!)
Quilt Top Assembly
Lay out the blocks following the picture below. You will have seven rows of five blocks each. Rows 1, 3, 5, and 7 will begin and end with stars and rows 2, 4, and 6 will begin and end with chain blocks. Again, be careful if you have used a directional fabric.

With the star blocks always on top, carefully sew rows together. Because the star blocks will be on top, you will be able to see the X and maintain those perfect points.

Remember when I told you that I like to take the time and add extra pins? Now would be a really good time to do that!

Press towards to chain blocks, which will help reduce the bulk that is created at the intersections.
Press all of the rows in one direction. Out of habit, I press up. The quilt top should measure approximately 45 1/2" x 63 1/2".

Yay! It's time for borders and then the giveaway!
Cut 6 strips - 2" x WOF. Diagonally piece all of the strips together. Trim and press seams open. Measure the length of the quilt and cut 2 pieces that length.
Sew these to the sides and press to the borders.
Measure the width of the quilt, including the newly added side borders. Cut 2 pieces that measurement and sew them tot he top and bottom of the quilt top. Press to the border. The quilt should measure approximately 48 1/2" x 66 1/2".
Border 2
Cut 7 strips 5" x WOF. Diagonally pieces the strips together, trim and press seams open. Following the same procedure as before, add the border to the sides first and then the top and bottom of the quilt top. Press to the borders.

And there's your completed quilt top!
This was as close to a winter/Christmas picture as I could get. The firewood reminds me of the cold and I can't wait to snuggle under this beauty while sitting by the fireplace.

I'd love to see quilts made using this tutorial!
***The Giveaway is CLOSED***
And now for the long-awaited giveaway...
Do you send out Christmas cards?
Here's your chance to win 20 beautiful cards
and the stamps to go with them.


On Sunday, July 31st, I'll randomly select a winner from the comments left here on my blog.
65 comments:
You have designed a beautiful Christmas quilt. Your instructions are very clear and it's a great size for a sofa quilt. Thank you for a great tutorial. I am from the UK so may not be eligible for your giveaway, but I still like to comment on great blog posts.
Smiles
Kate
Your holiday quilt is beautiful!! Thank you for the tutorial and tips to make one! I love the holiday cards - and thank you for the giveaway!
I love the fabric you used in your quilt!! Who is the designer? I missed it if you said!!
Great design and such clear instructions. Cards, I send some to special friends, and then have one each for the family to go with their present. But as I am in New Zealand, may not qualify either , however like Kate from the UK that shouldn't stop us from leaving some words. This has been a truly fab hop, and what a wonderful way to meet new quilters.
Love your quilt design and as a new quilter really appreciate the very clear instructions. Like Kate, I'm in the U.K so may not be eligible for the giveaway but just wanted to thank you for all the hard work you've put into this.
annamariehlustik@googlemail.com
The quilt is so pretty and I'm sure it will be perfect for snuggling under this coming winter.
What a beautiful quilt! And, yes, I still send out Christmas cards. Sadly, I think it's becoming a lost tradition. I love watching for the postman to come each day during the month of December!
What a beautiful quilt! And, yes, I still send out Christmas cards. Sadly, I think it's becoming a lost tradition. I love watching for the postman to come each day during the month of December!
Joanne, just beautiful! Your quilt has a great balance of lights and darks! You can never go wrong with stars! Your tutorial is excellent! The piecing and pressing tips are most helpful! Thank you for sharing!
I have sent out cards for years.. Sadly my list is growing shorter as most of my recipients were elderly and no longer with us. Great quilt design and your fabric is perfect.
Love your quilt-and I agree, everyone deserves a Christmas quilt!
Give your quilt- great reindeer fabric- love that grey! The cards are lovely too, I love birds!
Love love love your quilt, Joanne, and you did a wonderful job with the tutorial! Thanks for posting the tip about the flying geese blocks - I forgot to add that to mine! Thank you so much for all the time and effort you put into making the hop a success, too!
Thanks for the beautiful Christmas quilt-I love these fabrics! Thank you for the tip on the "X" I will definitely start using this from now on.
your quilt is lovely. thanks for the tutorial and the tips.
ohh what a fun give a way. thanks for the thought and for sharing.
Your quilt is sew pretty. I love the fabrics you used. I actually do not send Christmas cards but my mother loves to so if I am the lucky winner I would be gifting my mother (who is on a limited income) this great giveaway. Thanks for the giveaway and for sharing your cute quilt.
I love the red and grey together! I would never had gotten that idea. Thank you for the pictures with the tute on the star. I'm a newer quilter and appreciate seeing how to make them.
mindingmomma at aol dot com
Loved the christmas quilt easy to follow along...The fabric was very pretty.... happyness04431@yahoo.com
Beautiful quilt!! Love the design and colors you selected! Thanks for the tutorial.
I love your quilt. Beautiful. Yes I send out Christmas cards thanks for the chance to win these lovely cards.
Just in time for a Christmas quilt. A very stunning quilt and you have a well written tutorial that is so easy to follow and understand. Thank you for sharing with all of us and giving us this chance to try and win those Christmas cards. Yes I do send out cards still to family and friends.
Sandi Timmons
sandit1@sbcglobal.net
Love your Christmas quilt. Thanks for taking the time to make the wonderfully detailed tutorial.
This is a lovely Christmas quilt. A beautiful combination of traditional blocks and modern fabrics. I send out Christmas cards. I usually jot down a few lines of what's happening at our house. There's nothing like a personal message.
Thanks for the giveaway!
That is really pretty, Joann. Thank you for the great instructions on creating one of our our. It is so festive and pretty for the holidays.
Thank you so much for the tutorial. Your Christmas quilt is just beautiful. I love the fabric choices. Yes, I still send out Christmas Cards. I just retired as a Postmaster at the USPS and enjoy letter writing as well as anything sent through the mails. Thank you so much for your giveaway!!!
Oh I love your Christmas quilt, what a great tutorial so simple but stunning and the colours are fab :D #12daysofchristmasinjuly
Love how the red and gray play in your quilt. Thanks for sharing!
Your Quilt is AWESOME!!! Thank you for the GRRRRRREAT Tutorial too!!
I do send out Christmas cards every year! Even tho we don't get many in our mailbox...I love making sure folk's get warm wishes & hugs in their mailboxes!!
Thank you too, for chance to win your Give-a-way!! :D
My first time at your blog and I'm impressed. Will definitely be making this quilt out of some gorgeous red and white flannels I bought recently with no idea of how to use them. Now I know!
And if I should be the one to win the cards, well, that a great bonus! thanks so much!
Thanks for a great post with great ideas! Thanks for a neat Giveaway too!
msstitcher1214@gmail.com
Beautiful quilt and what a great tutorial! We do send out Christmas cards and a newsletter that is written from our dog's perspective. Everyone tells us how much they look forward to reading this letter each year. One year it was getting late, so we skipped the newsletter and boy, did we hear about it!
Love your Christmas quilt! Thanks for the pattern! You sure do accomplish a lot! Will be glad when I can get back to quilting. Nancy
Thanks for the tutorial for your awesome Christmas quilt. Very detailed instructions. Also, thanks for such a great giveaway!!
Linda "Cookie" Lawrence
lbcookie1@gmail.com
Beautiful quilt! Thanks so much for sharing the pattern!
Love your 2 block Christmas Quilts - awesome tutorial and love that you add the pressing directions too - that's important to me. Beautiful fabrics (I don't send cards, so leave me out of the give away)
What a lovely quilt! Your fabrics are awesome. The tutorial is clear and I love the tips. Awesome job! Thank you so much.
Love your Christmas quilt! Colors, fabrics are perfect!
Great star quilt. I have fabrics for a quilt for my brother, and this pattern would be great for those fabrics. Thanks.
Love your quilt, and the photos with the directions are excellent. Thank you so much for your efforts
Your quilt is really pretty, and you have a lovely idea for a giveaway. If I'm the winner, I'll be donating the cards and stamps to our local Ronald McDonald House, so that families who find themselves staying there over the holidays can send out a card to faraway friends to let them know what is happening in their lives. (Some relatives don't have email--especially older ones--and appreciate a written note. Also, people like to write letters at the holidays and during particularly meaningful times, such as when their children are undergoing health crises.) Thanks for giving me an idea of something I ought to do even if I don't win your giveaway; there are always so many ways to help out at a Ronald McDonald House.
This quilt is so wonderful! I will definitely be making this one, thanks!
Thank you so much for the lovely quilt and the giveaway. This quilt is definitely on my list of quilts to make for Christmas. Have an extensive quilt list!!
Thanks for your well-written tutorial on such a pretty quilt. I may end up featuring cats instead of Christmas, but want to make this pattern for myself!
Thanks for the tutorial. So many possibilities.
Such a beautiful design, great looking fabric that you picked too. Adding this one to my list. TFS!
Lovely Christmas quilt! I especially like your choice of slightly un-traditional Christmas fabrics.
Thank you for your wonderful tutorial and a chance to WIN!!!
I love your beautiful Christmas quilt! Thanks for sharing the pattern with us!
I have been holding Xmas fabric for a few years and have now found a home for it. Thanks for your beautiful pattern.
What a lovely quilt. I'm saving that idea for a near future quilt! Thanks for the opportunity to get an early start on Christmas cards, too...fun!
Joanne, your quilt is so warm and cozy looking - so perfect for Christmas and all winter long! I never can resist stars! You did a wonderful job writing the tutorial too! Giving away Christmas cards is such a fun idea.
You are too generous. Beautiful quilt and a giveaway.
Love the quilt. The fabric is gorgeous! You've managed to get me into the mood for some Christmas sewing!
I thought I had commented, but I don't see it. I like your quilt very much, the non-traditional colors are wonderful. Visiting from the Blog Hop
What a beautiful quilt with perfect fabrics! Yes, I do send out cards, but a couple years ago I started sending them out between Christmas and New Years, it helped my stress level! Now I take the quiet time during that week to write my notes and get them in the mail, I like to believe it helps stretch out the happy holiday mood :)
What a beautiful quilt and you are so kind to give us your tips on how to keep our points from being cut off as we sew. Love the cards! Thanks for the give a way.
I'm sitting in a hotel on vacation and wishing I could sit at my machine and sew this up!! It looks so beautiful!! Did you try sewing the long strips and then cut them apart for the chain block? Just wondering if that would work vs cutting all the small squares.
always and I usually include a letter with an update on what's been happening in my life this year
What a beautiful quilt! I have always loved star blocks and the red and grey look gorgeous together :)
I'm surprised how much gray is being used this year, looks great in your beautiful quilt. Thank you for all the time and effort you put in your tutorial. This makes it hard to make a mistake. But if there is a way I'll find it. I do such stupid thing sometimes.*-)
I love star quilts, and yours is beautiful !!! The colors are so rich! Thank you for the pattern!
That's a great giveaway! Thanks for the chance to win. I LOVE your Christmas quilt. Simple and Stars, perfect! The second blocks could even be done as leader-enders as you make the stars! dezertsuz at gmail
Beautiful work and great tutorial. I have some christmas fabric i can use, can't Wait to get started
Those fabrics really look great in your Christmas quilt. Thanks for the directions. I'm very tempted to try this quilt.
Yes, I do mail Christmas cards! My husband thinks they're outdated in this electronic age... However, I enjoy connecting with loved ones & friends to let them know I'm thinking of them and care about them. Christmas is about love and that is always worth sharing!
Thank you for the great tutorial! Your quilt is lovely!
Post a Comment