Friday, December 31, 2021

Quilt Wrap Up - 2021

As has been pretty darn obvious, I have been away from the blog for a few months. Life just got crazy and I had to make decisions on how to spend my waking hours. Blogging was put on the back burner, and I'm ok with that. 

When I made that decision, I vowed to post some pictures near the end of the year to share some of my projects. I guess I can't get any nearer to the end of the year than this, can I?.  hahaha 

So here it goes... lots of pictures and some explanations and in no particular order. There were other projects, but I chose a handful to share. Here's to hoping 2022 is more blogger friendly for me.  :-) 

Isn't this beautiful?

These sets are just one side of a pattern I recently tested for Myra of Busy Hands QuiltsLet me introduce you to Belle!


I have to say that I fell in love with this quilt while making it. I love all the fabrics and how I was given free rein to place them as I wanted. I will admit that scrappy, even controlled scrappy, is not always easy for me. I am working on that and beginning to enjoy the process and results more each time I do it. 

I made a few other quilts for Myra and have enjoyed them all. Patterns are available for all of these. Here's the link to her website - Busy Hands Quilts

This is Forever Stars. This is a very easy quilt to construct and I love the results. I've made two of these for Myra and one that I gave away as a Quilt of Valor. Do I have pictures of those? Of course not. I guess my picture taking was put aside like my blogging. 
This is a queen size Brick Cottage Lane 2 and it is beautiful. There is a consistent white background fabric, but everything else is a variety of batiks. As with all of Myra's patterns, the pattern includes multiple size options. This pattern also provides instructions for two different construction methods - strip piecing, which I used, and cutting and sewing a zillion individual bricks.  


This next quilt is also queen size and since I didn't have a large enough space to take a picture, I folded it and am only showing one quarter of it. (My quilt holder/namer/helper - AKA Jack, wasn't available to help with this. 😊) This is Calliope. I love this color variation, but it is also stunning in other colorways. Be sure to check out the samples that Myra has on the website. I am kind of partial to the quilt that is dark blue, mint green, and red


This next picture really does not do the quilt justice; and for some reason, I didn't take any other pictures of it. Shoot! I'll share one of Myra's pictures so you can see it in all it's glory. 

This is My Farmhouse and it is beautiful! Do you recognize the fabrics? These are the same ones used in Belle that I shared above. The background looks like it's black, but it's really a beautiful navy solid. 


Who doesn't love taffy? There is a funny story that I have with my sisters that involves taffy and our mom. It's too long to share here, but let's just say that they often have taffy available when we are going to spend a lot of time together. 


So what does taffy have to do with quilting? Well, ever since our oldest sister Kathie turned 60, the other sisters make a quilt for them to celebrate their 60th birthday. We have always tried to make the quilt relate to the sister, so this year my clever sisters made me a taffy quilt! 


The pattern is called Taffy Twirl and I just love the quilt. Doesn't it look great on the bed? This has been used every night since I received it. 


A little break from my quilts...As many of you know, I am one of the organizers of the Ohio's Amish Country Quilt Festival that is held in September each year. After a very revised event in 2020, we returned to the event center, made adjustments to the layout, number of vendors and attendees, and opened the doors for an event in 2021. The facility is HUGE, which was great to accommodate the new spacing we needed to have. It still amazes me how we can go from this empty building... 


to this, in just two days of setting up booth, hanging quilts, etc. 


I was very happy with the results and attendance and am looking forward to returning to a "normal" event in 2022. 

As you know, I love to test patterns for Tammy Silvers. I think her patterns are fun and well-written. She introduced a new pattern named Jester back in the Fall, along with a signature fabric line for Island Batiks. I loved the fabric and pattern. 


Tammy was coming to an event at Chestnut Ridge Sewing and we needed a one-day project for her to do, so I suggested that we make a table runner or placemat version of Jester. She was on board with that, wrote up the instructions, and I tested them for her. Here are my versions, using scraps that I had on hand. 


Like many of you, I have projects that have been set aside for a variety of reasons. This next quilt was one of them. I know why it was set aside many years ago, but I could never bring myself around to finishing it. It was one of my first quilts started and while I had big plans for it, I just fell out of love with the fabrics. Every time I pulled it out to work on, it would end up back in the bag and set aside for another day.


Fast forward to this past October when I pulled out the bag (again!) and told myself that I either had to finish the project, give it away as is, or throw it away. Well throwing it away was not really an option and I wasn't sure that I wanted to hand this off to someone else to fix my mess. As you can see from the next couple of pictures, I think my fabric choices were questionable (quality as well as colors) and I really didn't pay attention to the "rules" of quilting. I guess 1/4" seams, proper pressing, and lining up fabric correctly were just suggestion that I chose to ignore. :-) 


I bit the bullet and got to work. I had to throw in a couple of additional fabrics to make up for some really poor quality ones and this is the result. 


While finishing this, I decided that I needed to make another one of these quilts. I still liked the pattern and felt I needed to "do it right" this time. I made a three color version and used only four fabrics. I love the results! 


I designed and made the Amish Shop Hop quilt and like the results. As with so many other things, the fabric was delayed in arriving so the quilt had to be made in a very short period of time. I was very happy that the layout and construction was quite simple this year. The quilt is 91" x 91" and I love the scallop border. I used the Krista Moser scallop tool, which made it simple to do.  


I told you earlier that I was embracing the scrap quilting process and to that end, I made a Wonky Wishes quilt. This is a Bonnie Hunter pattern and the construction is easy, but a bit time consuming. I don't have a picture of the finished quilt, but here it is prior to adding the sashing. To be honest, the quilt is still just a top because after putting it together at this size (my revision, not Bonnie's), I decided that I want to make it larger. I will be teaching this quilt at Country Fabrics in Feb. so the top is hanging there until then. I'm making additional blocks that will be used as step-out units for the class and then I'll add those to the top to make it larger.


Do you see my Brick Cottage Lane 2 strips on the left? I was working on both of these quilts at the same time.   

I know this was a lot of pictures, but I hope you enjoyed it. 

Happy New Year and here's to more blogging in 2022. 

Friday, October 22, 2021

Skyline Divide - A Quick and Easy Quilt

I enjoy testing patterns and making samples, and this quilt was no different. I have been testing patterns and making samples for Myra at Busy Hands Quilts for over a year now and I always enjoy working with her. This quilt is a quick and easy pattern; and as usual, Myra sent the fabrics for me to use and I enjoyed working with them. As a matter of fact, I used the same fabrics for a couple of other quilts that I will be able to share soon, so be on the lookout for those.

Say hello to Skyline Divide. Myra wanted a new look to this pattern, so she sent me some wonderful fabrics to use. I love how it looks! This is Myra's image of the quilt and it is soooo much better than the ones I took. (I'll reluctantly share my pictures at the end of this post.)


I love how she makes these quilts come alive with her quilting! 


The Skyline Divide pattern includes 5 size options - Baby, Throw, Twin, Queen, and King. I made the Throw version and it measures 50" x 70". Besides all these sizes, there are two piecing options to the pattern as well - planned and scrappy. The planned version uses yardage and the scrappy version uses 2 1/2" strips, fat quarters, or yardage. As you can tell, I made the scrappy version; and I used 2 1/2" strips.  

This really was a fast and easy quilt! If you are planning to make quilts for Christmas and feel like you might run out of time, this would be a great pattern option. Just look at how this looks different, based on your fabric choices.


Below are pictures of the quilt I made. The first one is in progress and I took it so I could use it as a guide while assembling the columns. 


Below is the completed top. As I said before, Myra certainly does make these quilts come alive with her quilting.  


I am considering the idea of making this pattern using a more controlled color palette. I saw a quilt that Myra posted on her blog a while back that was made by one of her customers. It was made using five fabrics, ranging from white, to gray, to black. She added a yellow border, which really makes the quilt amazing. Check out the picture HERE

Stay tuned for more of the quilt tops I've recently made for Myra. In the meantime, be sure to visit her website - Busy Hands Quilts. You just might find the pattern for your next quilt! 

Wednesday, October 6, 2021

A Few Projects

It's been a while since I've posted, but that does not mean I haven't been busy and sewing. Right now, I'm working on my Cozy Cabin quilt from Modernly Morgan. She is having a Quilt Along and I'm happy with my process.


I am using the leftover fabric from my Homespun quilt, another Modernly Morgan pattern. I hosted a Sew Along for that pattern and made three different variations. All three of these quilts were made using the same initial blocks. It is in the layout of those blocks that you create completely different looks.


One of the original Homespun quilts has already been gifted. Bailey likes her quilt and the crazy ice cream she chose as her birthday treat.


I finished four quilt tops for Myra Barnes of Busy Hands Quilts, but I have to get those pictures together and will share those in another post.  I'm also working on a couple other "secret sewing" projects and can't share those yet, but I am staying busy.

What are you working on today?

Friday, August 20, 2021

Step Right Up Quilt

I had the honor to test a pattern for Terry Atkinson and I can finally share it with you today. 


I am in love with my version of the Step Right Up quilt and the intended recipient is excited to have it on her bed soon!

I used a light green background and bright pink for the accent/steps. The rest of the strips are from a 2.5" pre-cut package that I have had for a very long time. (Yay! I made a fun quilt AND used stash. That's definitely a win/win situation.)
I had hoped to have it quilted so I could share that today, but it's not quite done yet. Like Terry said in her video, yardwork has been calling because I too have been away from it for quite some time.
This is a fun and easy pattern that will look great and just about any fabric choice. :-)

The pdf version of the pattern is available on Terry's site - Atkinson Designs The paper pattern is available as a pre-order, but it should be ready in a couple of weeks.

I love testing patterns and this certainly was a fun quilt to make. :-)

Sunday, July 25, 2021

Christmas in July Blog Hop Conclusion

 Today is the last day of the Christmas in July Blog Hop


Thanks for hosting this Sarah and for all of the participants. 

Here's the full lineup, in case you missed it. 

Wednesday, July 14th

Thursday, July 15th

Friday, July 16th
Jamie of L'Fair Quilts

Saturday, July 17th

Sunday, July 18th

Monday, July 19th

Tuesday, July 20th

Wednesday, July 21st

Thursday, July 22nd
Sandra of MMM Quilts

Friday, July 23rd

Saturday, July 24th
Joanne of Everyone Deserves a Quilt (Part 2)

Sunday, July 25th

*********************************
I'm still waiting on my baking fabric. I checked the tracking yesterday and it shows that it in Chicago. That's good new because on Thursday it was Boulder, Co. 
I'll quilt it when it gets here and I'll share pictures later. 
The good news is that I have a new Christmas quilt almost ready.  :-) 

Saturday, July 24, 2021

Christmas in July - Part 2

 I am excited to be sharing a second post for the Christmas in July Blog Hop!

Sarah over at Confessions of a Fabric Addict is our hostess and besides organizing this Hop, she is facilitating a Sew Along. Sarah has been sharing the steps we need to create our own Peppermint Twist quilt. 


Along with Sarah's instructions each day, various bloggers have been sharing fun holiday ideas and tips. I am always amazed at the talent and creativity of quilters, and this hop has not disappointed. I may not sleep until December because I have found so many projects I want to do. :-)  

In case you missed a few days of the hop, here's the full line up...

Wednesday, July 14th

Thursday, July 15th

Friday, July 16th
Jamie of L'Fair Quilts

Saturday, July 17th

Sunday, July 18th

Monday, July 19th

Tuesday, July 20th

Wednesday, July 21st

Thursday, July 22nd
Sandra of MMM Quilts

Friday, July 23rd

Saturday, July 24th
Joanne of Everyone Deserves a Quilt (Part 2)

Sunday, July 25th

*********************************

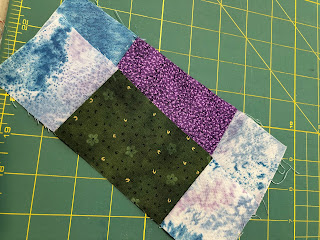
On Sunday, I shared a very simple table runner that is made with large half square triangles, a few rectangles, and three borders. I used these beautiful fabrics. I just love that Christmas print!


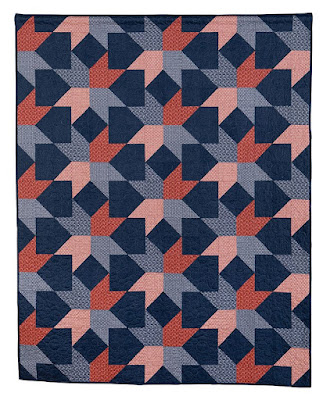
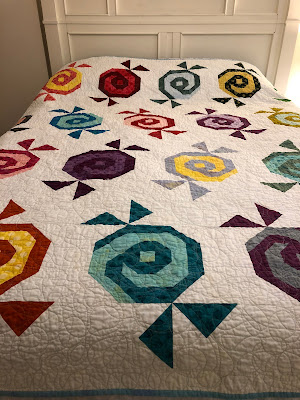
Right after I sketched the table runner in EQ, I knew I wanted to make it into a quilt too so I kept playing with various layouts and fabrics.


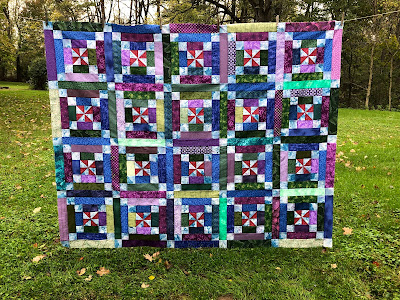
I decided to stay with the table runner look and I made this quilt. I have to admit that my decision was made easier by the fact that I had enough of all of these fabrics to make both the table runner and quilt. Plus, I had a little left over so I can make some placemats too. WooHoo!


I'm sure you've noticed that my pictures aren't great and that neither of my projects are quilted. Well, just like Christmas of 2020 when we ran into a snag with many gifts not being delivered in a timely fashion; something similar has happened with this hop. 
I ordered backing fabric for the quilt and table runner on July 5th and it still has not been delivered. I had no other fabric that would work and I didn't have time to go shopping, so nothing is quilted yet. :-(

I decided that, just like last year, we'd go to Plan B which was to stay calm and remain patient. Plan B for Christmas was to open the gifts that had arrived and open the balance of them on January 6th - the Epiphany (also knows as the Day of the Kings). That would have worked if everything had been delivered by then, but there were still some missing gifts. The last of the gifts arrived January 21 and it was really kind of fun to be getting packages for what really seemed like no apparent reason. Oh well... 
I kind of feel the same way about the backing for these quilts. Honestly, if this is the biggest worry and problem that I face, I am pretty darned blessed. The projects will get quilted and I'll share pictures when that happens.

*********************************

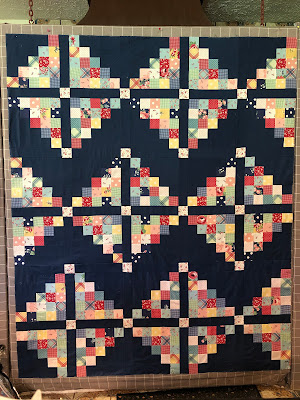
Back to the quilt... 

I guess I am lucky to have taken a picture (no matter how bad it is). I actually forgot that I hadn't taken a picture and when I remembered, it was too dark to try to take any outside. 
 
Even though there is no picture of the totally finished quilt, I can still share the details on what you'll need to turn your table runner into a quilt that measures 60" x 75".

Background Fabric: 3 yards
cut: 4 strips - 7" x WOF, sub-cut each into 6 - 7" x 7" squares for HST
cut: 8 strips - 2" x WOF, sub-cut each into 6 - 2" x 6.5"
cut: 13 strips - 3" x WOF - set aside for borders 1 and 3

Red Fabric: 3/4 yard
cut: 2* strips - 7" x WOF, sub-cut each into 6 - 7" x 7" squares for HST 
*(you may need a 3rd strip)

Green Fabric: 3/4 yard
cut: 2* strips - 7" x WOF, sub-cut each into 6 - 7" x 7" squares for HST 
*(you may need a 3rd strip)

Gold Fabric: 3/4 yard
cut: 10 strips - 2" x WOF, sub-cut each into 5 - 2" x 8" rectangles

Christmas Print: 2/3 yard *(more if directional)
cut: 6 strips - 3" x WOF - set aside for border 2

Binding: 2/3 yard
cut: 7 strips - 2.5" x WOF

*********************************

Following the instructions HERE to make 12 large blocks.


Sew large blocks into four rows of three blocks each. Press seams open to reduce bulk.


It's time to add borders.

Border 1 - Background Fabric Border Strips
 Sew 6 - 3" x WOF strips together. Press seam open

Measure the length of the quilt top and cut 2 strips that measurement.
Find the center of the quilt top by folding it in half lengthwise. Mark with a pin.
Fold the border strip to find the center and mark that with a pin.
Match the pins at the center point and pin the border to the quilt top.
Pin the ends of the border strip to the ends of the quilt top. Pin as needed in between.
Sew with the border on the bottom, near the feed dogs. Press open or to the border.

Follow the same procedure to add the top and bottom borders.


Border 2 - Christmas Print Fabric Border Strips
Sew 6 - 3" x WOF strips together. Press seam open.
Follow the same procedure to measure, cut, and sew the Christmas Print Fabric Border Strips to the quilt top.
Press open or to the border.


Border 3 - Background Fabric Border Strips
Sew 7 - 3" x WOF strips together. Press seam open.
Follow the same procedure to measure, cut, and sew the Background Fabric Border Strips to the quilt top.
Press open or to the border.


The quilt top should now measure approximately 60.5" x 75.5"

Quilt as desired and bind using your favorite technique.

*********************************

Stay tuned for pictures of these projects quilted. The good news is that I won't be rushing around in December, trying to get these done. 

Stop back tomorrow for the final day of the hop. We'll be sharing some past Christmas in July projects and I know that you'll love what you see. :-)