Monday, March 31, 2014

Design Wall Monday

This is what's up on the wall this morning and I know that it may be a bit bright or bold for some of you, but I love it! 


This past weekend was our annual guild retreat and I had been hem and hawing around trying to figure out what I wanted to work on while I was there. I have lots of projects that I should be finishing up and I could have taken at least one of them, but something was holding me back from making a decision.

Well, the decision was made for me when on Thursday I went to the new quilt shop in Sandusky, M & E Quilt Shoppe. I know the two owners (they are former students) and we've been talking about me teaching some classes there. (YEAH!!) Anyway, while I was there, we picked out a couple of patterns and fabrics for me to make samples. Before I even walked in the door, they knew they wanted me to make something using the From Outside In line. I was excited that they picked that line. It is awesome!! But then we had to choose a pattern...

I've had the I Used To Be a Layer Cake pattern (by Nancy Altsman for Black Cat Creations) for a little while, but haven't made it yet and the shop has the pattern so I figured, why not? What is so cool about this pattern is that you can make a small Bargello quilt using a layer cake or a jelly roll and the pattern includes the instructions for three different versions. AWESOME!! If you want a larger quilt, simply make more small quilts and put them together. The pattern explains how to do that. 


Since the pattern calls for either a layer cake or jelly roll, I decided I wanted to try it using both methods so I am prepared to help students using both methods. (OK, I really just couldn't decide which version to make so I'm making two of them.) We picked out a jelly roll of the From Outside In and a layer cake from Wishes, by Sweetwater.

Knowing that it might be a bit challenging to organize at the retreat, I did some preliminary work at home. I decided to use the jelly roll first and pulled it apart and organized the strips in a pleasing order.


And then I cut the strips into 10" segments (I'm going to advise students to cut them a little longer if their strips allow for that because after trimming, you only have about 1/8" to spare and that is living life a little too dangerously for me). 

Next I sewed the 10" segments together to get four of these lovely strip sets. (While doing this, I changed the order of a few of the fabrics.) I made one of these strips at home and sewed the other three at the retreat. 


Once the strips are made, you sewn the two ends together to create a tube. (For those of you that have made a Bargello quilt, I know this is old news for you, bu this is my first one and I found the process intriguing.) Following the chart provided in the pattern, I then cut the tubes into varying widths and then started the process of creating the columns of the quilt. It took a bit to get myself acclimated to doing this, but once I did, it was ok. 

I decided that it probably wasn't a wise choice to take this project to the retreat because it really helps to have a design wall or to be able to lay everything out to avoid mixing up the strips, etc. Lesson learned! But, having said that, this experience allowed me to make notes on how to help students keep themselves organized and avoid a few of the issues I encountered.

So, here's what I had sewn at some point on Saturday.


I hope to be able to get some sewing time in later today and get this top finished soon because I'm looking forward to making version three using the Wishes layer cake! I'm using a dark chocolate brown for the accent strips.

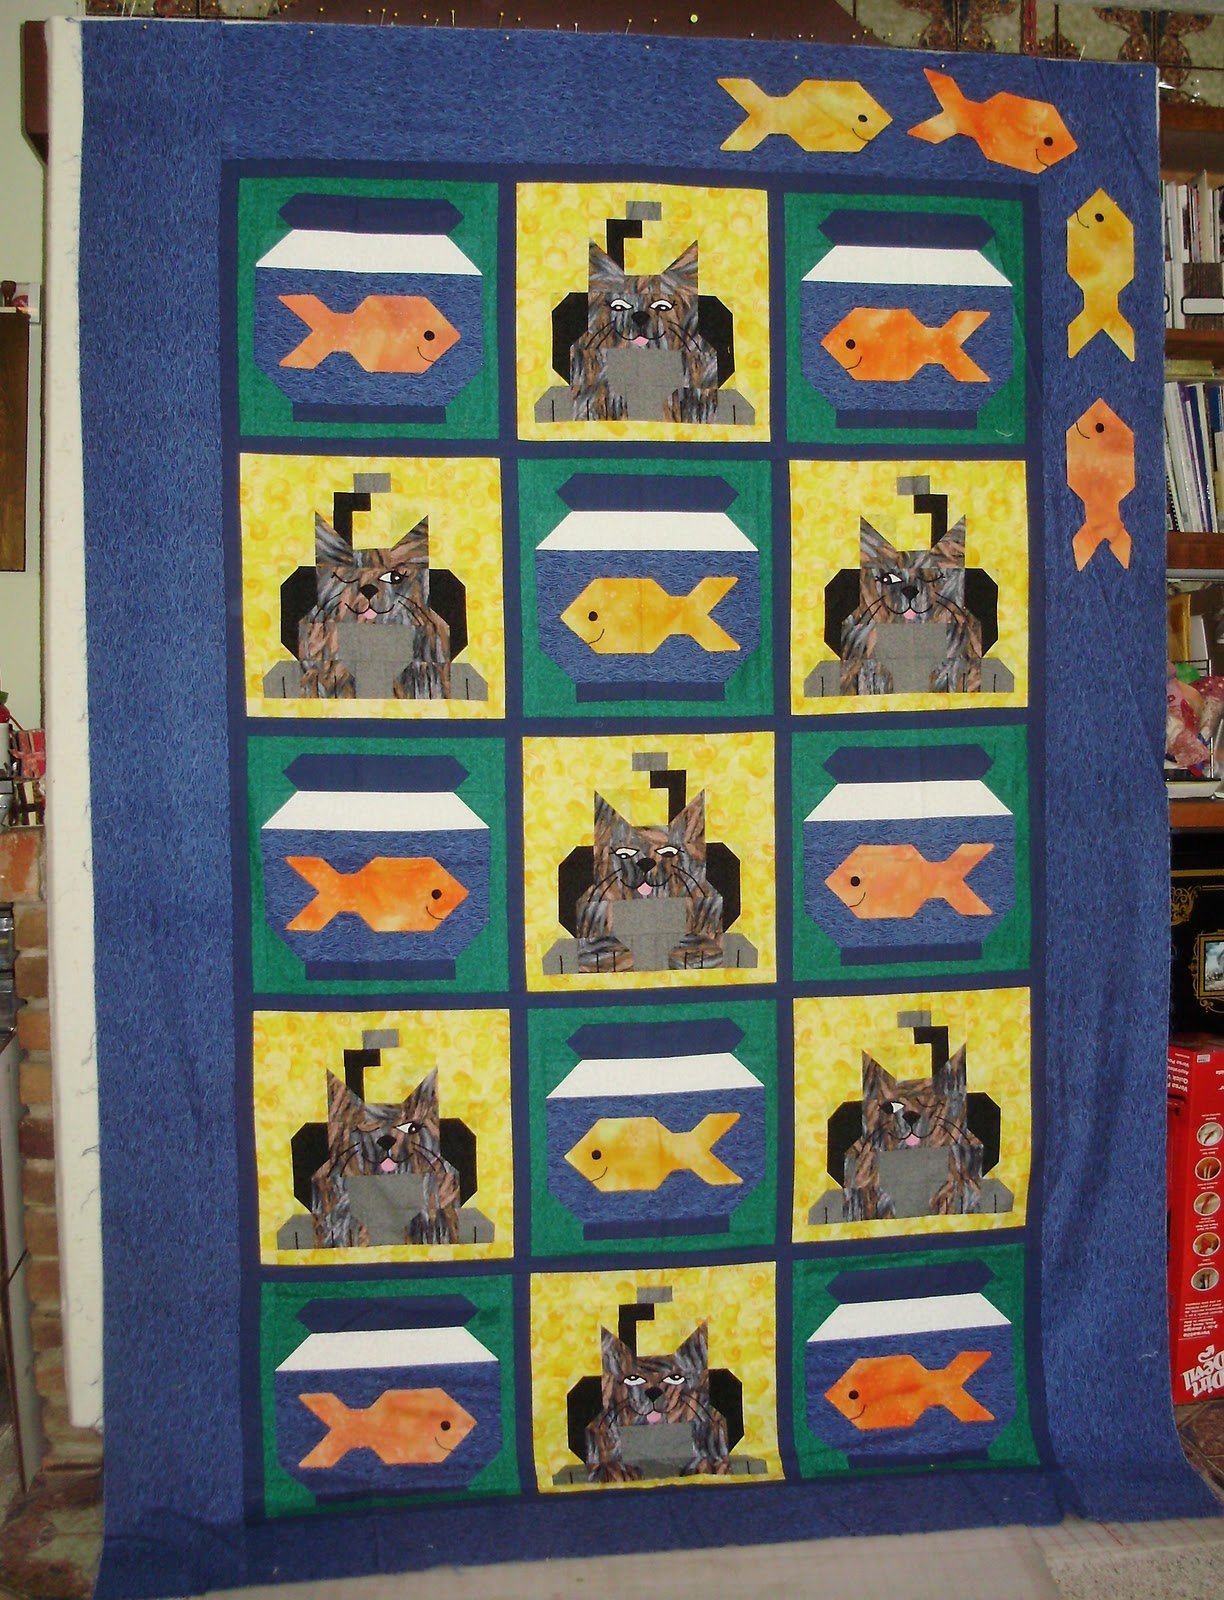
This isn't on my wall, but this is the quilt that my brother Jerry quilted while he was at the retreat. I love this!! The picture does not do this justice and he still has to tie his thread tails and bind, but it is awesome in person. He also sewed together a couple of practice quilts so he can work on his machine quilting technique. He was VERY productive!


What's on your design wall? Why not share it with us at Judy L's Patchwork Times?

Friday, March 28, 2014

Friday Finishes and Busy, Busy, Busy

It's been kind of busy here and I'm excited to say that I've actually been getting some things done. YEAH!

Do you remember this Charm Pack Cherry Quilt that I showed a few days ago?


Well, I had some help when I was putting the rows together. Sadie was on the other side of the machine keeping the pieces straight as they were coming out of the machine. She loves doing that! Anyway, when I was taking a couple of pictures of the quilt top, she asked if she could be in one. I said sure and she got herself in position to say "Ta-Da!" 

Well, we had to make a few adjustments and take a handful of pictures before we got it right. Check out the first picture. Notice anything "not so right" here?


Yea, I'm not sure what she was introducing but it sure was funny. I showed her the picture and suggested we take another one.


It's better, but when Sadie saw it, she said it wasn't perfect. So, another picture was in order.


Sadie thought this one was perfect because you can tell she's saying "Ta-Da!" and she's jumping for joy because it's beautiful. Even if it was a crappy picture of the quilt top, how can you not agree that this is the perfect picture? 

I love having grandkids!!

Avery finally got her quilt! I think she likes it.  


And finally, I was playing around with some red, white and blue fabrics and decided it was time to sew. I like how this turned out, even though a few of the blue fabrics were a little too light for my liking. I think I'll make another one and add borders so it will meet the size requirements of Quilts of Valor.


I plan to take a little bit of time early next week to evaluate what quilt tops I have done and get them ready to quilt. Then I can choose which ones will be donated for the Hands2Help Challenge.

Check out what others have to cheer about today (finishes, starts, exciting news, etc.)! Go to Sarah's Confessions of a Fabric Addict.

Wednesday, March 26, 2014

Oops! Tip Tuesday! - UFOs

I can't believe that I forgot to post this Tip Tuesday! I guess I was a bit stressed/busy/out of sorts, etc. yesterday. I've got to get myself better organized (which is funny considering today's topic). Anyone want to be a guest blogger for a Tip Tuesday! post dealing with how to be an organized blogger?

Welcome to
"Tip Tuesday!"


I love learning new things and then sharing that knowledge with my quilting friends. So, every Tuesday I'll provide some tips, hints, tricks, tutorials, shortcuts, etc. that I've learned over the years and share them here on the blog. 

"Tip Tuesday" will be a collection of information about a wide variety of subjects garnered from a large variety of sources.  I am not an expert by any means and do not take credit for being the great wizard behind all of these hints and tips. I will gladly give due credit whenever possible.

These tips will be archived and accessible to you just by clicking on the "Tip Tuesday" tab above. 

Read, enjoy, and be inspired! 


Tip Tuesday! - UFO Storage

I think that most of us have a UFO or two tucked away in our sewing room. Ok, maybe some of us have more than one or two. That's fine! (Remember, there are not quilt police here.) I think the biggest problem many of us have with our UFOs is that we aren't sure what we have or that we have all the pieces and parts to the projects.

The problem I used to have with UFOs is that I didn't really have them organized at all. Often, I had a bunch of fabric and partial blocks shoved into a tub, bag or just rolled up together but I wouldn't have a pattern with it. Or, I'd have a pattern and what I thought was all the fabric, only to discover that I was missing something and there were not notes to tell me the status. Why did I stop working on this? Did I run out of one of the fabrics? Did I make a mistake? Did I hate the construction method or how the quilt looked?

I've also been known to have a bunch of fabrics together for a particular project, but it contained fabric yardage that was perfect for another project so I would "borrow" that fabric with the plans to replace it the next time I got to the shop. (Well, you can guess where this is going, can't you?) I would go to the shop and forget to get that fabric and when I finally pulled out the original project to work on it, a year or more had passed and I couldn't find the fabric that I needed, even after an extensive internet search. It wasn't so bad if I hadn't used the fabric in any blocks yet, but usually I had made 6 of the 20 blocks and for some reason, I hadn't cut out all the fabric. (The fact that I had yardage left over should have been a clue!) ARRRGGGHHH!!! I quickly learned that it was time for a design change and that scrappy is great!  :-) 

Well, after that happened dozens a few times, I started to take the time to better organize my UFOs. I still have UFOs, but they aren't quite so frustrating anymore.

I am so happy that I started this practice right around the time Jack started the quilt I mentioned in this post on Monday.  

When Jack asked me about his black and white quilt, I knew exactly where it was and was positive that I hadn't "borrowed" any fabrics from it. (I think he was pleasantly shocked surprised!)


When we opened up the tub we saw all the finished blocks and rows, along with extra fabric. We even had fabrics that had not been used in so far in the construction, but were possible border fabrics. 


One thing we had not done before this got put away was to make detailed notes. We had a sketch of the block and layout, but since he had already put rows together, we knew that plan. So, after putting the rows/blocks up on the design wall, he separated fabrics, labeled them and even jotted down some possible quilting ideas. 


The next time he pulls out the tub to work on this quilt, he won't have to take much time to get organized and can just sit down and sew. That makes me and him, very happy!

What UFO storage and organization tips do you have? I'd love to hear them.

Monday, March 24, 2014

Design Wall Monday

There's a traffic jam on my design wall today.  :-)

This first quilt it what's actually up at this moment. I have three of the five rows sewn together and will have the other two done later today. Since I'm not adding borders, this top is almost ready to layer and quilt. YEAH! 

This is a free pattern that a friend got from The Fat Quarter Shop, and it's called Charm Pack Cherry Quilt. This is made entirely from stash and I think I even have fabrics for the backing and binding. This makes me VERY happy.


This is Avery's quilt that is finally quilted and the binding just needs to be hand sewn down. I should have had this done seven months ago, (she is seven months old today!!). I'm going to see her later today and since I'm not subbing today, maybe I can give it to her as a birthday gift.  :-)


This is not my quilt. It's Jack's. I was sewing with a group friends this weekend and Jack saw Chris working on a fabulous black and white star quilt He was inspired to pull out his long-ago-started quilt and get busy working on it. 

As you can see, the blocks are all done and he has sewn the top two rows and sashing together. It's a good thing we looked at this because Jack found a mistake on the bottom row. Now he gets to spend some quality time with a seam ripper. :-)


Jack and Jerry spent some time checking out border options (as you can see above). But, they were also already discussing the actually quilting Jack plans to do. He has been thinking about the quilting design since he started piecing this. He is really excited to get to the quilting. 


Here's the inspirations quilt. I love this Chris and can't wait to see the borders!!


Jack was very clear in his time schedule for finishing this quilt. He reminded me that he has an on-line class to take for the next two months, he has a couple of concerts for which he has to prepare, and he still has his regular schedule of teaching to maintain. I think we was worried that I was going to push him to work on this every day until it's completed. :-)  Silly man! He hasn't yet learned that I completely understand the value of a UFO. :-)

Want to be inspired or just take in a bit of eye candy? There are lots of people showing off what's on their design walls today.

Wednesday, March 19, 2014

Mixed Emotions

I have mixed emotions today.

It's raining right now and it's pretty gloomy out.


At least it's not snowing!


Tuesday, March 18, 2014

Modern Quilt Guild Meeting

I just returned from my first meeting of the Cleveland Modern Quilt Guild

I had a really good time and met some very talented people who were not only friendly and inviting, but excited about what they do. After a show and tell segment, members shared their favorite quilting book(s) and passed them around for the rest of us to peruse and ponder a new purchase. I have to admit that I have a list going.  :-)

For the next month's meeting, we are going to be making improvisational pot holders. We can make one or one hundred and if we desire, we can swap. Doesn't that sound fun? I think I'm going to have to spend some time fondling some fabrics and get busy sewing.

We also discussed, and are going to finalize our very own block party. WooHoo! We're basically following the concept from this book:


Block Party: The Modern Quilting Bee - The Journey of 12 Women, 1 Blog, & 12 Improvisational Projects 


I think this will be really fun!

Thanks ladies! I had a good time.

By the way, it's been mentioned a couple of times now that I haven't updated my Quilt Gallery lately. I will do that very soon.I promise! It may be after I finish my Prairie Star, the Fish and Cat quilt, and the Little Black Dress quilt, but it will definitely be before I completely empty the Tub of Shame, which is actually two tubs.  :-)

Tuesday Archives Linky Party

If you're looking for Tip Tuesday!, click HERE.


Val's Quilting Studio


Val wants us to share an old post that goes with the week's theme. This week, the theme is 'Animals' or 'Award Winners


Click HERE to go to Val's Quilting Studio for a step back in time.It's fun and inspirational!


YEAH!! - I have something to share about each of those. 

First the Animals...

Here's the link to my original post about my fish and cat quilt. Unfortunately it is in the tub of shame, awaiting an "appointment" with me to get quilted. Perhaps the real purpose of this Tuesday Archive is to shame me into finishing some unfinished projects. :-)

http://joanne-everyonedeservesaquilt.blogspot.com/2011/10/design-wall-monday-and-giveaway-2.html

Here are a few pictures from the original post.


 And now the Award Winner...

I don't have a post about an Award Winner, but I do have a picture.

I entered this quilt in the Ohio Bicentennial Quilt Challenge in 2003, and much to my surprise it took 3rd place in the machine pieced in machine quilted category. Third place! I was thrilled, especially when I found out that there were over 260 entries.

My husband named the quilt and swears that his name is one of the reasons that I won a ribbon. I have to admit that he's probably right.

               Ohio, A Beautifully Seasoned State


Like everything, this quilt has a story. 

When the challenge was announced, I thought it would be fun to try making something. I had only been quilting a couple of years, but I figured "why not." There was plenty of time to work on the quilt, as it didn't have to be submitted until early July.

There were a few guidelines/rules that needed to be followed, but overall, you were pretty much free to design as you wanted. I started playing around with sketches and quickly decided that I wanted to make a quilt in the shape of Ohio and somehow represent the changes of the seasons. That was the easy part! Being a relatively new quilter who had only made a handful of quilts, and that was strictly following patterns, I wasn't quite sure how to do this. Then I read something about string piecing blocks and thought maybe that would work. I wasn't really sure how to do it, but it "worked."  :-)

Well, I started looking for fabrics that I could use and started cutting them into strips ranging from 1" - 3". (Remember, I didn't really know what I was doing.) After cutting what was probably enough to make three of these quilts, I started sewing. I them cut the little strip pieced units into squares (3 1/2" squares), and then cut them once on the diagonal. I thought that would provide me with a really scrappy looking quilt, especially since I wanted the seasons to kind of overlap each other in the quilt.

If you look closely, you'll notice that some of the fabrics in the top left and bottom right are the same. That is supposed to represent the fact that the seasons really just blend together. Starting from the top left, we have Spring turning into Summer, followed by the browns and oranges of Fall. The large light center is of course Winter, followed quickly by the dirty snow of early Spring and then the wonderful greens of Spring again. The Ohio River is along the bottom, Lake Erie is at the top, along with Michigan. The binding changes colors to follow the lake, Pennsylvania, the Ohio River, Indiana and then Michigan. 

Anyway, I started working on this quilt and them life happened. As a freshman in high school, Lynn was busy with extra curricular activities like student council and softball; and Nikki was in her senior year and we were kept busy with a very active and successful track season. 

Then, Dad got sick and lots of things got moved to the back burner, including this quilt. 

In the days right before Dad died, Nikki was running in four events of the regional track meet finals. I was in Dayton and she was at home, deciding if she was going to run. I told her that she should, and that Dad would want her to do so. She had worked hard and he was proud of her. She ran well, and qualified for the state meet in three of the four events!

We were so fortunate that the state meet was being held in Dayton again that year because of the construction at OSU. (Nikki had qualified for the state meet all four years of high school; and all four years, she ran in Dayton.) It was perfect for us that year.

Nikki ran her prelims on Friday, the day Dad died. She ran finals on Saturday and says she felt her Grandpa with her as she finished third in each of her races, including the 4 x 400 relay, her most challenging race. She had obviously hoped for higher placing, but she was happy anyway. Graduation was on Sunday and Dad's funeral was Tuesday. 

We were all exhausted upon returning home and I decided that this quilt just was not meant to be - at least not at that time. I didn't touch it or even think about it for a couple of weeks. 

Then a friend was visiting and asked how the quilt was coming along. I told him that I had put it away and wasn't going to send it in for the challenge. He and Jack talked me into getting it out again and start working on it. They said it would help me. I did and it did! 

Do any of you remember the big power outage of 2003 when a large area lost electricity because of some grid problem? Well, we were without power for six days. I had been working on the quilt, but when this happened, I took it as a sign that I wasn't supposed to finish it. 

Oh, but not so fast! Our friend brought over his generator and hooked it up so I could sew. Really!! I got busy and finished the quilt, but wasn't thrilled with the results. I knew there were some technical problems with this thing - like the wide binding that I didn't know how to get to go around the lower tip of Ohio. (I'm just glad you can't see this thing up close.)

Anyway, after Jack named it, I packed it up and sent it out. I didn't hear anything for a while and actually kind of forgot about it. It was about a month later when a message was left on our phone saying that I had won a prize for my quilt. I thought  the call was a joke and that my kids were messing around. Imagine my surprise when they called back and I found out I had won third place in my category.

This quilt (and all the other entries), was displayed at the Ohio State Fair and that was fun to see. I was asked if the quilt could be part of an exhibit that would travel with the Quilt Expo, and I said yes. My quilt got to travel around the country for the next year and I think that's pretty exciting.

I haven't entered any more quilts into any contests, and I'm pretty sure I won't. It was fun, but not something I want to do on a regular basis.

So, there's the story. Long, but I think it's kind of fun. Thanks for reading! :-)

Tip Tuesday! - Math for Quilters, Part 2

Tip Tuesday! -  Math for Quilters 

It Doesn't Have to be the "M" Word - Part 2
Side Setting Triangles and Corner Triangles

Welcome to

"Tip Tuesday!"

I love learning new things and then sharing that knowledge with my quilting friends. So, every Tuesday I'll provide some tips, hints, tricks, tutorials, shortcuts, etc. that I've learned over the years and share them here on the blog. 

"Tip Tuesday" will be a collection of information about a wide variety of subjects garnered from a large variety of sources.  I am not an expert by any means and do not take credit for being the great wizard behind all of these hints and tips. I will gladly give credit where credit is due whenever possible.
These tips will be archived and accessible to you just by clicking on the "Tip Tuesday" tab above. 

Read, enjoy, and be inspired! 

Last week, I shared some basic math stuff, like a yardage chart, fraction/decimal/inches conversion, standard mattress sizes, etc. and I promised to discuss side setting and corner triangles this week. 

Now I know that most on-point or diagonally set quilt patterns will tell you what size to cut the squares in order to get your side and corner triangles, but often they are cut to the exact size and if your piecing is off even a little bit, that can result in a stretched seams or bowing corners. To avoid these problems, I usually increase the starting cut square at least 1/4" and trim as needed once the triangles are attached to the quilt. 

But, what do you do if you are designing your own quilt or enlarging an existing block? I hate to say it, but you must do some math. Have no fear though, it is very simple math. (It's trigonometry, bit it's still simple!) 

I'll start with a very basic explanation of on point (diagonal set) quilts and the math (with examples) will follow.

On Point (Diagonal Set) Quilts
When you place blocks on point, also called a diagonal set, you need to fill in the outer edges of the quilt with triangles. The triangles along the sides are called side setting triangles. Corner setting triangles fill in the corners of the quilt.

      
Calculating Side Setting Triangles
1. Multiply the finished size of the block by 1.414 (round up to the nearest ¼”)
2. Add 1 ¼” to that number
3. Cut a square equal to that number
4. Cut the square twice on the diagonal (corner to corner)

Example: finished block = 6”
1. 6” x 1.414 = 8.484  -- round up to 8 ½”
2. 8 ½” + 1 ¼” = 9 ¾”   (8.5 + 1.25 = 9.75)
3. Cut square 9 ¾” and cut twice on the diagonal (corner to corner)


4. Use the quarter square triangles as side setting triangles

Calculating Corner Setting Triangles
1. Divide the finished size of the bock by 1.414 (round up to the nearest ¼”)
2. Add ⅞” to that number
3. Cut a square equal to that number
4. Cut the square once on the diagonal (corner to corner)

Example: finished block = 6”
1.  6 divided by 1.414 = 4.24 (round to 4 ¼”)
2. 4 ¼” + ⅞” = 5⅛”  (4.25 + .875 = 5.125)
3. Cut square 5 ⅛” and cut once on the diagonal (corner to corner)


4. Use half square triangles for corner setting triangles

I love the look of diagonally set quilts and used to be afraid of them, but not any more. Once I figured out the math and did it a few times, it was easy. 

I hope this helps! Feel free to ask questions.

Monday, March 17, 2014

Design Wall Monday


I've really been trying to use up some of my stash, especially some of the pre-cuts I've acquired over the years. Here's something I started last night and am really happy at how quickly it's going together.


I had a couple of Little Black Dress charm pack by Basic Grey for Moda and decided that I needed to use them. I found some background fabrics that matched up pretty well together and went with the charm packs so I was set. 

This is nothing more than a disappearing nine patch, set on point. (Come back tomorrow to see Tip Tuesday! when I present Math for Quilters, Part 2. I'll give you the formulas for figuring out how to cut the side triangles and corner triangles. It is soooo easy!)

Anyway, I'm really happy how this is looking.

So, what's on your design wall today? 

Please share with the rest of blogland. 

Have nothing on the wall and need inspiration?

Go to Judy L.'s Patchwork Times

Happy St. Patrick's Day

Irish Blessing


May the road rise up to meet you.

May the wind be always at your back.
May the sun shine warm upon your face;
the rains fall soft upon your fields 
and until we meet again, 
may God hold you in the palm of His hand.

(traditional Gaelic blessing)

Happy St. Patrick's Day Everyone!

I'm not Irish, but here's the closest thing to an Irish Sitting Room that I have in my house.


I really like this quilt and it always makes me smile. I really should make a larger version of this.  :-)

Do you notice the little container on the child's desk? Speaking of the desk, it belonged to my grandparents and was in terrible condition when I got it but Jack fixed it and painted it for the grandkids, who use it often when they are here. Click HERE to see Sadie using (and loving) that desk.

Ok, back to the container on the desk. That is a little ceramic container that is filled with stones. There is something written on each stone and I love to sit and pick up a few and read the messages, which were written by my sisters and Mom during one of our sisters' weekends in Burr Oak. Doing this ALWAYS makes me feel close to my siblings and helps when I'm really missing mom.

The grandkids also LOVE playing with the stones and I posted about it HERE.

Enjoy your day, and be safe!

Sunday, March 16, 2014

Hands2Help Challenge

For a number of years, I've made quilts and pillowcases for various of charities, mostly local charities, but some national and international ones as well. 

The Honor Flight Quilts that I made in honor of my dad and mom a few years ago were probably the most emotional for me, but quite honestly I get choked up every time I send out a quilt or pillowcase. Feel free to click on the tab above to see the 15 quilts I made or HERE, HERE, and HERE to see part of the progression of making these quilts and the distribution of them. 

Well, I've decided to continue the giving and am taking the plunge to join Sarah and countless others in giving back to the community. 


This year, there are three charities.

Option #1 - Quilts of Compassion

Option #2 - Hurricane Sandy Survivors

Option #3 - Happy Chemo

Sarah has this quote from St. Augustine on her blog and I just think it's wonderful and feel compelled to share it. I think this is beautiful! Don't you? Thanks for sharing it Sarah.

"What does love look like?
It has the hands to help others.
It has the feet to hasten to the poor and needy.
It has eyes to see misery and want.
It has the ears to hear the sighs and sorrows of men.
That is what love looks like"
--St. Augustine       

Why not take a few minutes and check out the information about this challenge and each of the charities? Go to Sarah - Confessions of a Fabric Addict

Of course, to encourage more people to join the fun, there's a giveaway too!  :-)