Showing posts with label Paper Piecing. Show all posts

Monday, April 21, 2025

Point the Way - New Version

I taught my wall hanging pattern, Point the Way - A Paper Piecing Primer at the NE Ohio Quilt Show last year. Because it sold out quickly and had a waiting list, I was asked to offer it again this year. Of course I said, "Yes!" 


This is a very basic introduction to paper piecing, which is exactly what my students wanted. 

I was given a charm pack of the fun collection called Creativity Roars by Creativity Shell for Moda. I loved the fabric and was thrilled to receive the pack. Of course there was a stipulation. I had to create something NEW with it. I was permitted to add fabric to the charm pack, but because it was a "Moda Guy" who gave it to me, preferably I would only add Moda fabrics. (I added a Thatched fabric by Robin Pickens that I think worked great!) 

I laid out the squares and looked at them for a while, trying to get some ideas. After a couple of days, inspiration struck and I started sketching. After some basic sketches, I sat down at the computer and started plying in EQ 8.  Here are some early sketches, all of which were discarded after a while. 


I quickly decided that I didn't care for the extra wide light pink sashing that was created when I put blocks together, so I tried it with just a few of them. 


I still wasn't thrilled and finally decided to ditch all the pink sashing, including the diagonal pink that was added to each of the blocks. (Can you see my seam ripping? LOL)


I liked this much better so I sewed all the block units together. Once that was done, I randomly sewed them into nine blocks. 


Much better!


Even better when I added the outside borders!


So...why am I showing you this now? Well, I decided that I wanted to make a new version. Here's what I have so far.


Sorry for the really bad picture!

Here's the fabric I'm using. The background is a Primitive Muslin by Primitive Gatherings and it is beautiful! I have more of each of these fabrics and am playing with the idea of expanding the pattern to add least one more size. I'll do the math first and then decide. Stayed tuned...


Of course I have thoughts on making another version of this too, but we'll see if that gets done any time soon. Don't hold your breath. Hahaha

Monday, March 25, 2024

Quilt Show Classes


I am excited to be teaching at the North East Ohio Quilt Show this coming July!

I will be teaching four classes
**Plays Well with Others
**Preserving Memories - T-Shirt Quilt Basics
**Granny Gets an Update
**Point the Way - A Paper Piecing Primer

Along with my classes, I am also offering a lecture - Math for Quilters.

For more information or to register click HERE

I hope you can join me!

Monday, August 24, 2020

School Colors - Secret Sewing Reveal

 This isn't on my design wall right now, but it was recently one of my secret sewing projects that is now complete. The timing of the reveal is perfect, as it's that time of year that kids are headed back to the classroom.

Introducing...

School Colors


This pattern is now available in both 
print and pdf version at 
Busy Hands Quilts.


Just like every other quilt I've made using one of Myra's pattern, this was so easy to follow and her illustrations are wonderful. The pattern includes two sizes (throw and twin); and they both perfect for kids going off to college or when you want to show your school spirit and stay warm at the same time. Unlike many patterns that require more blocks to be made to increase the size, the twin size is made using the same number of blocks, just a larger size. How cool is that? 

Here are a few pictures of Myra's completed quilt. 
 
School Colors - Image from Busy Hands Quilts


School Colors - Image from Busy Hands Quilts

Check out that quilting! 

School Colors - Image from Busy Hands Quilts

As you know, I always like to take pictures of the quilts I make from side angles. 


And a look from the other side...


One of the coolest things about this quilt is that the blue stars are not pieced as star blocks. They are created with some awesome pieced sashing. WooHoo!

You all know that I am a sucker for a good red, white, and blue quilt, so I'll be making my own version of this soon because it will make a great Quilt of Valor. But, I am also thinking that this would be a great quilt to make for a school fundraiser. All you need are the two school colors and a background/accent, and you are good to go. If you are having a difficult time visualizing this, Myra has provided some samples in a variety of colors. Check it out HERE.

School Colors - Image from Busy Hands Quilts

You can get your own copy of School Colors at Busy Hands Quilts.
While you're there, sign up for her newsletter. 

Check out Myra's Facebook page for more pictures of this beautiful quilt. 
You won't be sorry you did! 

So, what IS on my design wall today?

I finished Peyton's elephant quilt top. I'm got the back ready to sew and then it's time to quilt this puppy elephant. :-)


I've been playing around with a small project that I can use for teaching a very basic paper piecing class, and this is what I've come up with. After I took this picture, I layered it, quilted it, and have the binding sewn on. I'll hand stitch that down later today. 

 
I did finish the Picket Fence quilt top that I showed last week. Since I was using up leftover pieces of a layer cake (10" squares), my quilt is smaller than the pattern size. I was toying with the idea of adding a border, but I opted against that and am happy with my choice. Without thinking, I took it off the wall before I remembered to get a picture.  I hope to get this quilted and bound by mid-week, so I'll get some pictures then.


What are you working on today?

Check out the Quilters Eye Candy at


and

Monday, July 30, 2018

Christmas in July Projects Done and Design Wall Monday

If you read yesterday's post, you know that I've been working on and teaching Christmas in July projects. Although these two are not technically Christmas projects, they are winter-themed, so I'm including them in my list of Christmas projects done early. :-)

This first table runner is called Bethlehem and the pattern is by Doug Leko and is in the book Once Upon a Memory


The runner measures approximately 14" x 42" and I find that it's a good size for our table - not too long and not too wide. See all those flying geese? There are a total of 80 and they measure 1" x 2" finished. Yikes! That's a lot of small geese. 

I did some very simple quilting on this runner. I simply quilted straight lines (sort of echo lines) around all the triangle units. Instead of trying to keep a perfect 1/4" seam, I used the edge of my walking foot. Sooooo much easier!


I stitched in the ditch (or close to that!) of all those flying geese triangles and figured out a way to stitch all the way down one side and back up the other. By doing that, I created a square in a square look in the small center squares. It was so easy and fast and I'm very happy with the results.


This next runner is Winter Wonderland, a Judy Niemeyer pattern. This runner measures 20" x 74" and because it's so long, I'll most likely use this as a bed runner. 


This is paper pieced, but it is very easy to do. And, since there are only four blocks, it's pretty darn quick too. I fell in love with this pattern when it was first released back in 2011 and like the updated version (2107) even more. I'm happy to have finally made this and since I have extra papers, I'm planning to make a pillow and small wall hanging. 

It's difficult to see in this pictures, but I quilted a swirly loop design from the top to bottom in the light blue centers, and then I stitched right along the inside edge of each one. I also stitched right along the inside edges of the dark blue centers, and then I stitched right along the outside edge of the blue snowflake points. (I knew that stitching in the ditch was going to be a challenge for me, so I just dropped my feed dogs, held my breath, and stayed as close to the edges as I could. It's not perfect, but it looks good to me. Besides, snowflakes aren't perfect and no two are alike, so it's ok if mine aren't perfect.) 

  
To make the pieced parts of the blocks stand out, I quilted a meander in all the background fabric and I'm very happy with how that looks.


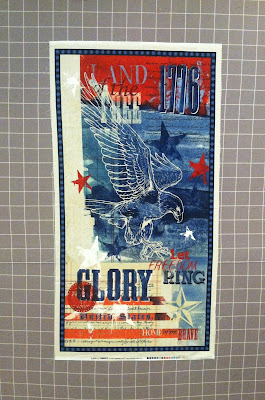
I'm taking a break from Winter and Christmas projects and have this panel up on the design wall. I'm contemplating how I want to use it. I have a few ideas and some coordinating fabrics, but we'll see what I decide after looking at it for a couple of days. I'll keep you posted!


Have you used this panel? If so, what did you do? I'd love to see pictures.

What are you working on today?


Check out the quilting eye candy at 


and


Sunday, July 29, 2018

Classes and Projects - Lots of Pictures!

It's been a crazy couple of weeks and I'm finally close to getting caught up with things. The 12 Days of Christmas winners should be receiving their packages within the next day or two and I am pretty well set and on task for the schedule I set for myself to get a variety of projects completed.

Keeping with the Christmas in July theme, I taught a couple of classes that were really fun and very productive. Check out what these ladies made while learning the basics of paper piecing. 


Bonnie's light green fabrics look great!


Hazel added a touch of pizzazz with the green swirl. 


Linda was a quick learner and only has one more tree section and then the base to sew and then she's ready to add borders. 


Dorothy wanted to keep her greens pretty similar in value and texture. I think she did a good job of that and still have interest in the tree. 


Sue chose to make her tree patriotic and very scrappy. I can't wait to see this completed. 


Like Linda, Barb was a quick learner and even though it looks like she made a mistake (she sewed section 3 with the paper backwards), we are choosing to believe that she has just started piecing her second tree already.  I generally tell students that we don't make mistakes. We make design changes. 😄


I also taught the Poinsettia Millefiori Quilt and had an awesome time spending the day with twelve very fun ladies.


One of the best things about this quilt is that no two will be the same. Although no one was ready to lay out their entire quilt by the end of the day, they all were very productive and made a lot of the blocks. (Of course I didn't get any pictures of blocks up on the design wall. 😑)

A couple of the ladies decided that they wanted to cut everything before they started piecing. Good for them! They will be able to whip up their blocks in no time.


Me, I'm kind of an instant gratification kind of gal and like to cut a little and then sew a little. Cut some more, and them sew some more. That's what the majority of the group did too. 


I love all the variations!


It's hard to believe that everyone started with the same fabric. 

Of course everyone had to check out their classmates blocks. Marcia stated to lay her blocks as she was making them to get an idea of what the quilt might look like.


I thought I might have to do a bag check on everyone when they were leaving because we all found a block made by someone else that we loved and wanted to add to ours. There might have been a little planning to distract someone and do a block switch, but that plan was quickly foiled. 😁 (It might have worked if we could have whispered when making the plan, but nooooo. We were loud and laughing too much for that.) 


I always enjoy teaching, but it's especially fun when the class has really enjoyable students. Thanks Ladies!

Tomorrow I'll post pictures of a couple other Christmas-themed projects that I completed this past week.

Have an awesome week!