Friday, January 30, 2015

Reviews and Giveaways

Did you know that FaveQuilts has weekly reviews and giveaways

I didn't. At least not until today.

The reviews are about various quilting items like books. patterns, notions, etc. You know, everything that we quilters like.  :-) 

I spent a little time going back through some of the review archives and was quite impressed. I like the variety of things reviewed and will go back when I have more time.

As for the giveaways, they last for two weeks, which give people plenty of time to enter. If the item being offered is not something of interest for you, simply don't enter; but if it is, go for it. 
There are even ways to receive extra entries. 

Another nice feature is that 
upcoming reviews and giveaways 
are posted on the site. 

So, go ahead. Treat yourself to some quilting eye candy.

Check out FaveQuilts

We Support You Blog Hop Days 1 &2

Yesterday was a limited computer day for me, so here are the participants for the first two days of  


Sew we quilt

My plan is to spend some time tonight checking out all the posts. 
I hope you'll join me.  :-)

Jan 29th 


Tuesday, January 27, 2015

Tip Tuesday! Signature Quilts

"Tip Tuesday!" - Signature Quilts

I love learning new things and then sharing that knowledge with my quilting friends. So, every Tuesday I'll provide some tips, hints, tricks, tutorials, shortcuts, etc. that I've learned over the years and share them here on the blog. 

"Tip Tuesday" will be a collection of information about a wide variety of subjects garnered from a large variety of sources.  I am not an expert by any means and do not take credit for being the great wizard behind all of these hints and tips. I will gladly give due credit whenever possible.

These tips will be archived and accessible to you just by clicking on the "Tip Tuesday" tab above. 

Read, enjoy, and be inspired! 

I don't know about you, but when something happens that is out of the ordinary, I immediately think about making a quilt. Remember the AIDS quilt? What about the quilts for the people affected by Sept. 11th? Sometime these quilts include messages to let the recipient know that you care and are thinking of them.

Often, we make quilts to memorialize events in life such as a graduation, a wedding, a special birthday, moving away, etc. These quilts consist of blocks that have been signed with names, either stitched or written with pen. Although Signature Quilts were very popular in the mid 1800's they went out of favor in the mid 1900's. Fortunately, they've seen a re-emergence in the last 10-15 years and that's a wonderful thing. 

Signature Quilts were common gifts given to a departing pastor and his wife, to a retiring physician or teacher, or to recognize an individual's years of service. It is still a common practice in many quilt guild to give their outgoing president a quilt, and it often includes signatures. Signature Quilts (along with T-shirt quilts) are common gifts for students entering college. Signature Quilts are also seen in many churches today. 

Here's a sketch of the quilt that is being constructed to honor the 150th anniversary of our church. Various blocks were made and church members signed in the white area of each block. (All of the blocks have signatures, but I don't have a picture of the quilt so this EQ sketch will have to do. Inside the center wreath is a panel with the church name and important dates.)


Signature Quilts have been used as fundraisers for many years and were known as Dime Quilts because it cost 10 cents to add your name to the quilt before it was auctioned or raffled off. A contemporary example of the Dime Quilts, although it costs much more than a dime to sign them, are the various cancer awareness quilts. The purpose of these quilts is not only to make money to support the cause, but more importantly to make the general public aware of the issue.


Just about any block or quilt layout can be used for a Signature Quilt. As long as the blocks or quilt have open space for signatures, it can be used. Below are the most recent Signature Quilts I made. Click HERE and HERE for the back story of these quilts. 

There was no real block for this quilt, just a lot of open space for signatures.


Heart Quilt - 2.5"  squares - Signature Quilt


Here is a close up of some of the signatures. As you can see, they go every which way, which is what I wanted to have so no matter how this quilt is laid out, at least some signatures will be easily read. 

Heart Quilt - 2.5"  squares - Signature Quilt


Here's Paige's quilts. The signatures were mostly contained to inside the heart, on the alternating strips of fabric. I asked for that to be done so Paige knows that her friends will always be with her.  


Heart Quilt - 2.5"  strips - Signature Quilt

Here's the close-up of these signatures. Again, they are not all written right-side up, which is fine with me. 

Heart Quilt - 2.5"  strips - Signature Quilt

In the last five years, I have made at least ten Signature Quilts. I've made them for a variety of reasons, but they are always a big hit. I have taught a few classes on how to plan a Signature Quilt and one of the first questions I am asked is what kind of fabric to use.

Generally a heavy thread count fabric is suggested for use on the areas that will receive the signatures. It is easier to write with the heavier fabric and it generally looks better. Even though white or off-white fabric is the most commonly used fabric, any fabric can be used as long as the print does not interfere with the process of writing or distract from being able to read it.

The next question is usually about what kind of pen or marker to use. Pigma pens or other indelible pens should be uses for the signatures, as they will be permanent and not bleed. Do not be tempted to use a regular Sharpie or other marker that does not state it is for fabric. They often bleed or cause shading around the signatures and make it difficult to read. I have used and like Pigma Micron, Zig Fabricolor, and EZ Quilting Permanent Markers.


Zig Textile Markers   

EZ Quilting- Permanent Fabric Markers

No matter which pen or marker you choose, ALWAYS test before gathering signatures. This test should include not only the actual writing, but the washing as well. (Read the instructions carefully. Some markers need to be heat set while others need to "rest and set" for 48 hours before being washed.)

And the final question I am usually asked has to do with how to gather the signatures. I am not a fan of sending blocks in the mail simply because I always end up with a couple of blocks on which the person did not follow the instructions. Those blocks become a challenge with which to work and often require another block mailed out to be signed. I understand that there sometimes you have no choice but to mail the blocks, but if that is the case, I try to be very clear with the instructions on signing. 

I try to always have the blocks constructed before gathering signatures to avoid the possibility of someone signing in the seam allowance area. If the blocks are not pre-made or there is a chance that someone will sign along the outside edge of the block, it is advisable to be very explicit about the location of writing and I often use a water-soluble pen and draw a line representing the seam allowance. That creates a "window template" to control the writing.

I also try to stabilize the writing surface so the signatures look nice. Freezer paper is a great way to stabilize the fabric and to do this, I simply iron the shiny side of the freezer paper to the wrong side of the area to be signed and remove it before sewing it to the quilt. I've also used wide painters tape instead of freezer paper and that works well. 

No matter what fabric or pen you use, Signature Quilts are fun to make. They are a wonderful way to commemorate special events and provide a terrific historical "document."


This post is linked to
Freemotion by the River 

Check it out for other linked posts!

Monday, January 26, 2015

Design Wall Monday

This quilt top is done, but I put it back up on my design wall because I'm trying to decide if I like the corner units.


Red and White Quilt, Prairie Star - Judy Niemeyer quilt pattern

Since I've been teetering back and forth about the corners, I decided to put it up on the wall and look at it for a while and then make my decision. (I took the Reflecting Pool blocks down to sew them into rows and that opened up the wall to put this up and look at it again.)

I posted a picture of this on Facebook and the response has been very nice and complimentary. Most people are suggesting that I leave it as is while a few are saying to change it because it will drive me crazy if I don't. Jack likes it just as it is. Judy Niemeyer and I discussed the corners while I was piecing this top and she suggested pulling the fabrics from the center out to the corners so that's what I did. Even if I decide to change it, I'm really not sure what I would do. I don't hate it. It just seems "heavy" or "chunky". 

For those of you who are not familiar with the pattern, here is the original version.

Prairie Star - Judy Niemeyer quilt pattern

Looks completely different, doesn't? 

I'd been playing around with wanting to make a two-color, red and white quilt for a very long time and I'm happy that I chose this to be it. I like the original version too and I love the latest version, using Judy's Reclaimed West fabric so I may make another version of it down the road.

Prairie Star - Judy Niemeyer - Reclaimed West fabrics

It's not like I don't have other quilts to make though, so this may be quite a while down the road. My friend Kare made another version of this quilt that is AWESOME! I'll see if I can get a picture to show you. 

Anyway, no matter what I decide, this is coming off the wall later today so I can get back to completing the Reflecting Pool quilt. Here's what I took down to piece into rows.

Reflecting Pool - Kaffe Fassett

 The signature quilts I made for Paige and Allie are done and will be taken to school tomorrow. They are both being washed right now so I'll post a picture of them tomorrow. I've decided that they will be featured in my Tip Tuesday! post so be sure to stop back and check them out. 

What's on your design wall?

To see what other quilters are working on today, go to 

Sunday, January 25, 2015

Sunday Ramblings

It's snowing, we have a nice warm fire, and I have lots of quilting projects on which to work. I really don't think it can get much better than this!

I'm finishing up the quilts I showed last week for the two young ladies who were in the accident, and since I'll be at the school Tuesday, the plan is to deliver them at that time. I'm not sure who will take Allie's quilt, but I'll be very happy when she has it with her.

I finished all of my Reflecting Pool blocks and had them on the design wall Friday evening. I didn't spend too much time playing around with the block order and just started sewing the rows together. I spent a little time yesterday sewing will probably work on that after I finish the other two quilts. 

I'm lucky to have today to relax, enjoy the snow and sew. I hope you have that luxury as well.

Happy Sunday!

Wednesday, January 21, 2015

Snow Day = Sew Day or Clean Day?

I did not have a sub assignment today and was pretty certain that I wouldn't because there was a morning teacher in-service program followed by students arriving two hours later. So, today was designated as "clean and organize the sewing room" day. Good plan, I thought.

Imagine my delight dismay when we ended up with 3" of snow. 

Since Jack was going to be gone today, I thought I should plow instead of waiting for him to come home and do it. (I don't mind plowing, it's just that Jack usually does it. I am generally the one who does any shoveling that needs done though, so it's a good sharing of the work.)

Ok, so maybe I plowed a little more than what was needed.


I just wanted to be sure that there was plenty of room in case a truck or something had to come down the drive. Of course if Jack ordered something that I don't know about, I wanted to truck to have plenty of turn-around room. I also wanted a clear path to walk from the house garage to the shop overhead door.


And of course we need a path to the side door of the shop and another one to Jose's car so I can start it on a regular basis to ensure the battery is okay. (I would not want him returning to a car that doesn't start.) 

  
I didn't take a picture of the path to the wood pile, though. I only plowed a two-pass path to that. I figured we probably didn't really need it to be any wider since we have a good size load of wood ready for use already. Here is a picture of one quarter of the wood that is stacked inside, ready for use in the fireplace.


But, I really wanted to be prepared, just in case it didn't stop snowing until March and we needed to get to the extra wood. It didn't take too much time away from my organizing and cleaning plans.  :-)

I also shoved a path to the trash bin, the bird feeders and the ash barrel.

And when I was done outside, I decided that a little bit of sewing on my Reflection Pool quilt would help me warm up.


Do you think Jack will figure out that I really didn't want to clean and organize today? 

By the way, I'm updating my Gallery of Quilts pages. They are all in the construction stage right now, but I WILL get them organized, updated and labeled soon. That counts as organizing today, doesn't it?  :-)

Tuesday, January 20, 2015

Tip Tuesday! - Organization, Part 2

"Tip Tuesday!" - Organization, Part 2

I love learning new things and then sharing that knowledge with my quilting friends. So, every Tuesday I'll provide some tips, hints, tricks, tutorials, shortcuts, etc. that I've learned over the years and share them here on the blog. 

"Tip Tuesday" will be a collection of information about a wide variety of subjects garnered from a large variety of sources.  I am not an expert by any means and do not take credit for being the great wizard behind all of these hints and tips. I will gladly give due credit whenever possible.

These tips will be archived and accessible to you just by clicking on the "Tip Tuesday" tab above. 

Read, enjoy, and be inspired! 


Maybe it's the new year.

Maybe it's because I am just plain tired of the mess. 

Whatever the reason, I am in organization mode. 

Slowly but surely I will get not only my quilting area organized but other parts of the house as well.


One of the biggest problems I have in all areas of my house are those little items that I need, but don't know where or how to store them. I don't want to see them, but I want them easily accessible.

I've tried baskets, but then everything just ends up in the bottom and a mess because I have to root through everything to get the item I want. 

Image result for images of storage baskets

I've tried plastic storage containers but they never seem to be the right size and they tend to end up like the baskets. If I use a bunch of small individual containers, I run out of room to store them.


I've also used over the door shoe organizers and even though they work well in some areas, they are usually too long for in my sewing area. They work great for a lot of different craft items like paint and supplies that I can keep on the inside of a closet and away from the little hands of curious children.


I know. I'm picky! Maybe being picky is just my excuse for not getting organized. Well, I also have to admit that I am cheap. I'm sure I could find exactly what I need if I was willing to spend a bunch of money. Mmmmmm, maybe that's the real problem. But I'd be using money that could be used for quilting and even though it's kind of related, I think I'd rather buy more fabric or another book. (Like I need any more of either of those things!)

There is a possible solution.

A couple of years ago, while wandering around the internet, I happened upon a website call The Complete Guide to Imperfect Homemaking

I bookmarked the site and went back to it a number of times but never did anything about it. Until now...

Kelly has a tutorial on how to make this organizer for any size that you need. DUHHHHH, why didn't I think of that? 


I've taken some measurements and plan to make one of these for the area right next to my sewing machine, one for the end of the shelf unit next to my cutting area, and one for next to the pressing station. 

I think I may make one for each of the cabinet doors in both bathrooms and one for under the kitchen sink. The grandkids play area sure could use one too!

Oh this is going to get crazy! I'm going to start to get all of those little things organized. I can feel it.  :-)

Check out Kelly's tutorial HERE. She has a whole bunch of other ideas too, so plan to spend a little time perusing her site. 

No, it's not wasted time. It's research time.  :-)  

Monday, January 19, 2015

Quilt for Paige

For those of you who read my earlier post about the two young ladies in the accident, I am ready to sew the quilt for Paige. I made some adjustments to the Summer Love tutorial that Jera over at Quilting in the Rain provided back in 2011 and I think it turned out well.

Here's my version with the strips ready to sew. I will add borders, but I'm not sure what fabric I'll use.

Heart Quilt - Jelly Roll Friendly - Signature Quilt

Allie's quit top is done and ready for the signatures.

Heart Quilt - 2.5 inch squares - Signature Quilt

Both of these quilts were made using the same fabrics. That was very important to me and I was glad that I had enough to do so.

Design Wall Monday

All last week  I was very excited for the upcoming weekend, knowing that I'd have time to work on a couple of projects that were very close to completion. 

I sub taught 7th and 8th grades Social Studies the last two weeks and I loved it! Much to the students' chagrin, my original degree is in Comprehensive Social Sciences and I LOVE teaching about the Middle Ages, the American Revolution, etc. (I kind of think they thought they were going to do nothing for two weeks and maybe even have to wait to take mid-term exams until the "real" teacher was there.) Anyway, between prepping for the classes, grading exams and other evening commitments, I knew that a lot of sewing and quilting was just not in the cards.

Everything was going along swimmingly and I was grading the last of the exams when WHAM!!

Thursday afternoon two students were involved in an accident - a very serious accident. Paige is fine (physically) and was released from the hospital. Allie, an 8th grader was not so lucky. She was life- flighted to Toledo where she remains in critical condition.

Needless to say, Friday was a roller coaster day of emotions for all of us. Upon arriving to school, there was a quick teachers' meeting to discuss the day. We were given a prepared statement to read regarding the accident and the latest update on Allie's condition. The principal and counselor were in the classrooms and available as needed all day and many of the students were in a state of shock and disbelief. They wanted to do something, but didn't know what. During study hall they made signs and cards. At lunch they made wrist bands to wear and took group pictures to send to Allie. They discussed ways to raise money for gas cards, food vouchers, etc. for Allie's family because Toledo is about an hour away and they knew it would be expensive to make that trip daily. They did a lot, but they still needed/wanted to do more. (Despite what we often think when we listen to the news, there really are some great kids out there who are compassionate, intelligent, caring and just plain good!)

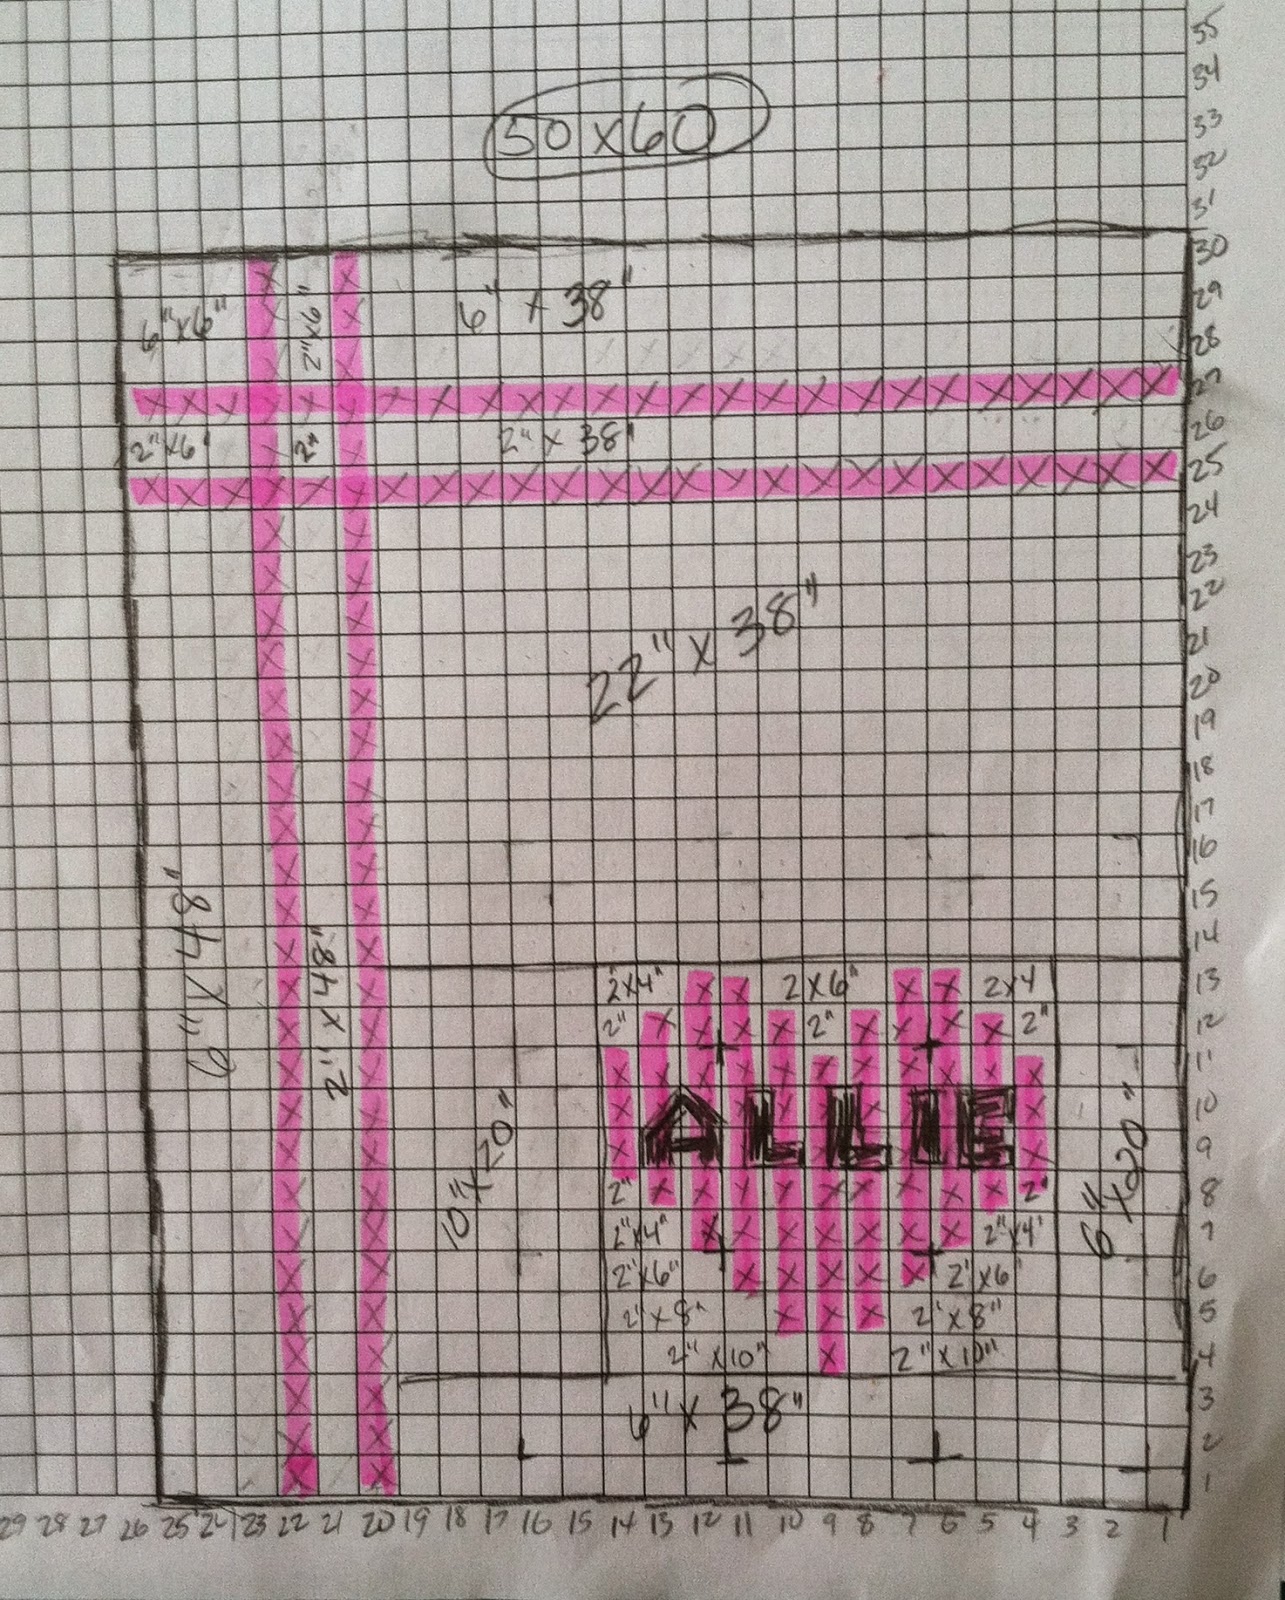
Watching and listening to the students got me thinking and after school I spoke with the Dean of Students and Principal about making a signature quilt for Allie. The students (and teachers) could sign it and Allie would have it with her like a big group hug. They agreed that would be a good idea and Friday night I started making a few sketches. I knew I needed something with lots of negative space for signatures and that Allie's favorite colors are pink and purple. I kind of wanted a heart, but wasn't sure. 

I saw a pixelated heart pattern on Moda Bakeshop,  liked it, and started sketching. (Yes, I have EQ and I could have used that, but I wanted to use paper and pencil.) Here's what I came up with.


Heart Quilt - 2.5 inch squares - signature quilt

I liked the sketch and started pulling fabric Saturday night. The pinks would be scrappy but Allie's name would be in a single purple fabric that will also be used for the binding. 

I couldn't start sewing until Sunday evening, but here's the top so far. Everything except the top two rows are sewn. (The big open spaces sure made piecing this quick!) 


Heart Quilt - 2.5 inch squares - signature quilt

I think I'll press some freezer paper to the back side of the large white sections where signatures will be place. That will make signing easier. I have the fabric pens ready and the instructions for the Dean of Students who is going to be organizing the signatures. The plan is that I will have this back by Thursday so I can quilt and bind it and give it to Allie's parents to take with them this weekend. 

This isn't what I had planned to do this past weekend or even this week, but it is what NEEDS to be done this week. I'll get to those other projects eventually. They've been waiting a long time and they can wait a bit longer. 

This quilt has moved to the front of the line. It speaks volumes for how I feel about quilts and my role in making them. My hope is that it will be therapeutic to the people who sign it as well as Allie and her parents.

Click HERE for an update to this post. Allie's quilt top is done and I'm piecing one for Paige. It will be ready for signatures tomorrow also.

Hug your loved ones today and tell them how you feel about them!


What's on your design wall?

Check out what other quilter's have on their design walls today.

Go to Judy L's Patchwork Times.

Check back tomorrow for Tip Tuesday!

Tuesday, January 13, 2015

Tip Tuesday! - Fabric Organization

"Tip Tuesday!" - Fabric Organization

I love learning new things and then sharing that knowledge with my quilting friends. So, every Tuesday I'll provide some tips, hints, tricks, tutorials, shortcuts, etc. that I've learned over the years and share them here on the blog. 

"Tip Tuesday" will be a collection of information about a wide variety of subjects garnered from a large variety of sources.  I am not an expert by any means and do not take credit for being the great wizard behind all of these hints and tips. I will gladly give due credit whenever possible.

These tips will be archived and accessible to you just by clicking on the "Tip Tuesday" tab above. 

Read, enjoy, and be inspired! 

Is your fabric stash organized and set up in a manageable way? 

I know I previously had a Tip Tuesday! that dealt with organization, but check out the fabric storage system in the picture below. 


I have to admit that while some of my stash is organized, most of it is not. I have kits made up for various projects - some started and some in progress, but the rest of my stash is not in the best possible state. 

I do have most of the stash together by color, theme or "specialty" like in the picture above, but after that, I really am lacking. I have every intention of getting things in better shape, but I really have a difficult time deciding what "system" I want use.

When I saw this picture and tutorial on how to fold the fabric, I thought that this would beat the use of tubs by a long shot.

Although I understand the use of storage tubs and have some of my own, I REALLY like how all of this fabric is folded and stored on shelves. I find it cumbersome to have large tubs because I can't see all of the fabric and if I use small tubs, they never seem to be quite big enough for what's in my stash.

I have some shelves and I know I can get some boards. 
I AM GOING TO DO THIS!

Here are the sizes she uses, but I'm guessing you can easily make necessary adjustments.

Name:  Attachment-3120.jpe
Views: 33073
Size:  34.6 KB

Click HERE to see all the information you need to get your stash looking like a mini quilt shop.

I'm going to give this a try and I'll let you know how it works for me. I'd love to hear your thoughts on this method.

Monday, January 12, 2015

Design Wall Monday

I've been finishing up some projects lately and I'm excited about that. I need to get some good pictures to post here, but it may be a while before that happens.

I'm still working on adding the pieced borders to  Lynn and Ty's quilt, and I hope to have that ready for quilting by the end of the week. Of course I don't have the backing fabric yet, but I'll be ready for it. :-)

I have a project on the wall that I can't show just yet. It's for an upcoming We Support You Blog Hop.  It's fun and I'm really looking forward to showing that off to you all.  

What I am working on is something that has been in the works for quite a long time and if you've been reading my blog for any length of time, you've probably seen these before. Well, not really these actual blocks, but some like them.

Yep! I'm back to my hand pieced Grandmother's Flower Garden. 

Hexagons - Grandmother's Flower Garden - Hand Piecing

I always like to have a hand project sitting around and since I've finished all of the bindings that were ready, I pulled this out again. The timing to work on these is perfect. I enjoy watching the football playoff and college bowl games, but I don't like just sitting there to watch them. I can be sewing and enjoying football at the same time. The only way it could be better is if I was watching baseball.  :-)

Here are a few of the blocks that I've already done. I've staged them so you can see how they will be laid out and sewn together. 


Hexagons - Grandmother's Flower Garden - Hand Piecing

Here's the storage container that holds all of the completed blocks. I'm happy that although I've duplicated fabrics, I've not duplicated any of the blocks exactly. 

Hexagons - Grandmother's Flower Garden - Hand Piecing

Here's a close up of them.

Hexagons - Grandmother's Flower Garden - Hand Piecing

And a side view so you can see how many are completed.

Hexagons - Grandmother's Flower Garden - Hand Piecing

I was quite surprised to take a count and realize that I only have to make nine more blocks before I can start putting them together to create this quilt.

Hexagons - Grandmother's Flower Garden - Hand Piecing

I still have to make the partial blocks, but I'm still pretty darn excited. This project has been a long time in the making and I'm not making any promises or resolutions, but I see some light at the end of that proverbial tunnel.  :-)

What are you working on today?

Check out what other quilters have on their design walls today.